It’s certainly not 2010 anymore. So why are so many businesses still resourcing social media teams as if it is?
Social teams have evolved far beyond publishing posts and responding to comments. Today, they manage content and video production, influencer partnerships, customer care, social search, paid media, community engagement and increasingly, social intelligence. Social’s role is expanding across the business, and a social team’s structure needs to evolve with it.
Organizations are also looking to social data for more than marketing insights. According to Sprout’s Social Intelligence Report, 93% of leaders view social intelligence as essential for future growth, yet only 10% of organizations have embedded it into enterprise strategy. Closing that gap requires more support for social teams that are already stretched across a growing list of responsibilities. They need the right people, roles and processes to turn social data into action across the business while creating more capacity for strategic work.
There’s no one-size-fits-all social media team structure. But the strongest teams connect their work directly to business outcomes rather than organizing solely around the tasks they complete. Building for that future requires the right mix of specialized expertise, cross-functional relationships and technology to keep pace with social’s expanding role.
In this guide, we’ll break down how to structure a social media team, which roles to prioritize and how to build and manage a team that’s prepared for the future of marketing.
How to structure a social media team
Social’s dynamic nature can give marketers a professional advantage if leaders give them space to grow. With the right structure, teams can quickly refine and grow their skills, creating career-making opportunities.
Proactively experimenting with new social media department structures can also shift a brand’s trajectory—helping it win a larger audience, build customer loyalty and sustain growth.
Here are four common models to consider, plus how your structure may evolve as your company grows.
1. Functional
The functional model organizes social media team roles around specific responsibilities, such as influencer partnerships, social media intelligence or paid media. Generalists may also have defined focus areas, including content creation, video production and social search optimization (SOSEO).
At Sprout, the social team also partners closely with Brand Creative on asset development and with teams across the organization—including PR, Content, Customer Marketing, Events, Internal Comms, Revenue Marketing and Product Marketing—on messaging, research and distribution.
Constantly switching between incoming DMs, reporting, influencer coordination and content production can limit time for creative and strategic thinking. A functional structure can help reduce burnout, clarify ownership and create more room for social marketers to deepen their expertise.
With clearer focus areas, teams can scale priority initiatives and measure their impact more effectively. This model works especially well for organizations that want to support career development while assigning clear ownership to specific social priorities.
2. Network
Some teams align individual employees to specific networks, such as TikTok, Instagram, Facebook or LinkedIn. With this approach, each person owns a network strategy from development through execution, which in turn enables them to build deep network expertise.
Sprout’s social team experimented with a network-specific structure in 2022 before eventually moving away from it. While the model supported highly intentional content and stronger network-specific audience insights, it wasn’t scalable for a growing team.
The social landscape has also become more fluid since network-based structures first gained popularity. New networks emerge and consumer preferences change rapidly, creating gaps or redundancies when roles are tied too closely to individual networks.
A network-based social structure can still work as an interim model for lean teams developing their social media marketing strategy from the ground up. As the team grows, shifting toward functional ownership can make it easier to adapt across networks.
3. Audience engagement
Another common team structure organizes social media team roles around audience engagement goals and customer needs. These typically fall into three categories:
- Awareness: Creating content to increase brand visibility among new and existing audiences.
- Engagement: Creating content and responding to comments, DMs and other inbound interactions to build community and strengthen brand loyalty.
- Customer Service: Managing customer questions, requests and complaints to resolve issues quickly.
These teams often include specialists beyond content and community management. For example, an awareness-focused team might include a content creator, an influencer marketing strategist and a performance analyst who work together to develop relevant and effective content.
Because this model requires employees to work across multiple networks, centralized social media management software becomes especially important. Bringing publishing, engagement, reporting and collaboration into one system reduces time spent switching between disconnected platforms.
4. Center of excellence
In a social media center of excellence (CoE) model, representatives from different departments form a central council that shapes social strategy and establishes shared standards.
Participants may include leaders from PR, employer brand, HR, product, customer care and other teams that rely on or contribute to social. Together, they align priorities, improve information sharing and create clearer governance around how the organization uses social.
CoE models tend to work best for large organizations with social stakeholders spread across multiple departments or regions. A centralized group reduces silos and gives distributed teams a shared framework for decision-making, measurement and execution.
5. Structure by company size
Company size can help determine which structure makes the most sense, but complexity is often the better signal. A lean team may work well with broad ownership until the volume of channels, stakeholders and social data becomes difficult for a few people to manage.
As demand grows, teams usually need more specialization and clearer ownership. Enterprise organizations also need stronger governance, especially when social intelligence spans multiple departments. Sprout’s Social Intelligence Report found that only 29% of organizations house social intelligence within the social team, with responsibility spread across functions like analytics, marketing, communications, insights, corporate strategy and product.
The key is to evolve the structure before unclear ownership starts slowing the team down. For larger organizations, that may mean formalizing decision rights, reporting standards or a center of excellence that connects social intelligence across teams.
How to build a social media (dream) team: 9 roles to invest in
Marketing leaders are prioritizing specialists in areas like social search, customer care, paid media, influencer marketing and social intelligence. These roles deepen expertise in the parts of social that influence discovery, customer experience and business decision-making.
The right mix depends on your goals, audience and existing resources. Larger teams may hire dedicated specialists, while leaner teams may combine responsibilities across a few roles or partner closely with other departments.
Here are nine roles and capabilities to consider as you build out your team.
1. The SOSEO strategist
As social and AI change how consumers discover brands and products, search behavior is spreading across more platforms. Sprout’s Q2 2026 Pulse Survey found that search engines and social media are the two most commonly used search platforms across all age groups and demographics. Consumers especially favor social when looking for experiential, highly visual or peer-led information.
An SOSEO strategist is a valuable addition to a modern social team because they own your social search strategy and work with the broader team to create discovery-focused content. They conduct audience and keyword research, then use those insights to inform and optimize content strategy and analyze trends.
2. The social customer care lead
Your social customer care lead serves as a conduit between your social media and customer service teams. This role is essential for businesses that receive a high volume of customer questions or support requests through social.
This individual documents social customer care processes, creates escalation management strategies and manages integrations between social media and case management tools. They also support customer service agents as they learn how to deliver more brand-aligned support across social channels.
Speed matters here. According to Sprout’s Q3 2026 Pulse Survey, 38% of consumers expect a response to a customer care issue within one to two hours, including 14% who want a reply within minutes. A dedicated social customer care lead streamlines response workflows so teams can act quickly and deliver a consistent customer experience.
3. The paid media specialist
Organic and paid social strategies are two halves of a whole, so they should complement and reinforce each other.
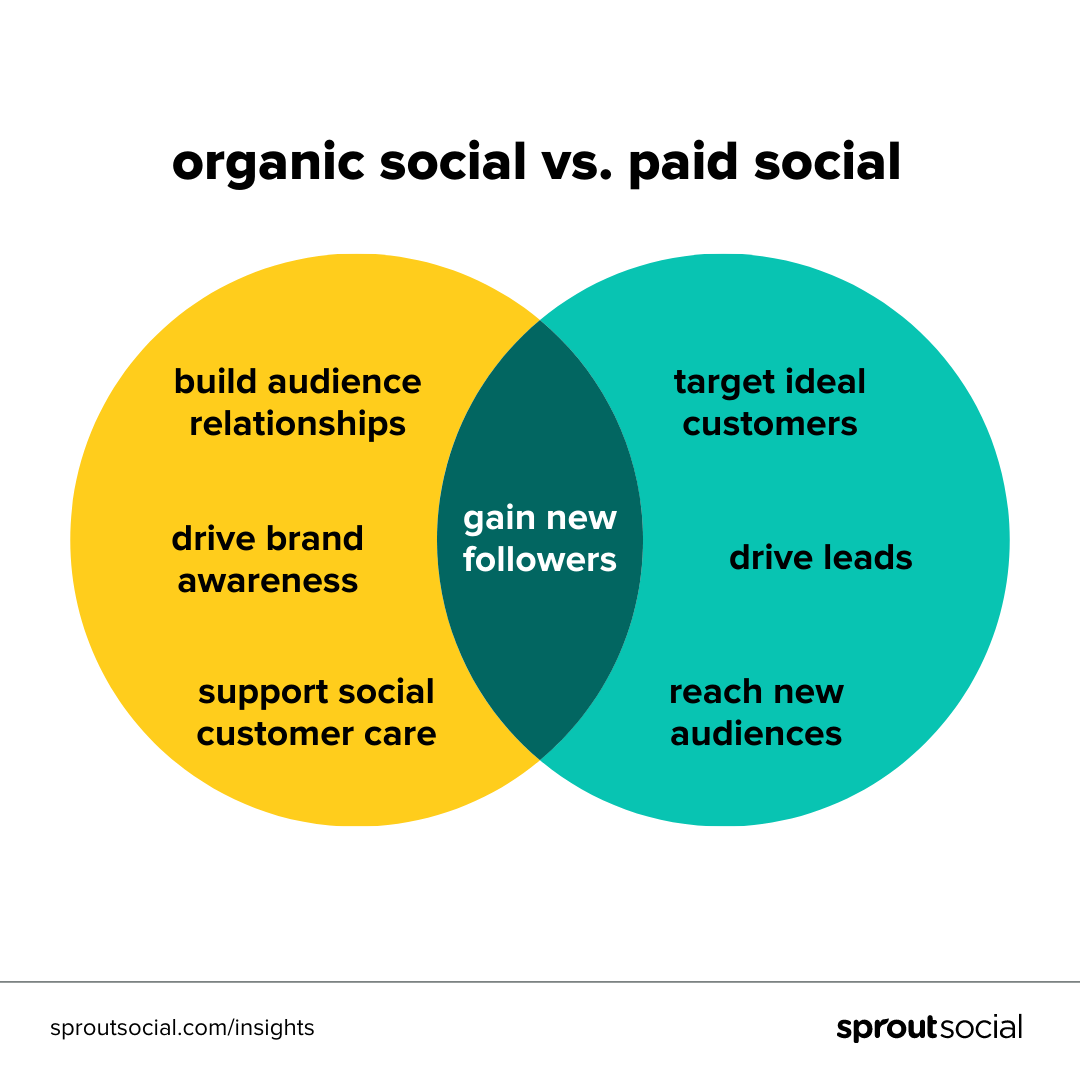
Whether you aim to boost brand awareness, welcome new followers or gather new leads, combining both efforts can improve results. It’s still valuable to separate organic and paid social media team roles so each area gets the focus and expertise it requires.
While other social media marketers focus on the art of organic content, a teammate who specializes in paid digital media can further optimize those efforts and deepen social’s business impact.
4. The influencer marketing strategist
Influencer marketing now directly influences purchase decisions. According to Sprout’s 2026 Influencer Marketing Report, two-thirds of consumers made a purchase based on an influencer’s recommendation in the past year, and nearly one-third did so 10 times or more.
A great influencer marketing strategist does more than source influencers and build relationships. They also integrate influencer partnerships across the funnel, from influencer shop pages on your site to repurposing creator content across channels.
Managing those is inherently high-touch. Add ongoing performance reporting, budget optimization and campaign planning, and a dedicated strategist quickly earns their place on the team.
5. The social intelligence analyst
Social is a powerful source of business intelligence, so having someone on your team who can interpret the data is critical.
A social media intelligence analyst makes sense of raw numbers and reports, turning them into actionable insights. They track key performance indicators, assess whether your strategy is on track and recommend adjustments when it isn’t.
Their impact also extends well beyond the social team. According to Sprout’s Social Intelligence Report, 98% of professionals agree social intelligence has driven cross-functional business outcomes. A strong analyst shows where social data matters most, whether that’s revealing an emerging audience need or tying social activity to revenue.
6. The content creator
Social teams are producing more video, graphics and network-native content than ever, so they need more professionals with hands-on creative production expertise to support it.
A content creator may specialize in video, photography, design or editing, but technical skill is only part of the job. They also need to know internet culture: what people are paying attention to, how different platforms communicate and when a trend fits the brand versus when it feels forced.
That combination of creative skill and cultural fluency makes the role especially valuable on fast-moving social teams.
7. The social media leader
The more influence social has across the business, the more important it is to have someone senior steering the function.
A social media leader sets direction for the function and represents its priorities in broader marketing and business conversations. They also translate social insights for executives and make the case for the resources the team needs.
As the role matures, day-to-day execution takes up less of its focus. The leader spends more time clarifying priorities, removing roadblocks and ensuring social has a voice in broader business decisions.
8. The extended team
Some of the most important members of a social team may sit outside it.
Brand, PR, legal, product and customer care all influence how social operates. They also rely on social for audience, competitor and market intelligence. Sprout’s Social Intelligence Report found that marketing (62%), customer experience (41%), corporate strategy (29%), product (28%) and R&D (18%) actively use social intelligence insights.
Strong cross-functional relationships create a two-way flow of information. Social teams bring in expertise from across the business, then share relevant insights with the teams best positioned to use them.
9. The AI assistant
AI is already changing the balance between execution and strategy on social teams.
Sprout’s Social Intelligence Report found that 80% of individual contributors spend at least half their time on operational execution, leaving less room for strategic thinking.
An AI assistant can take on repetitive work like monitoring, first-draft replies and report generation. The payoff is more time to interpret what the data means, decide where the team should focus next and craft high-quality content.
How to make a case for expanding your social media team
Hiring is a big investment, and recruiting can take time. But under-resourcing carries its own costs, especially when social data plays a bigger role in business decisions.
Only 17% of professionals say they’re extremely confident their organization is maximizing the value of social media data. Limited budget and dedicated resources are also the second most-cited barrier preventing social intelligence from influencing strategic decisions.
If your team is already stretched, build the case around what more capacity would make possible.
Here are three ways to make that argument to senior leadership and the C-suite.
1. Use budget trends to your advantage
Social investment is still rising. According to Sprout’s 2026 Influencer Marketing Report, more than 75% of marketers say their influencer marketing budgets increased compared to the previous year.
Higher investment raises expectations for the team behind it. Leaders need people who can manage increasingly complex programs, prove their impact and turn performance data into business-ready insights.
When budgets grow, but headcount doesn’t, the team has less room to take on the strategic work those investments demand.
2. Explain the opportunity cost
More resources create space for work that teams often push aside when they’re overloaded. That could mean more community building, deeper analysis or more time to turn social data into useful business recommendations.
Only 17% of professionals say they’re extremely confident their organization is maximizing the value of social media data. Sprout’s Social Intelligence Report also found that 86% believe their organization may have missed opportunities over the past two years because consumer insights were delayed, siloed or underused.
Missed opportunities put a clearer price tag on under-resourcing. Point to insights the team couldn’t act on quickly enough, or opportunities that stalled because no one had the bandwidth to act.
3. Underscore the urgent priority of company-wide social intelligence
Evangelizing social intelligence org-wide is still out of reach for most teams, leaving valuable audience and industry insights buried.
And the stakes are rising. By 2029, 71% of directors predict social data will influence core enterprise strategy more than traditional market research. Next year, 26% of organizations plan to invest more in social intelligence through headcount.
More dedicated resources let teams get useful social insights to colleagues across the business faster. Over time, social intelligence can play a much larger role in how teams understand customers and make decisions.
How to future-proof and manage a social media team
Managing a social media team often comes down to one question: how quickly can the team turn an insight into action? This gets harder as more stakeholders, approvals and data enter the picture.
Speed-to-action is one of the biggest gaps. Sprout’s Social Intelligence Report found that only 10% of organizations can act on a social insight within hours. Most take one to two weeks.
Effective management clears roadblocks so the team can move with more focus and consistency. Here are the areas leaders should prioritize.
1. Invest in your team’s ongoing development
Fostering opportunities for growth and career advancement is crucial for retaining experienced social talent. Even when immediate pay increases or promotions aren’t possible, leaders can still invest in skill development and create clearer paths toward specialization.
Budget for conferences, courses and professional development resources where possible. Free communities can also connect team members with peers and expose them to new ideas and approaches.
Ongoing development prepares people for the future of work and makes it easier to recruit and retain candidates with the skills your team needs.
2. Identify more opportunities for cross-functional data sharing
The best social media strategies influence decisions well beyond marketing. That level of impact happens only when social data is accessible across the business.
Forward-thinking companies share social intelligence across departments so it can inform customer, product and business decisions.
Executive sponsorship accelerates that work by opening doors to broader collaboration and making social data more visible across the organization.
Over time, wider access to social intelligence also makes it easier to demonstrate how the team contributes beyond channel performance.
3. Encourage experimentation
Emerging technologies are redefining what it means to work in social. In the past, regular social media data analysis, along with managing a full content calendar and engagement duties, felt daunting. Now, thanks to AI, teams can expand their impact without adding more hours to the day.
AI tools can analyze massive amounts of social listening data and turn it into recommendations that support cross-departmental work. To stay ahead, support your social media team in experimenting with the latest AI use cases.
Invest in tools that prioritize AI development and work with business leaders to establish thoughtful AI use policies. These policies protect your business and brand while setting clearer guardrails for experimentation.
4. Advocate for stronger attribution models
According to the Impact of Social Report, over half of marketing leaders say incompatibility between their social media management tools and the rest of their marketing tech stack is the top reason they can’t understand social’s impact on their business. They also cite difficulty setting up reliable attribution models and limited internal knowledge about connecting social efforts to business goals.
The same report found that fewer than half of marketing leaders say their teams embed social data into any CRM (customer relationship management) software.
Make social data integration a priority for your analytics team. As more budget moves to social, proving results will matter even more. At Sprout, prioritizing social reporting within marketing analytics led to a multi-touch attribution model that revealed a 5,800% increase in social’s pipeline impact.
5. Establish workflows
Speed often breaks down in the handoffs. A useful insight or a social media compliance check may still sit for days if ownership is unclear or an approval gets stuck.
Audit the workflows behind those delays. Look for bottlenecks in approvals and handoffs, then clarify who owns what. Clearer processes help the team respond while the insight or trend is still relevant without sacrificing compliance.
6. Foster a feedback culture
Teams work better when people can be candid about what’s working and what isn’t.
Make feedback part of the regular rhythm, not something you save for formal reviews or moments when something goes wrong. Regular check-ins create space to surface friction early and clarify expectations before small issues start affecting the work.
Feedback should also move both ways. Managers need input on how processes are landing just as much as team members need direction on their work. Over time, that openness makes it easier to learn from experiments, adjust course and build trust across the team.
7. Measure the ROI of your social media team
If your reporting stops at likes, reach and engagement, you’re missing the bigger picture.
Sprout’s Social Intelligence Report found that only 43% of organizations have clearly defined social intelligence success metrics. The most commonly reported outcomes include improved retention (45%) and identifying new audiences or segments (40%), along with more responsive messaging and better executive decision-making.
Use those kinds of outcomes to define what success looks like for your team. The clearer the link between social and business priorities, the easier it is to show where the team is driving value.
Lead a social media team of tomorrow
The future of social depends on teams that have the structure, expertise and support to drive measurable business impact. As social takes on a larger role across the organization, leaders need to build teams that can evolve with it.
Two mistakes can limit that potential: treating the social team primarily as a content-creation and reporting function, and treating social as simply a communications channel. Social is part of many users’ everyday lives, so it provides intelligence that can influence decisions across the business, from customer experience to long-term strategy.
Building for that future starts with recognizing the function’s full value and resourcing it accordingly. Explore Sprout’s Social Intelligence Executive Brief for more insights on turning social data into business action.
The post How to build your social media team for the future of marketing appeared first on Sprout Social.
from Sprout Social https://ift.tt/WS01MRq
via IFTTT