Friday, 28 May 2021

Get More Sign Ups with 2-Step Landing Pages

get more sign ups with 2-step landing pages

To sign up, or not to sign up?

That is the question that everyone who visits your landing page will ask themselves.

And a few things will make or break their decision.

One thing that can scare them off? An overwhelming amount of information on your landing page. 

It’s a fine line to walk. Too much, and your visitors could feel overwhelmed. Too disorganized, and they won’t understand what you offer them. Too little, and you may not state your case well enough to encourage the sign up.

Finding the right balance of content on your landing page is a crucial step to get more sign ups. And with 2-step landing pages — which include sign up form that pop up with a button click — finding that balance becomes a lot easier.

What is a 2-step landing page?

A 2-step landing page does not include a visible sign up form on the main page. The sign up form on a 2-step landing page will only appear when a visitor clicks a button with a call to action (CTA). 

A 2-step landing page is also commonly referred to as 2-step opt-in or on-click pop up forms. 

In order to opt-in with a 2-step landing page, visitors must take 2 steps:

  1. Click a button. This triggers a pop up form.
  2. Enter an email address into the form to subscribe.

It is another way of encouraging visitors to sign up for your email list by presenting the right information at the right time.

How does it work?
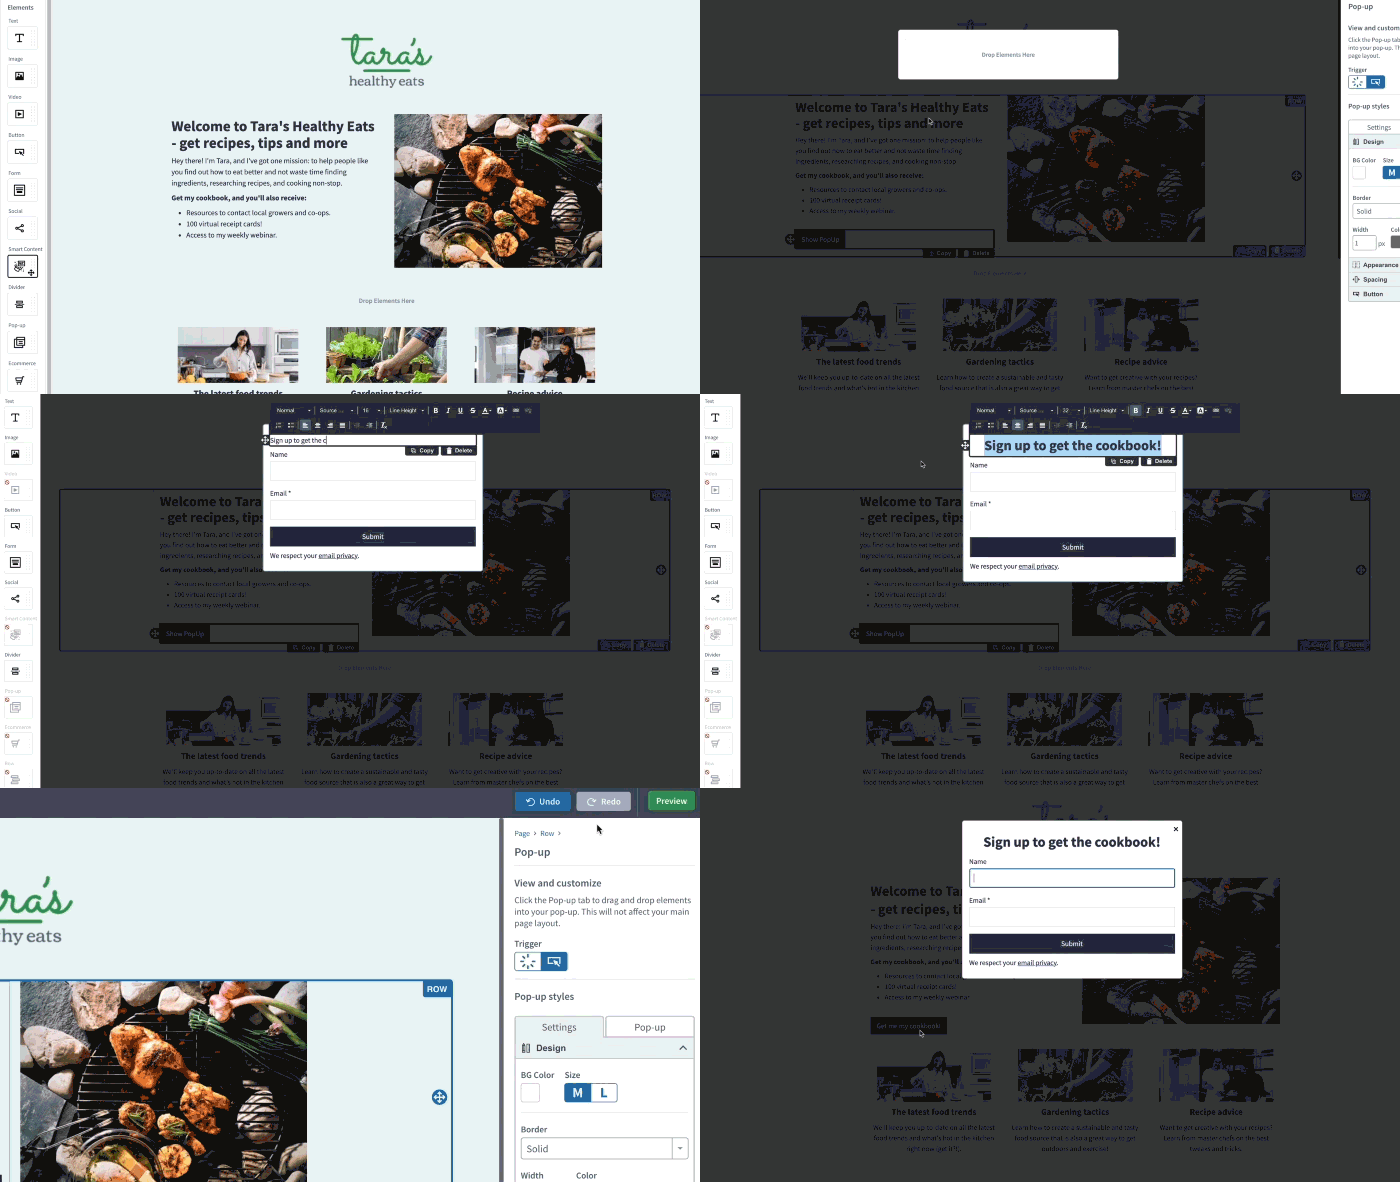
GIF showing 2-step landing page set up

One thing to note: 2-step opt-in is often confused with the term double opt-in — or confirmed opt-in. With double opt-in, you must confirm your interest in subscribing to a list via a confirmation email. While you can certainly use double opt-in in addition to 2-step opt-in on your landing page, the two terms often get misused. 

The main reason to use on-click pop-up forms? Psychology.

As we’ve already discussed, landing pages can feel overwhelming if there's too much information on the page. If the page is too full, visitors are more likely to leave your page immediately because they perceive reading the page as too much effort.

So, not only does including a button with a strong CTA decrease clutter on the page, it makes you look more professional.

But a cleaner look isn’t the only reason to give 2-step landing pages.

Requiring 2-step opt-in reduces friction in the sign up process. Landing pages without visible sign up forms are easier to digest. It keeps readers focused on your offer without asking them for something right away.

Plus, as is the case with all marketing tactics, some psychology comes into play. Visitors who click on a button and then enter their details are more invested in your offer. This is a psychological tactic in marketing called “foot in the door technique.”

The foot in the door technique says that prospects who take a small step first are more likely to take to a larger, more desired action later on. 

Clicking the button = having a foot in the door. A visitor who triggers the pop up form on a click is more likely to fill out the form when the pop up appears. 

So what do 2-step landing pages look like out in the wild? Let’s take a look.

2-step landing page examples

Selling a product? Offering a service? Simply want to grow your email list?

No matter your goals, 2-step landing pages can help you optimize conversions.

Check out how these pros use 2-step opt-in to support their growth.

Grow your list with a free online course

Amie Tollefsrud, Founder of Rebelle Nutrition, helps other nutritionists build their audiences by touting the value of course creation. 

She practices what she preaches, and promotes a course to help her audience create passive income. By creating a landing page for this masterclass, she easily promotes it via email and social media to drive sign ups.

The page is clean, and it only displays the information that visitors need to know before being presented with an opt-in form. Ultimately, this is a friendlier approach and less intimidating to first time visitors. 
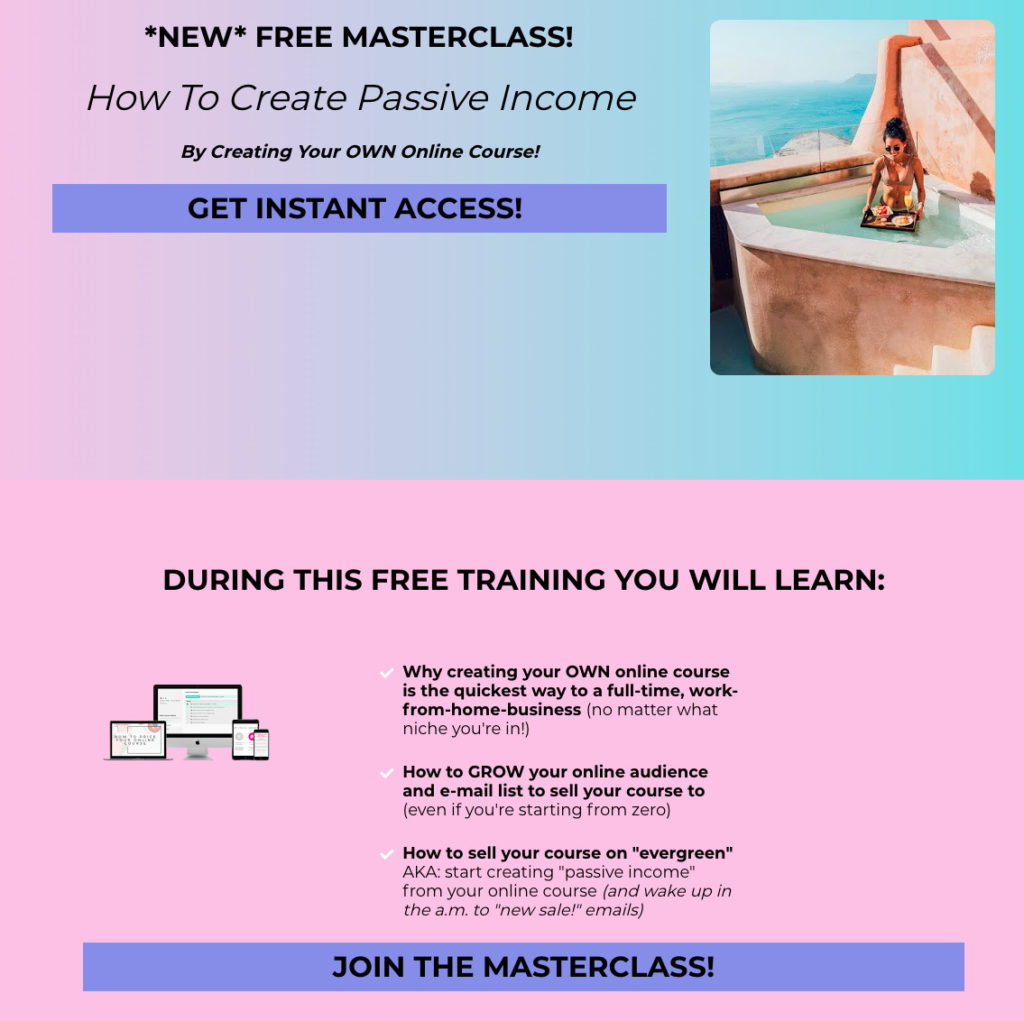
2-step landing page example

When visitors click either of those 2 buttons, the following on-click pop-up form appears:
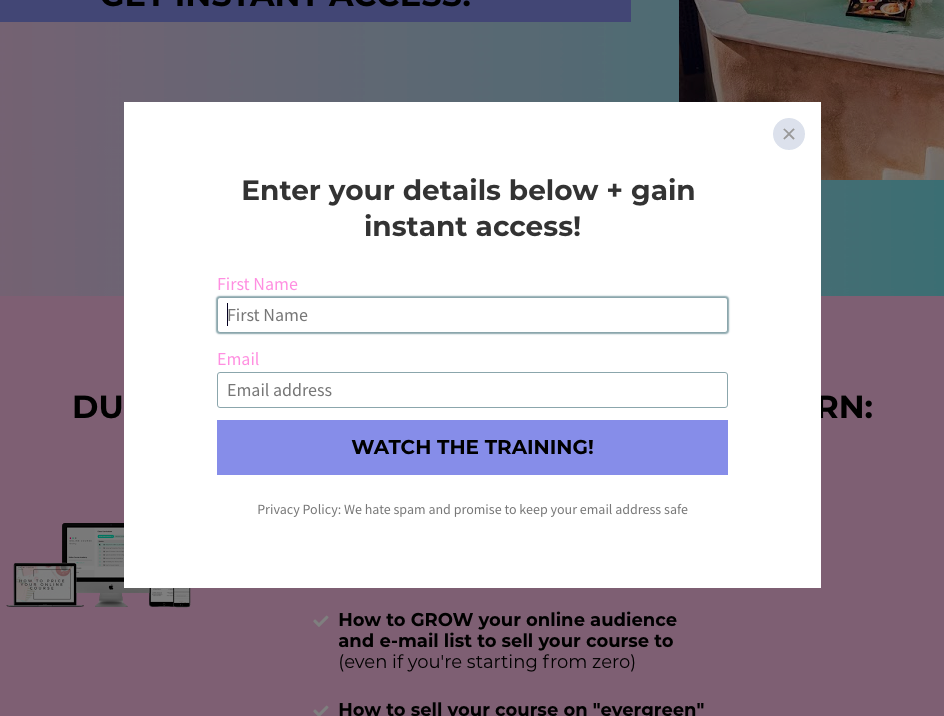
on-click pop-up form example

Using 2-step opt-in lets Amie keep visitors focused on the value of her course. It’s also more aesthetically pleasing than having multiple sign up forms littered across the page.

Sell a product

Kevin Curry — a fitness influencer and author — runs FitMenCook, a site dedicated to helping men prepare healthy meals that fit their lifestyle.

He uses a 2-step landing page to direct visitors to purchase his cookbook.

2-step landing page example for sales

Clicking “Get the Book” triggers an on-click pop up form, making it easy for visitors to purchase at their preferred store:
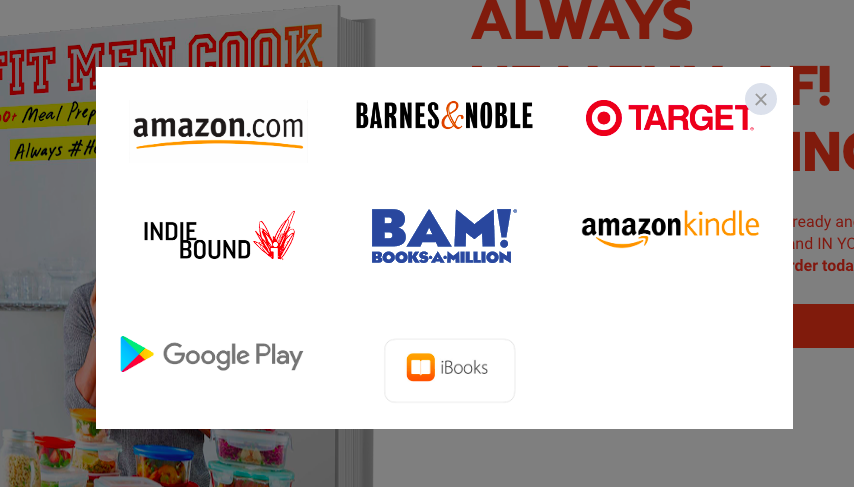
on-click pop up form example from Get the Book

Sign up for a newsletter

The Daily Stoic is a book written by Ryan Holiday and Stephen Hanselman. The book’s website includes a top bar navigation with a button to trigger a 2-step opt-in.

Clicking the yellow “sign up for daily email” button triggers the following pop up:

newsletter pop up form

This process makes it easy for website visitors to sign up for daily updates. Plus, the pop up form sells the value of the newsletter without taking up precious real estate on the homepage. 

How to create a 2-step landing page with AWeber

AWeber Landing Pages are now equipped with the ability to use on-click pop-up forms. So all customers — on any plan — can create a landing page they need with tools they already use. 

To create a landing page with this type of form, complete the following steps:

  1. Navigate to “Landing Pages” in your account. At this point, you can create a new landing page, or edit an existing one. 
  2. Once your landing page is ready, drag the “Pop-up” element into the landing page creator where you would like your button to appear.
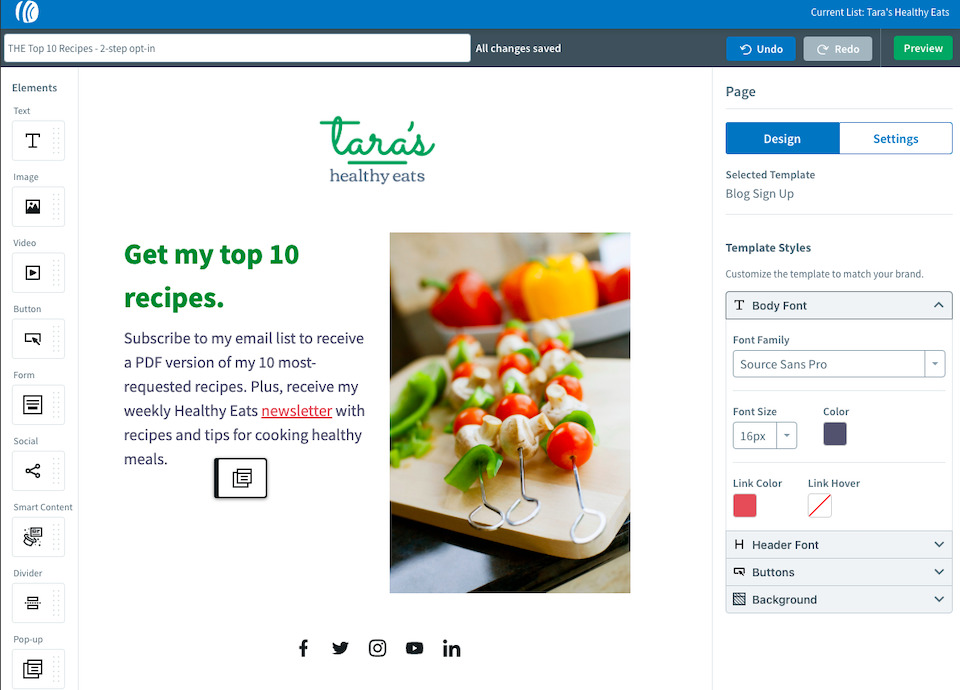
pop up element in AWeber

3. Set the pop-up element to trigger when clicked, on the right side bar.

on-click pop up element

4. Customize the pop-up style you would like in the right side bar. You can change the background color, size of the button, how it appears, and align the button however you’d like.
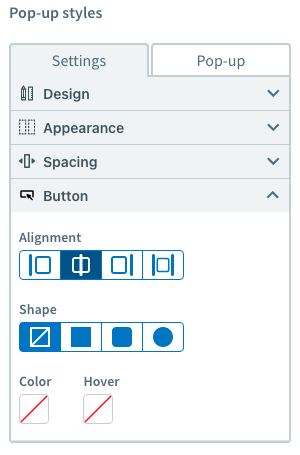
customize pop up form

5. Next, click the “pop-up” tab next to settings. You should see a blank box pop up. Drag in the “Form” element from the left side bar to utilize the pop-up space as a form.
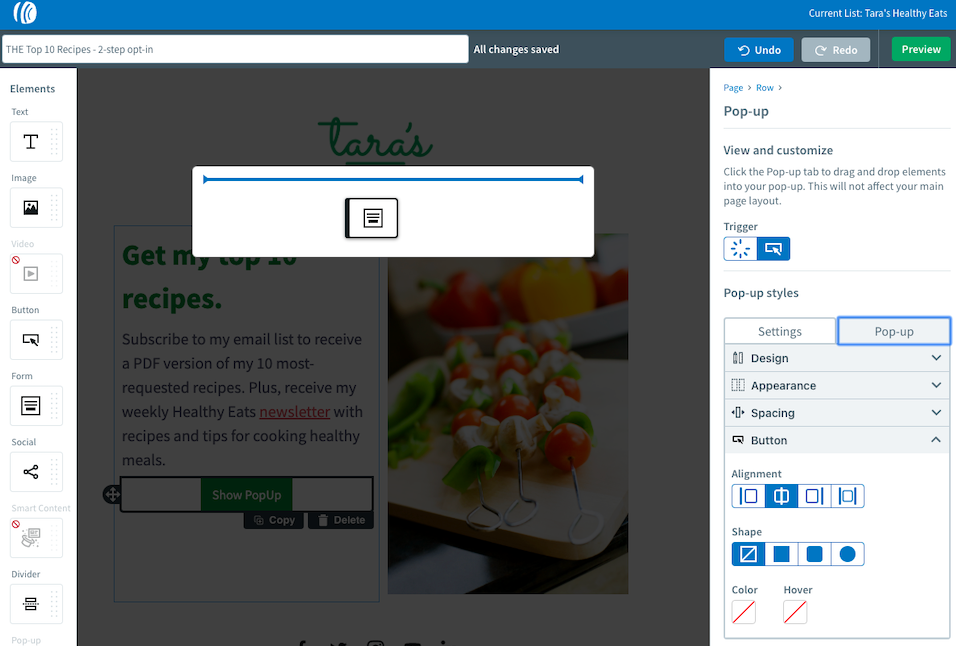
setting up your pop up form

6. Customize your form fields and submission settings using the right side bar.
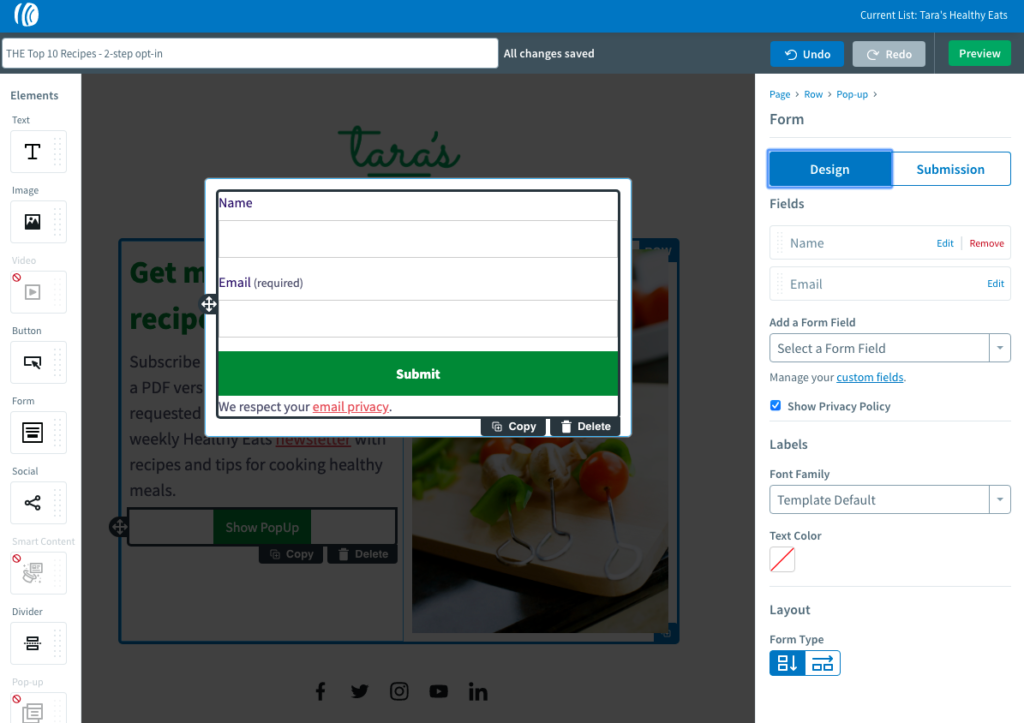
customize pop up sign up form

7. Once your customizations are set, you’re ready to go!
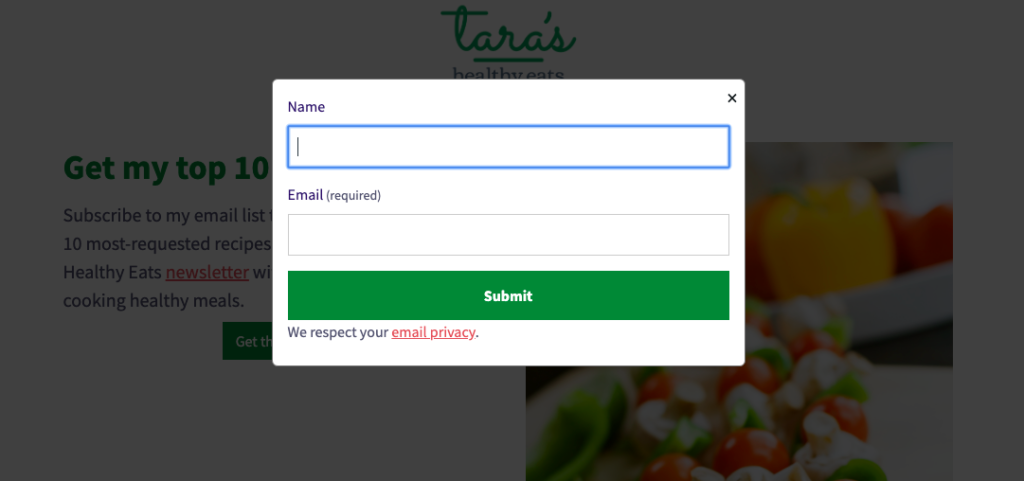
finished 2-step landing page form

Want to get more sign ups with your landing page?

Give 2-step landing pages a try with the “Pop-up” element in the AWeber Landing Page Builder today. 

Not a customer? Sign up for free today.
Have more questions about landing pages? Check out the new Marketing Glossary. Quickly look up terms and get answers to all your marketing questions with ease.

The post Get More Sign Ups with 2-Step Landing Pages appeared first on AWeber.


from AWeber https://ift.tt/2SG8Yaw
via IFTTT

Your guide to social media comments: How to post and respond

Social media is all about engagement and interacting with your audience. This means that when your followers and customers actually leave social media comments on your posts, you need to be responding – even if they’re not necessarily the nicest comments.

It can seem a little daunting to know the best way to interact with customers as your brand, so we’ve put together this guide on the different types of social media comments you’ll face and how to respond to them.

Let’s dig in!

Why responding to social media comments is important

First things first, let’s cover the basics. We already mentioned that you need to be responding to social media comments, but why is this so important?

One of the main goals of social media marketing is building a brand community and engaging your audience, and responding to social media comments is a key part of that, regardless of whether they’re positive or negative.

Positive comments are great and give you a chance to make connections with your audience and build your reputation. Negative comments give you the opportunity to fix mistakes and right wrongs, helping customers to feel better about your brand and become return customers

Responding to even neutral comments is just a way for you to nurture customers and take advantage of this unique one-on-one channel that social media offers to your brand.

How to handle different types of social media comments

There are four main types of social media comments that we’re going to cover, and each needs its own separate approach. All responses will need to still to adhere to your social media brand voice, so be sure to update or include these guidelines in any existing style guides you’ve created.

1. Positive comments or feedback

When someone responds to one of your posts or mentions your brand positively, you always want to acknowledge the comment and thank them for their time. Let the customer know you appreciate them and their positive feedback.

Here’s a simple example from Pocket.

Pocket responding to a positive tweet.

A quick acknowledgement and thanks to the customer for their comment is all it takes when it comes to positive feedback.

2. Neutral comments

Not every comment is a raving review or an upset customer. Some are neutral, whether it’s the user asking a question; making a comment about the product, post or photo; or even tagging a friend in the comments.

Based on what the comment says, try to take this as an opportunity to engage the commenter, either by striking up a conversation or asking a related question.

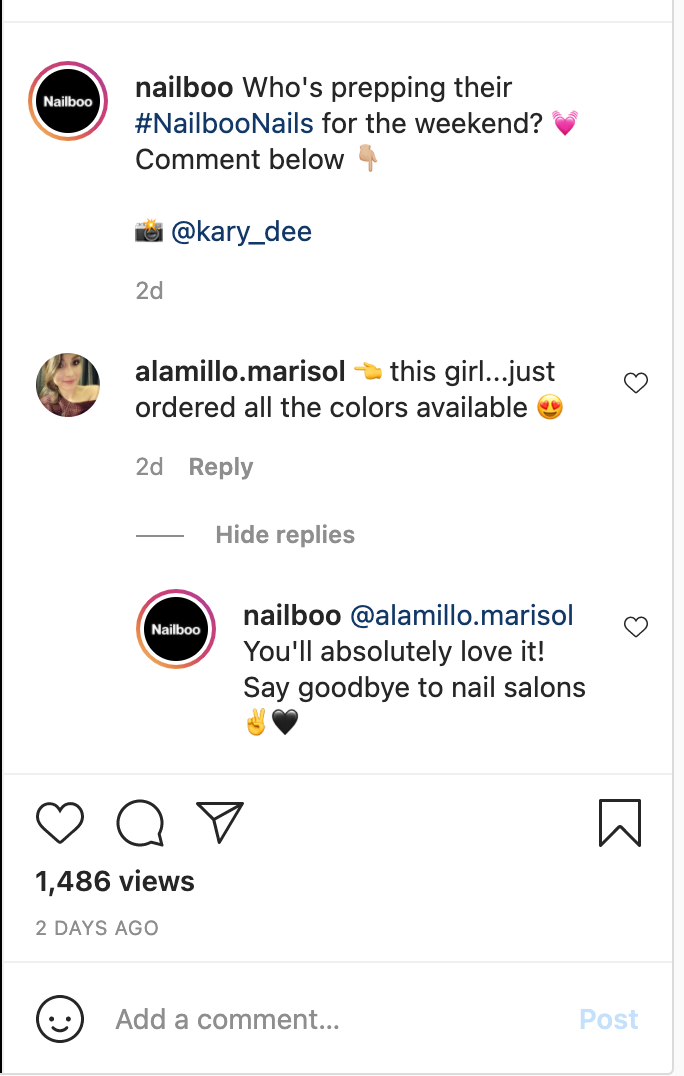
Take a look at this Instagram example from Nailboo. Continuing the conversation is so much more meaningful than simply leaving a like on the comment.

Nailboo responding to an Instagram comment

3. Negative comments

There are a few different ways to deal with negative social media comments. Many times, you want to be sure to respond so you can help fix the situation. Resolving issues like problems with orders or products can help turn a negative comment into a repeat customer, and social can also be a source of insight into larger issues your brand needs to take action on, like recurring complaints that could indicate a defective product batch or a critical flaw in your service.

Sometimes, though, brands face negative comments from online “trolls” who are simply trying to stir the pot. This might include comments with an aggressive tone, overall criticism or questioning of your company’s conduct, or messages targeted at specific individuals in your company. If your brand hasn’t done anything actually wrong, these are best to ignore or escalate to a manager to review, depending on the severity. You may also want to ban or block repeat trolls..

Handling negative comments requires a lot of consideration and care on the part of social media teams. Learn more about providing customer service on social media to help you understand how to handle negative comments and reviews, and consider creating guidelines for escalation management that go into detail about specific scenarios.

4. Comments related to a crisis

A crisis for social media teams could be a major global issue that’s affecting customers or a time when your brand might be facing PR or legal backlash. This varies from typical negative comments in that the team is likely facing an unusually high volume of comments, and critical comments may be much more severe or serious.

Crisis management is an important part of your social media strategy to have in place in advance of these situations. It can help your team navigate the stresses of these challenges successfully, and set up guidelines to protect your brand’s reputation and retain customers.

While you’ll want to develop a fully documented crisis management plan, there are a few basic steps you can keep in mind and communicate to your team. For example, take screenshots of relevant comments and make sure they’re sent to your HR, legal, or other necessary department so they can be fully handled appropriately and everyone is aware of the crisis.

How to respond to social media comments

Now that you know what kind of response you should be sending to various types of comments, let’s review how to actually respond to social media comments on each of the major platforms.

We’ve put together step-by-step instructions to make sure you’ve mastered the comments section of each social media network your business has a presence on.

1. Facebook

It’s pretty simple to respond to comments on each platform. The tricky part can be making sure you don’t miss a single comment. In order to do this, you’ll just need to head over to your Facebook Page manager and click Inbox in the left sidebar.

From there, you’ll see this sidebar pop up where you can access your Facebook comments and make sure you don’t miss any notifications.

Facebook's inbox showcasing comments on posts

From there, you can click over to posts that have comments you need to respond to. Simply click Reply underneath the comment to leave a response.

How to respond to Facebook comments

Once you finish typing out your response, hit Enter or Return on your keyboard to send your comment.

2. Twitter

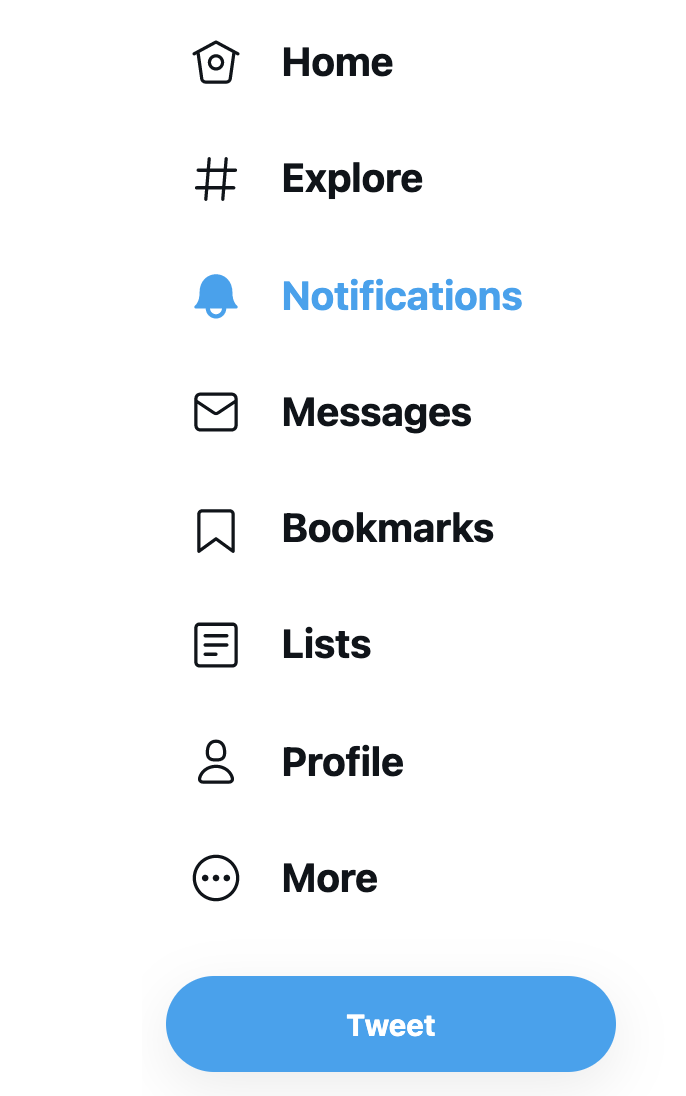
Twitter will always show you your notifications on the Notifications tab in the left sidebar.

Twitter's notifications tab

To respond to a mention on Twitter, you simply need to click on the comment bubble icon at the bottom of the tweet.

How to respond to a Twitter mention

A popup will appear for you to type out your response, then you simply need to click the Reply button for your message to send.

3. Instagram

To view your Instagram notifications, head to the app on your smartphone and tap the heart icon in the top right corner. This is where you’ll see likes, comments and follows from your audience.

Click on any comments you’d like to respond to, and you’ll automatically be taken to the post. Simply tap Reply to respond to the comment and type out your answer or acknowledgement.

How to reply to Instagram comments

If you’re trying to leave a social media comment on someone else’s post, all you have to do is tap the comment bubble icon directly below the photo to be taken to the comments page.

After you type your comment, simply tap the Post button for it to send.

4. LinkedIn

Commenting on LinkedIn posts is incredibly straightforward. Simply head over to the post you want to leave a comment on or reply to a comment on. To leave a new comment, click on the Comment option and a text box will appear. Type in your comment and hit enter.

To reply to someone else’s comment on your post, open the post and click on the “X comments” link (in the example below, we can see that there are 2 comments), then click Reply on the comment you want to respond to.

How to respond to LinkedIn comments

Type your response, then hit Enter or Return on your keyboard.

5. Pinterest

If you have a business account on Pinterest, this visual search engine has recently upgraded the way they manage comments. While commenting may not be as common as other interactions on the platform, users can now see comments that have been left on their Pins so they can answer questions or respond to feedback.

First, click on the megaphone icon to view recent comments left on your pins. Click through the list on the left sidebar to find any unread comments you may not have seen. Then click Reply underneath the comment to leave your response.

How to respond to Pinterest comments

Type out your comment, then tap Enter or Return on your keyboard to send it.

To leave comments on other Pins, open the Pin, click the Comments tab and type in a message to leave on the Pin.

How to leave a comment on a pin

6. TikTok

If your brand has a presence on TikTok, you definitely want to make sure you’re monitoring comments and engaging with viewers to help grow your account.

To view comments on a video, tap the comment bubble icon on the right side of your screen. Then, to reply to a comment, all you need to do is tap on the comment and a Reply to [username] text box will appear with your smartphone’s keyboard.

How to respond to TikTok comments

Click Send on your keyboard when you’re finished with your reply.

7.  Sprout Social’s Smart Inbox

Or, to make your life even easier, you can handle most of your social media comments from Sprout. Sprout’s Smart Inbox brings together comments and messages across all platforms into one view, and you can respond directly from Sprout rather than logging into individual networks. You can further filter, tag and search to make sure you’re zeroing in on your busiest channels, or catching comments related to a specific theme. Monitor notifications and respond to comments all at once in your Smart Inbox using Sprout’s social media engagement tools.

You can start by reviewing your newest messages to find the most important ones to address and respond to social media comments across platforms from one app.

Start managing your social media comments

Ready to start managing your own social media comments? Get out there and start engaging with your followers and customers. To help you tackle your social strategy more efficiently, check out our 2021 social media toolkit.

This post Your guide to social media comments: How to post and respond originally appeared on Sprout Social.


from Sprout Social https://ift.tt/3yJfNJ7
via IFTTT

Thursday, 27 May 2021

Facebook Lookalike Audiences: How to optimize ads to reach new customers

Wish you could take the guesswork out of your social ad targeting?

Don’t we all.

Sure, it’s awesome that marketers have so many choices when it comes to our Facebook advertising strategy and who we serve our ads to.

But navigating the numerous targeting options and factors can be downright daunting.

That’s where Facebook Lookalike Audiences are a game-changer.

Rather than start each campaign from scratch or tweak a bunch of targeting factors, Lookalike Audiences lets you base new ads on your existing audience.

The result? More engagement and conversions with a lot less guessing.

In this guide, we’ll break down the basics of Facebook Lookalike Audiences and what marketers need to know to get started.

What is a Lookalike Audience, Anyway?

Facebook Lookalike Audiences represent an ad-targeting option for a totally new target audience that shares characteristics with your existing ones, based on previous engagements with your business account or ads.

The concept here is simple. Instead of researching a new audience manually, Facebook figures out who’d be most likely to click through your campaigns on your behalf. This is determined by factors such as interests, interactions (think: “likes,” comments, shares) and previous ad clicks.

While Lookalike Audiences are ideal for marketers that have run ads successfully in the past, they’re fair game for first-timers as well. That’s because Facebook allows you to create Lookalike Audiences based on:

  • People who like and follow your Business Page
  • Conversion pixels you’ve created in the past
  • Existing custom audiences

In addition to more accurate targeting by default, this format also provides more experienced advertisers with customization and flexibility. For example, you can broaden your Lookalike Audience to your liking or keep new ad targets almost identical to your own.

If nothing else, Facebook does a pretty good job of holding marketers’ hands through the process of creating a Lookalike Audience to make sure they’re relevant. Doing so is in the best interest of the platform, after all.

Why use Facebook Lookalike Audiences versus other ad formats?

Again, there are plenty of ad formats on Facebook to choose from. What makes Lookalike Audiences so special?

Below are some of the key benefits:

  • They save you a ton of time. If you’ve already gone through the legwork of fine-tuning a Custom Audience, you’ve done the hard part. Lookalike Audiences allow you to squeeze more out of what you’ve already established.
  • In theory, Lookalike Audiences are “proven” versus creating something cold. That’s because they’re based on parameters that show user interest.
  • Lookalike Audiences can easily supplement your existing ads. For the sake of stretching your social media budget, Lookalike Audiences allow you to experiment and target multiple audiences at once without running totally different campaigns.

What scenarios are Facebook Lookalike Audience ads ideal for?

Good question. Let’s look at some of the most common scenarios, for reference:

  • You’re interested in engaging a new audience. Let’s say you want to reach a previously untapped demographic. With a Lookalike Audience, you can expand your targeting without going totally off-base in terms of interests.
  • Your existing ad audience isn’t engaging like it used to. If you suspect you’ve exhausted your customers as-is or your base is too small, these types of ads can help you test the waters.
  • You want to compare two different audiences against each other. Again, Lookalike Audiences can supplement any of your current ads. Comparing performance might open your eyes to new opportunities without blowing out your budget.

What do Lookalike Audience ads look like in action?

In reality, ads based on Lookalike Audiences resemble any other successful Facebook campaign in terms of creatives.

Here are a few examples from Facebook’s own ad success stories which highlight how such ads can be used, piggybacking on the same scenarios we discussed earlier.

This ad from the Teaching Company highlights how Lookalike Audiences can be used to explore new ad targets in terms of geography. For this campaign, the company took a US-only ad and served it in Canada, the UK and Australia based on their best customers. The end result was a 10x boost in monthly average subscriptions to their service.

teaching company facebook lookalike audiences ad

Here’s another example from Shipt. For this ad, the brand created multiple Lookalike Audiences based on current and past customers. Experiencing a 14-point lift in conversions, this is yet another shining example of how targeting based on your existing audience can be so effective.

shipt facebook lookalike audienes ad

This campaign from OLIPOP included Lookalike Audiences of top purchasers as part of a budget experiment, attempting to determine whether increased spending resulted in diminishing returns. The brand found that ramping up their efforts resulted in a significant lift in conversions and add-to-cart events alike.

OLIPOP facebook lookalike audiences ad

How to create a Lookalike Audience on Facebook

Let’s say you’re interested in putting together your first Lookalike Audience.

Excellent!  First things first: log into your Facebook Ads Manager account. On the left-hand corner, you’ll see the “Create Audience” dropdown.

create facebook lookalike audience in ads manager

Again, the platform makes the creation process fairly straightforward but the number of options to choose from can be overwhelming. The breakdown below can help speed things up.

1. Select your audience source

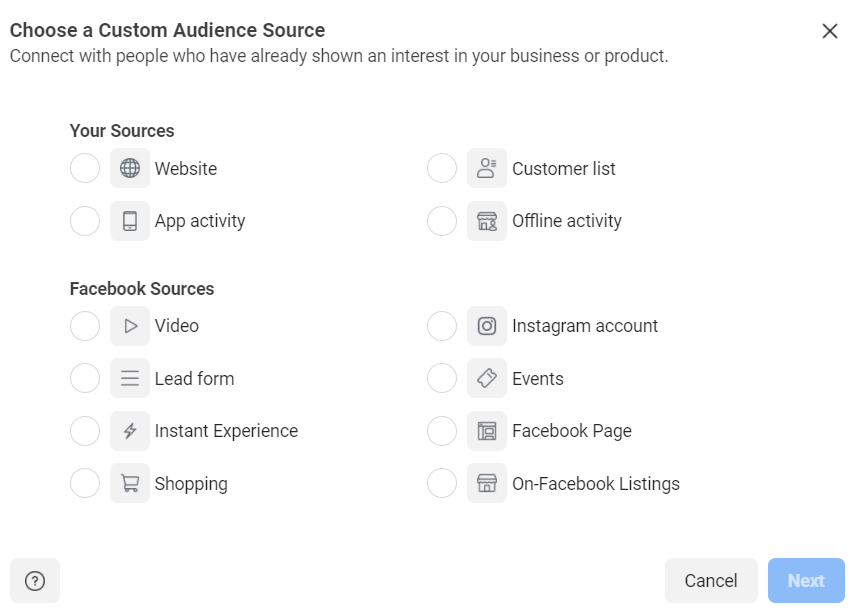
From the word “go,” you have the options we talked about earlier: Pages, Facebook Pixel or an existing Custom Audience.

facebook lookalike audiences choose source

Facebook recommends using “events with value” (AKA value-based sources). That’s because such targeting is based on actual past customer purchasing data. For example, creating a Lookalike Audience based on a remarketing Pixel allows you to base your campaigns around targets with higher (or lower) average order values.

facebook lookalike ads marketing pixel

If you opt to use a Custom Audience as your source, make sure to familiarize yourself with the various Facebook ad targeting options available. For example, you can upload a customer list or base your Lookalike Audience on people who’ve interacted with your website.

facebook custom audience creation


2. Choose your audience location

No big surprises here. Once you select a source, you’ll be prompted to select a region for your Lookalike Audience.

Again, this is helpful if you’re looking to run or experiment with international marketing. This selection allows you to find relevant ad targets based on geography.

facebook lookalike audience region selection

3. Determine your audience size

Finally, you have a choice to choose just how “alike” your Lookalike Audience is.

The smaller the percentage here, the more similar your audience is to your source audience. On the flip side, a larger number makes your audience broader.

facebook lookalike audience similarity

Whether you want a super similar audience or a larger one really depends on your goals and budget. Like any type of Facebook ad targeting, a little bit of experimentation goes a long way.

Note: Lookalike Audience specs and requirements

Before you’re allowed to create your audience, there are a few parameters you need to familiarize yourself with. Although Facebook will prompt you on some of these, make sure to consider the following:

  • Your audience size must be at least 100 people from the same country
  • Facebook recommends between 1,000 and 50,000 of your “best” customers based on lifetime value, order size, or engagement for optimal Lookalike Audiences
  • It can take between six and 24 hours for your audience to actually be created

What can my Facebook Lookalike campaigns teach me?

Just like any other type of ad data, you should note how your Lookalike Audience performs and look at your KPIs.

If your campaigns perform similarly or significantly better than your previous ones, you’re golden. If not, you might consider some tweaking (think: pulling back or ramping up your audience size, experimenting with Custom Audiences versus Pixel, etc).

Either way, make sure you’re keeping an eye on your metrics. You should also assess not only how your ads compare against each other, but how your paid performance compares against your organic social posts.

With tools like Sprout Social, you can use our paid ad reporting and analytics to do exactly that. With a holistic view of your Facebook presence, you can better determine your budget in terms of time and resources.

facebook ad reporting in sprout social


Are you taking full advantage of Facebook Lookalike audiences?

Lookalike Audiences are an invaluable tool for social marketers.

Like any other type of ad, they can take time to master but are worth pursuing for the sake of experimenting and reaching new audiences.

Now that you know how to create a Lookalike Audience on Facebook, perhaps it’s time to consider how such ads fit into your paid social strategy.

And if you need to secure a bigger budget to expand your campaigns, we’ve got you covered. Make sure to check out our guide on making a business case for social media to get the buy-in that you need to run a new campaign.

This post Facebook Lookalike Audiences: How to optimize ads to reach new customers originally appeared on Sprout Social.


from Sprout Social https://ift.tt/3hUwKuh
via IFTTT

Wednesday, 26 May 2021

How to generate more income from your existing customers using email marketing

Troyer Websites Generates $30,000 using AWeber

Getting new clients in the door is important. But it’s often easier and more cost-effective to look to your existing customers to increase your revenue.

Why?

Because they already know, like, and trust you. They have already seen value from your relationship.

In fact, the success rate of selling to a customer you already have is 60-70 percent, while the success rate of selling to a new customer is 5-20 percent. And existing customers are 50 percent more likely to try new products and spend 31 percent more, when compared to new customers.

Still not convinced?

Let’s take a look at how Jonas Troyer, owner of Troyer Websites, made more than $30,000 in new sales from his existing customers in one day using four emails, all of which he sent through his AWeber account.

Related: How to Make Money with Email Marketing

How Troyer Websites generated over $30,000 in new sales using AWeber

Troyer Websites offers website design services, in addition to some complementary services, like search engine optimization (SEO), social media advertising, graphic design, and more.

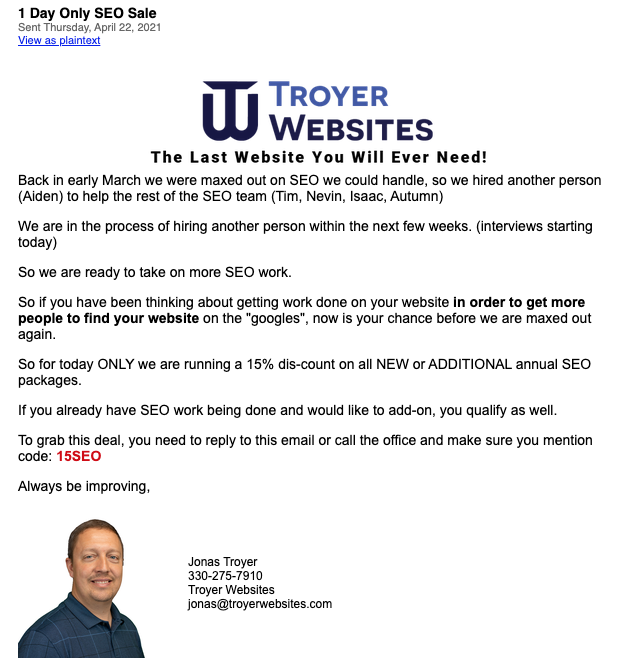
Troyer wanted to bring in more business for his SEO services, so he came up with a 15% off one-day promotion to cross-sell an annual package of SEO services to his existing website customers.

He sent four emails to his current customer list of less that 500 subscribers, all on the same day ⏤ one in the morning, one at lunchtime, one in the mid-afternoon, and one at night.

Why did his emails work so effectively? Let’s look at some of the tactics that worked in Troyer’s favor.

How to write emails that drive action

Create urgency through scarcity

Scarcity drives a fear of missing out, or FOMO, and generates demand. Troyer’s emails highlighted that the 15%discount was only available for a limited time and that he only had limited spots available.

Troyer Websites Promotional Email 1

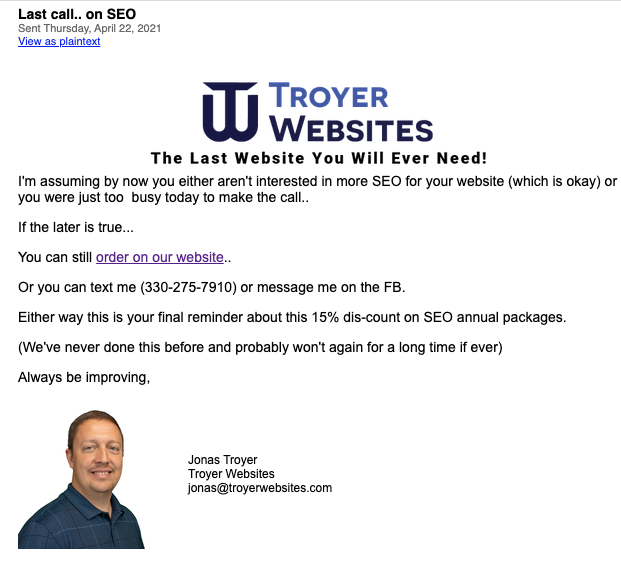
His final “last chance” email dialed up the FOMO by saying his company would “probably never do this again.”

Troyer Websites Promotional Email 4

Create interest through exclusivity

Because Troyer’s customers were already paying him for other services, offering a discount on another service seemed like an exclusive opportunity just for them.

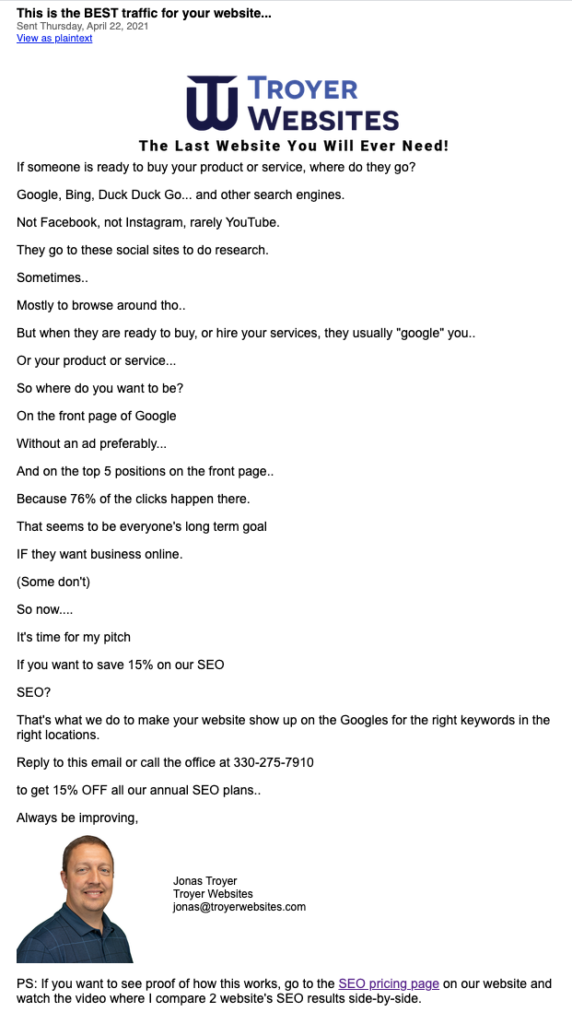
Use benefit-focused language

Your potential customers don’t just want to know what services you offer. They want to know how it’s going to benefit them.

Use language that focuses on the benefits to the customer. What company doesn’t want to “show up on the first page of Google?”

Troyer Websites Promotional Email 2

Use social proof

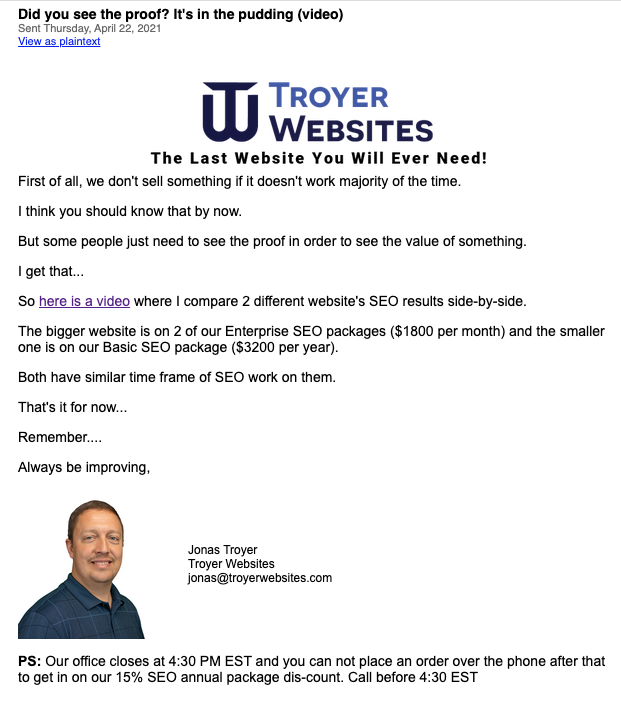
One of the most effective ways to grow your business is word of mouth. Leveraging customer testimonials and success stories can help other potential customers feel more confident in doing business with you.

Troyer used social proof in his emails, sharing a video where he walks through two of his SEO clients’ websites and the results they’ve seen in working with Troyer and his team. This helps position his promotion in a way that potential clients can see how they will benefit from his SEO services.

Troyer Websites Promotional Email 3

How to do this with your customers

If you offer complementary products or services, you can cross-sell these to your existing customers.

  1. Create and publish a landing page in AWeber to collect payment from your customers.
  2. Use AWeber Ecommerce to collect payments and tag customers based on their purchase. This will allow you to see how many sales you’ve made from your existing customers. Make sure to apply tags to your customers when they make new purchases so you can target additional offers to them in the future.
  3. Create a segment of your customers based on past purchases. You can do this by either searching for tags based on past purchases, or importing tags from a spreadsheet based on purchases.
  4. Draft an email (or series of emails — called a campaign) to your customers about the complementary product or service you’d like to offer them, and link to the AWeber landing page you created.
  5. Schedule your email to go to your segment of customers and watch the sales roll in.

Ready to increase your sales with your customers? Create a free AWeber account and get started today.

The post How to generate more income from your existing customers using email marketing appeared first on AWeber.


from AWeber https://ift.tt/3fqENxk
via IFTTT