What can your team accomplish in 30 days?
If you make the most of your Sprout trial, the answer is a lot.
After a well-managed 30-day Sprout trial, you’ll have organized all of your social content, have everything scheduled and ready to publish, plus be able to track your performance across different networks every step of the way.
We understand nothing spurs fear of commitment quite like a binding vendor contract. Choosing the wrong social media management solution can be a pricey mistake—from the team inefficiencies to the cost of a product they never use.
Sprout’s 30-day trial eases those nerves by providing you and your team with a chance to try before you buy. Our intuitive platform is designed for immediate adoption, so you can get up and running in minutes. What’s more, you don’t need a large team or a technical set-up; Sprout fits in with what you’re already doing, enabling you to achieve results faster and more efficiently.
Once you activate your Sprout trial, follow the tips in this guide to go from setting up and managing your content calendar to tracking results and staying connected with your followers.
Get fully set up
To make the most of your Sprout trial, set clear success criteria right at the beginning of your 30-day period.
This is a good time to look back on why you started evaluating new tools in the first place. Do you want more in-depth reporting? Easier ways to manage socials across multiple networks? Or do you want to connect with your cross-team managers to identify key priorities and go from there?
After aligning on your goals, you’ll need to connect your profiles. Sprout enables you to connect all your accounts across every major social media network and bring them together in a single interface. You can find a full list of Sprout’s integrations here.
You can start your Sprout trial by connecting just a single social profile, but you’ll get the most out of your 30 days by connecting all of them up front. By connecting all your profiles, you can streamline cross-network publishing and get deeper insights across profiles when you view your reports.
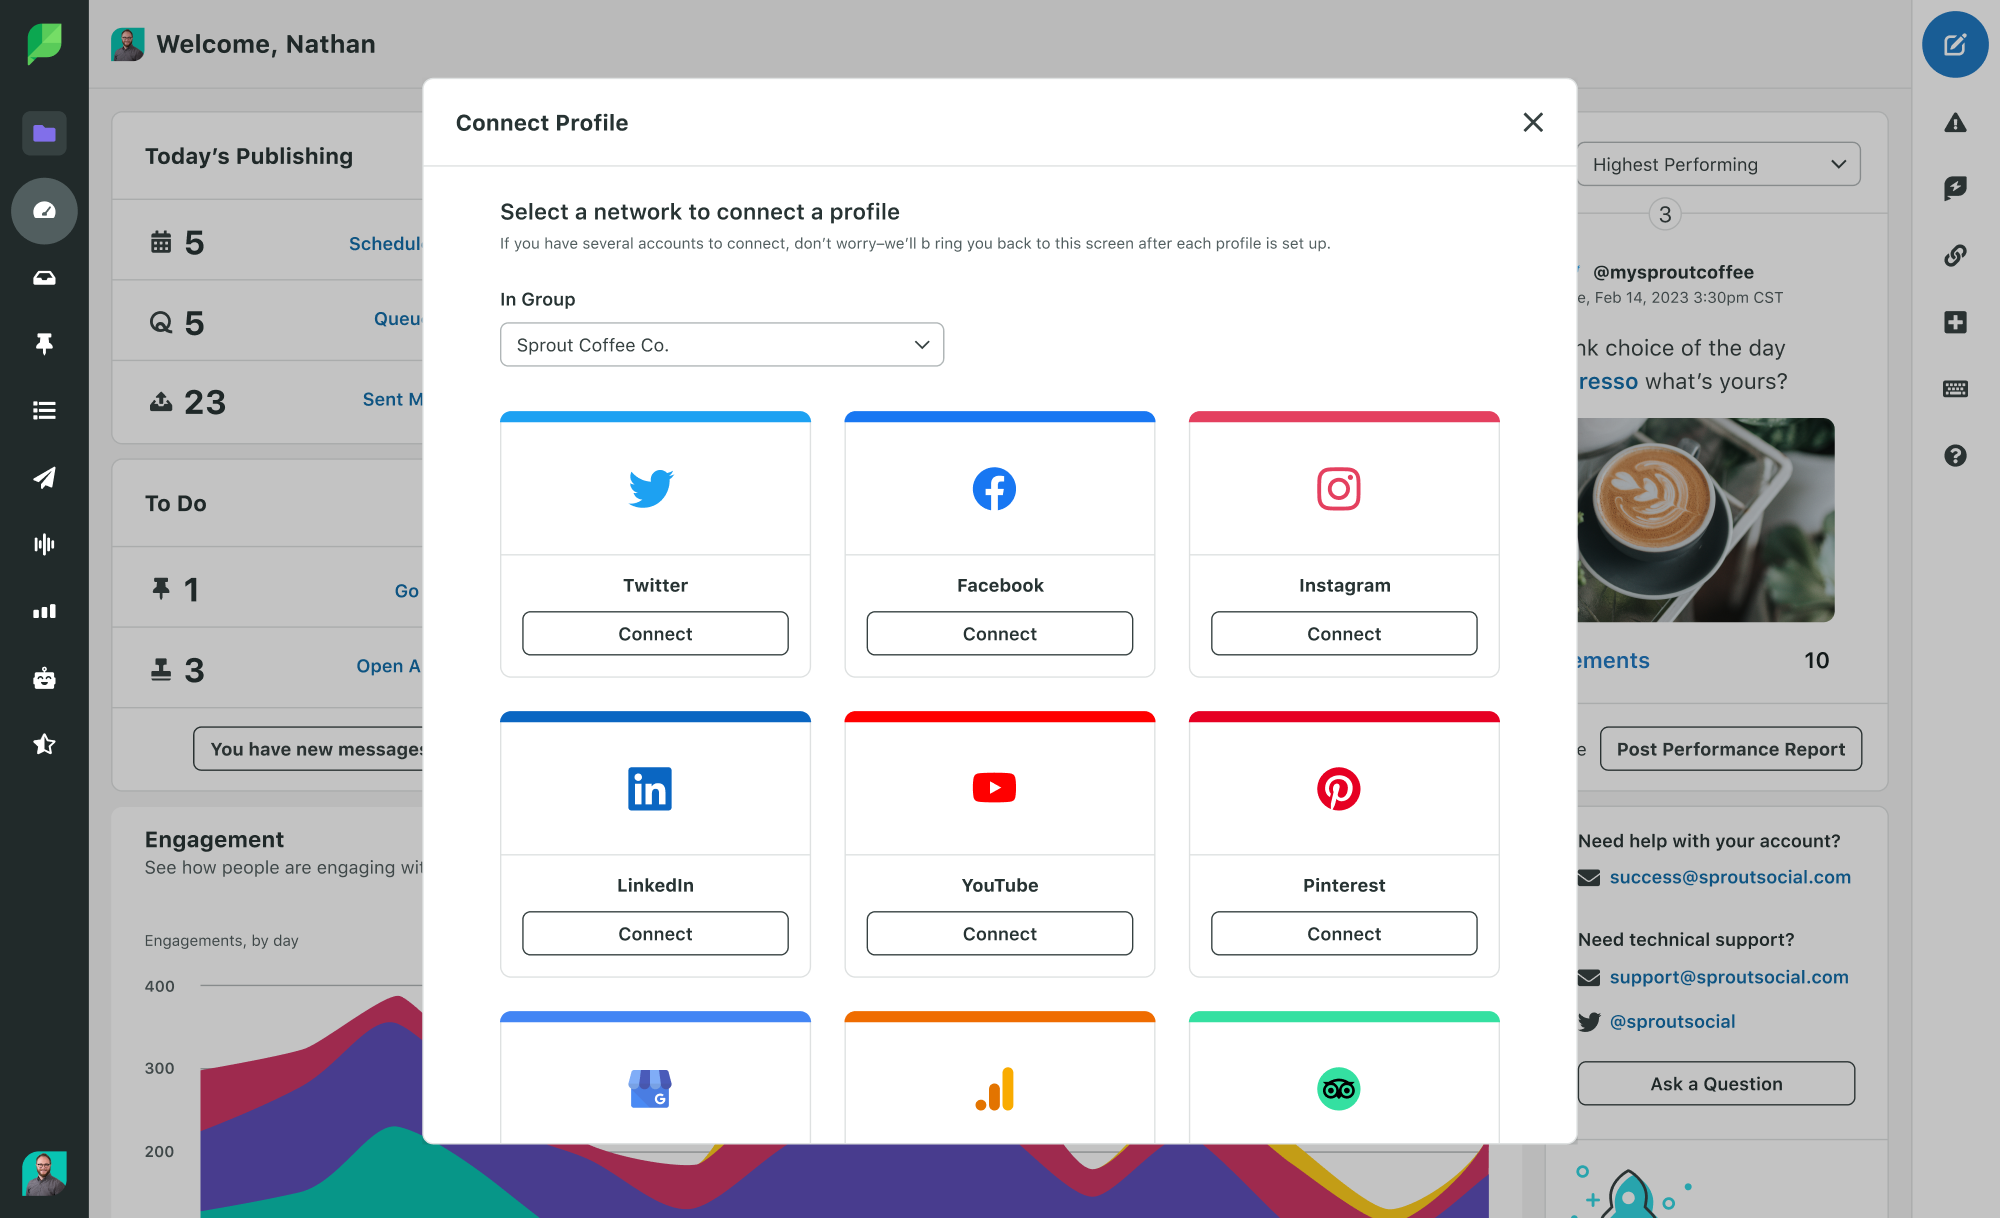
When first signing into Sprout, you’ll be prompted to connect your social media profile. Select whichever profile you’d like to get started with. You can add more profiles and networks later by clicking the + icon in the top right corner of the Sprout app.
Here’s a list of all the social profiles you can connect in Sprout. Once you’ve completed your setup, it’s time to start using the Calendar.
Get started with the Publishing calendar
The Publishing Calendar serves as the central hub for content scheduling in Sprout; it’s a holistic solution that simplifies creating, managing and reviewing your content output across all networks. Instead of juggling multiple spreadsheets and fiddly cross-posting across multiple apps, use the Sprout Calendar to simplify the entire content planning process.
First, we’ll introduce Sprout Calendar’s planning features, then we’ll explain how to streamline content creation and posting in Sprout directly by using Compose.
Meet your content calendar
After connecting all your profiles to Sprout, you’ll be able to visualize all of your social posts at once in the Calendar. View posts you’ve already published, as well as any future posts you’ve scheduled or drafted in Sprout.
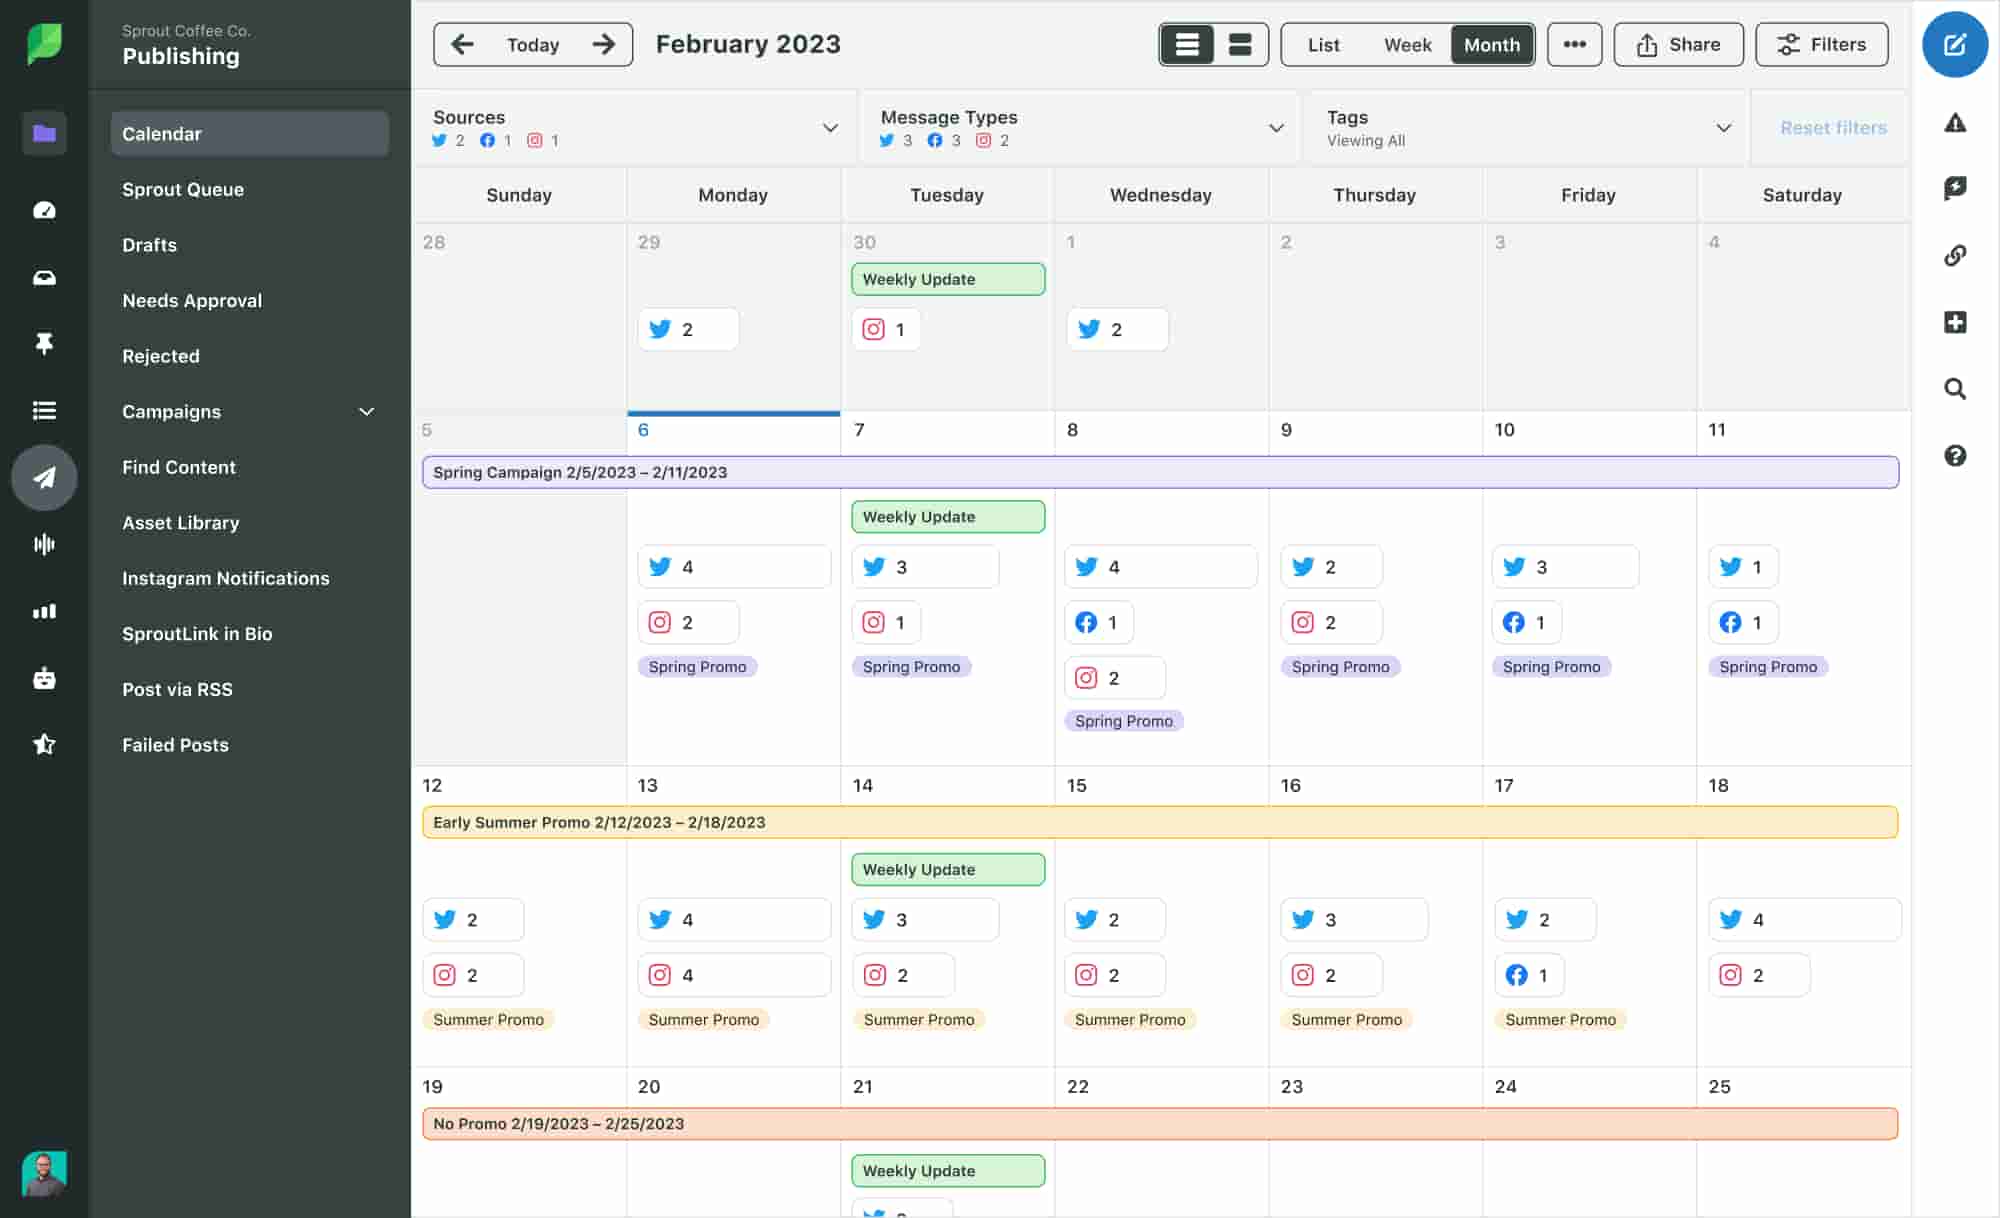
Alongside centralizing all of your posted and planned content, Sprout’s Calendar offers several useful collaborative and planning capabilities, including:
- Calendar notes: You can create notes on the Calendar as references for your social strategy. These might include things like marketing campaigns and holidays that influence your posting schedule or the performance of your content.
- Filling content gaps: Sprout makes it easier to identify and fill gaps in your calendar. Simply hover over an empty day to create a new post or draft right from the Calendar.
- Shareable links: Create simple shareable links to your calendar, or export it as a PDF, so you can share your plan with other teams and stakeholders.
Now that you’re familiar with some of Sprout’s Calendar, think about how you’d create a 30-day content plan to fill your trial period.
Once you know what content you want to post, you’ll use Compose to input, schedule and customize your content directly in Sprout.
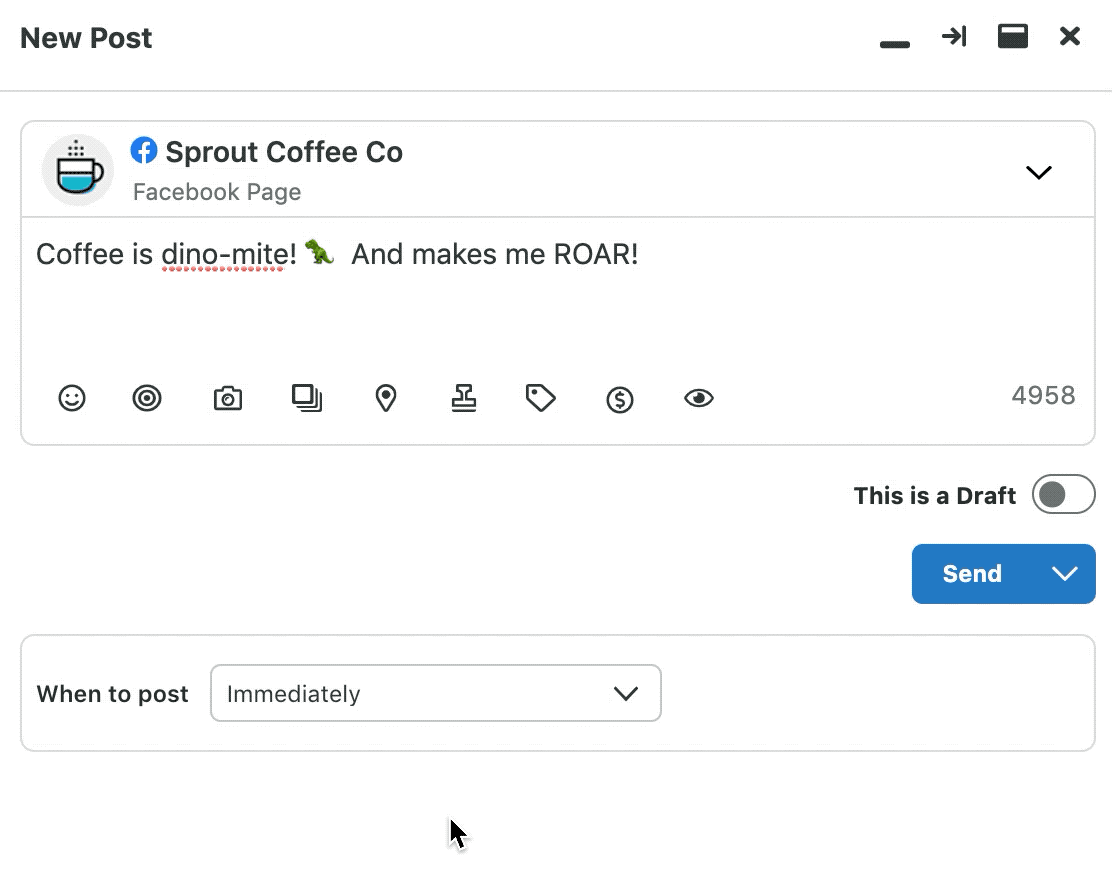
Craft posts in Compose
You’ve now seen how the Calendar gives you a complete picture of your social strategy in one view. When you’re ready to start crafting content, Compose gives you powerful tools to create posts that are tailored for each network. Using Sprout Compose, you can make sure everything you post is fully optimized and make the most of your Sprout trial.
To create a post, click the Compose button in the top right corner of the Sprout app. From the Compose window, you can:
- Add images, GIFs and video to your post by uploading from your device, or via one of our integrations.
- Expand to fullscreen view to preview posts on each network before publishing.
- Tag locations, like your business address, to let customers know where you’re located.
- Publish your post immediately, schedule it for the future or add the post to your queue.
Learn more about posting and customizing in Sprout Compose in this Sprout Bites video:
Just like with the Calendar, Sprout Compose has tools that make it easier to optimize and publish across all social networks. Some of the main Compose features you’ll use during your 30-day trial period include:
- Cross-network Publishing: Write once, tailor slightly, then post your content across all your connected profiles. Create your post in Compose, then use Sprout’s Profile Picker to select which profiles to publish on, and then proceed to post to all of those profiles at once.
- Optimal Send Times: The best time to post on social media depends on the network you’re using and your audience. Take the guesswork out of your timing using Optimal Send Times. Select the Optimal Send Times dropdown, and you’ll be given a choice of suggested times based on different networks and your engagement data. Selecting one of these suggested times helps your content achieve superior reach across your different networks.
- Draft Posts: Work on your content on your schedule using Compose’s drafting capability. Save any piece of content you’re working on, and revisit it later. Saving drafts also connects your content to the Calendar so it remains part of your wider content plan. And if you don’t have a posting date yet, you can find all of your drafts by navigating to Publishing > Drafts.
- Sprout Queue. Schedule your content ahead of time using Sprout Queue. Designed for content that isn’t time-sensitive, Sprout Queue enables you to build out future posts for your content calendar.
You can also preview and customize posts for different networks. Use Compose’s built-in image editor to tweak your images, and Generate Alt Text by AI Assist to come up with quick captions and hashtag suggestions.
For a more in-depth guide to publishing in Sprout, take a look at the Introduction to Publishing course in Sprout Academy.
See what’s working with Reports
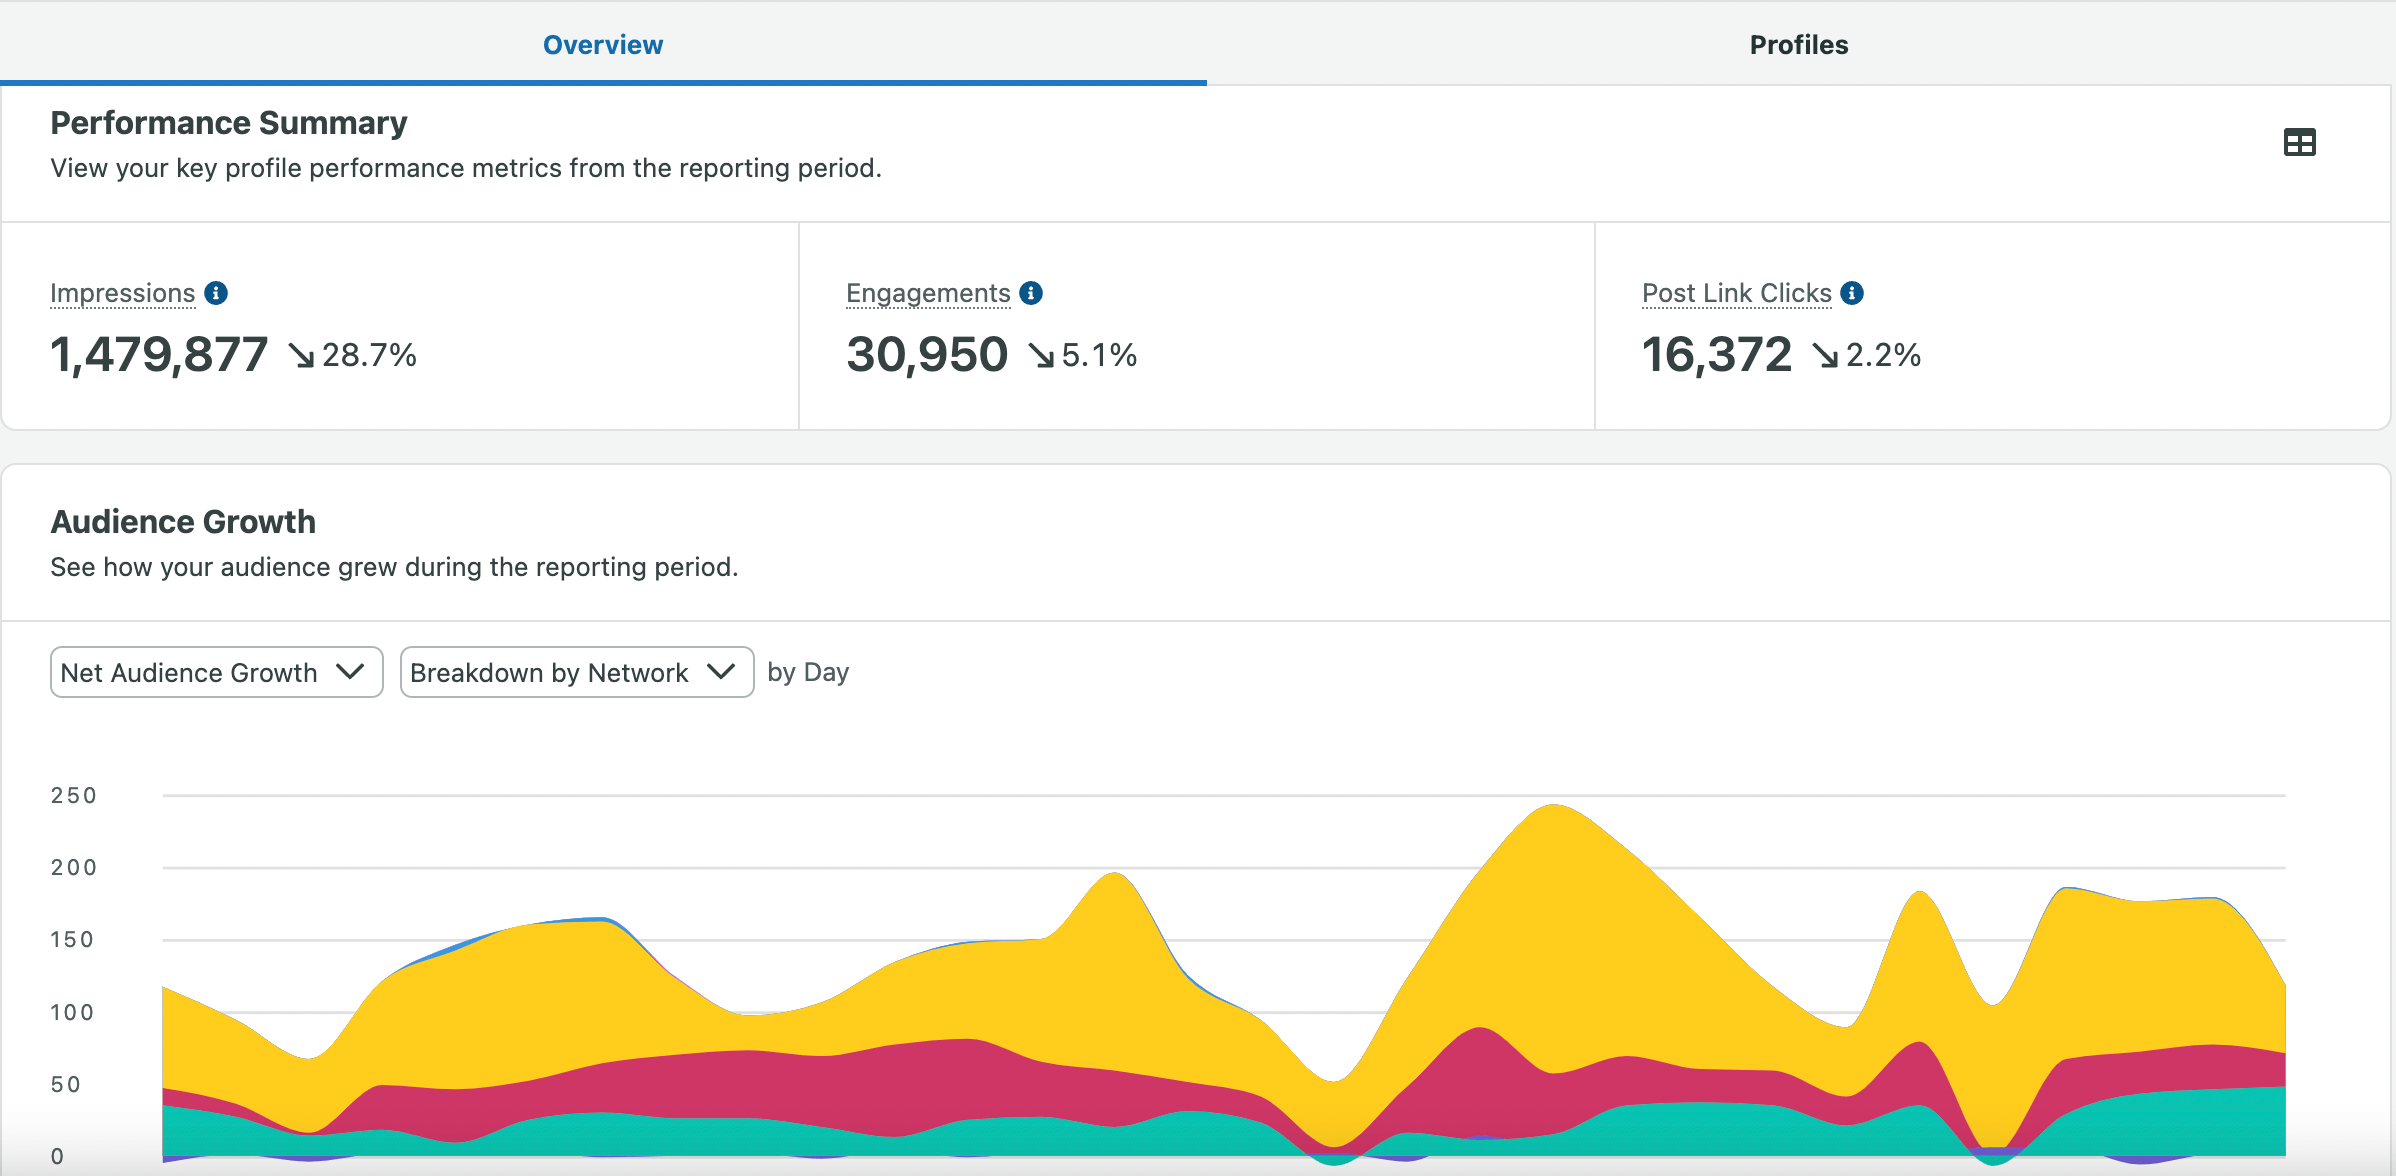
Once you have customized and scheduled your content, the next step is tracking its impact. Sprout’s Reports show you how your content is performing across different social networks.
Sprout has reports for individual posts, specific networks and across networks, so you can get insights to drive your social strategy at every level of detail. Filter and drill down in the Sprout app or download presentation-ready reports via PDF to share with stakeholders.
We start filing Reports with data as soon as you connect a profile, but some reports may take a day or two to pull in data. Connect all your profiles early in your trial to get a complete picture of your performance and to get the most value out of your trial.
Post Performance Report: Measure your content strategy
Sprout’s Post Performance Report ties your content strategy directly to measurable results. You can analyze how your content is performing down to individual posts, based on metrics like engagement, shares, clicks and more.
Customize your view to focus on specific content types, like Instagram videos or Facebook Ad posts. Or, drill down to boosted posts to track how your paid content is performing when compared with organic posts.
Use the data covered in the Post Performance Report to refine content strategies so you can focus on creating more top-performing posts. It also provides a granular level of detail on how well your specific campaigns are performing across different networks. For greater visibility, combine this report with a big picture view of each account using the Profile Performance Report.
Profile Performance Report: Measure the health of your social presence
The Profile Performance Report tracks the performance of all your social accounts in one place. Use this report to visualize which profiles or networks are under- or overperforming, and refine your strategy going forward.
Compare networks against each other through specific metrics, like audience growth, message volume and impressions. These stats might reveal that a profile you thought was underperforming in impressions is actually more useful for driving follower messages. Accessing these insights can guide your priorities for each account.
Then, take these insights one step further with Sprout’s network specific reports.
Network specific reports: Dig deeper into profile performance
Sprout’s network specific reports are designed to give unique data for each social network. They provide a specialized layer of insight when compared with profile performance. This includes focusing on network-specific metrics that aren’t universal across every network.
Make the most of your Sprout trial by using these reports to further refine your approach to different networks, based on your prior performance.
For a deeper dive into Sprout’s Reporting, take the Sprout Academy reporting course, Introduction to Reporting & Premium Analytics.
Bonus: Stay connected to your audience with Smart Inbox
Sprout’s Smart Inbox is a more advanced inbox management feature that’s available for users on Standard, Professional and Advanced plans. If you’re on an Essential plan, don’t worry; you still have everything you need to manage Publishing in Sprout. If you’re on an Essential plan and find you’re receiving a lot of messages and comments on your content, you can easily upgrade your plan for free during your trial to start using Smart Inbox.
The Smart Inbox simplifies engagement and community management by unifying inbound messages and comments from X, Instagram, TikTok, Facebook, LinkedIn and YouTube into a single stream. From there, you can filter, sort and reply to messages all in one place.
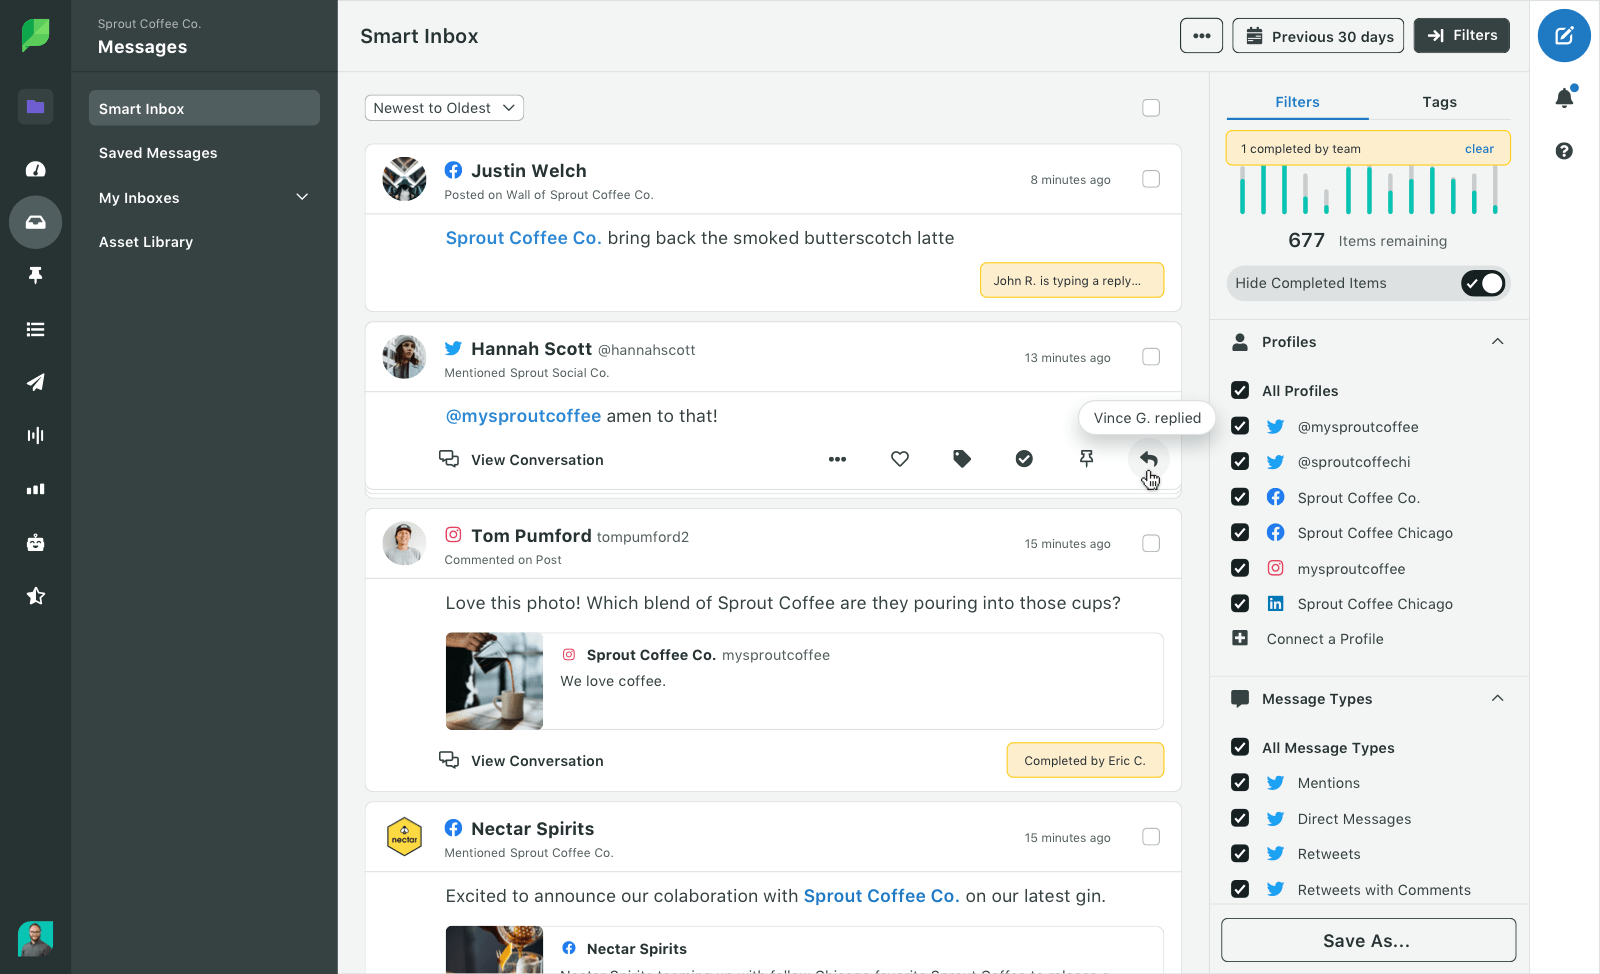
Smart Inbox streamlines the process of managing your social inbox. It makes community management and direct engagement with your followers much easier by providing a centralized inbox and collaboration features.
Pro tip: When you’re starting out with Social Inbox, use the right sidebar to choose which social profiles are filtering into your inbox at any given time. To start fresh in the Smart Inbox, bulk complete messages from before your trial period or set the date filter to the start of your trial period. You can also select Hide Completed Items to remove messages that have already been addressed from your current view.
Key tips for success
If you want to make the most of your Sprout trial, bear in mind these more general tips for success:
- Keep posting consistently during your trial. The more you’re able to post during your trial period, the more data your Reports will be able to draw from.
- Check your calendar regularly. By frequently checking and optimizing your calendar, you’ll keep your content strategy organized and on track.
- Connect as many profiles as you can. This will enable you to access more network comparison data, and means you’ll get better acquainted with how Sprout’s features work for specific networks.
- Use the Sprout Academy. All of the courses in Sprout Academy are designed to be easily accessible, and give you a foundational understanding of how to make the most of Sprout’s core capabilities.
- Bookmark our help center. If you ever encounter a problem, navigate to our help center first, as there might be a page there that can help.
- Download the Sprout mobile app. The mobile app brings the power of Sprout straight to your smartphone. Customize your push notification settings and get real-time updates to keep track of your socials on the go.
- Join The Arboretum. The Arboretum is a member-driven virtual community powered by Sprout Social. It’s where social media professionals can meet and connect over their shared career goals.
Keep each of these tips in mind, and you should have no trouble making the most of your Sprout trial period.
Put Sprout to the test today
As long as you follow these steps, and tailor your tool use to the specific needs of your brand and your accounts, you’ll maximize the value of your 30-day trial period with Sprout Social.
By the end of your trial, you’ll have your content calendar built, your reports running and a clear picture of how Sprout can simplify your social strategy.
The post How to make the most of your 30-day Sprout trial appeared first on Sprout Social.
from Sprout Social https://ift.tt/4f0MYKR
via IFTTT
No comments:
Post a Comment