Your phone buzzes with a new comment on the Reel you posted. A quick scroll shows fresh likes, shares and a bump in followers. That’s the power of an Instagram post done right.
But building visibility, sparking engagement and nudging people closer to becoming customers takes creativity, planning and timing. Brands with a strong Instagram marketing strategy and consistent publishing see the best results.
This guide walks you through how to post every Instagram format—photos, videos, Stories and Reels—with practical tips on captions, timing and the tools that make the whole process faster.
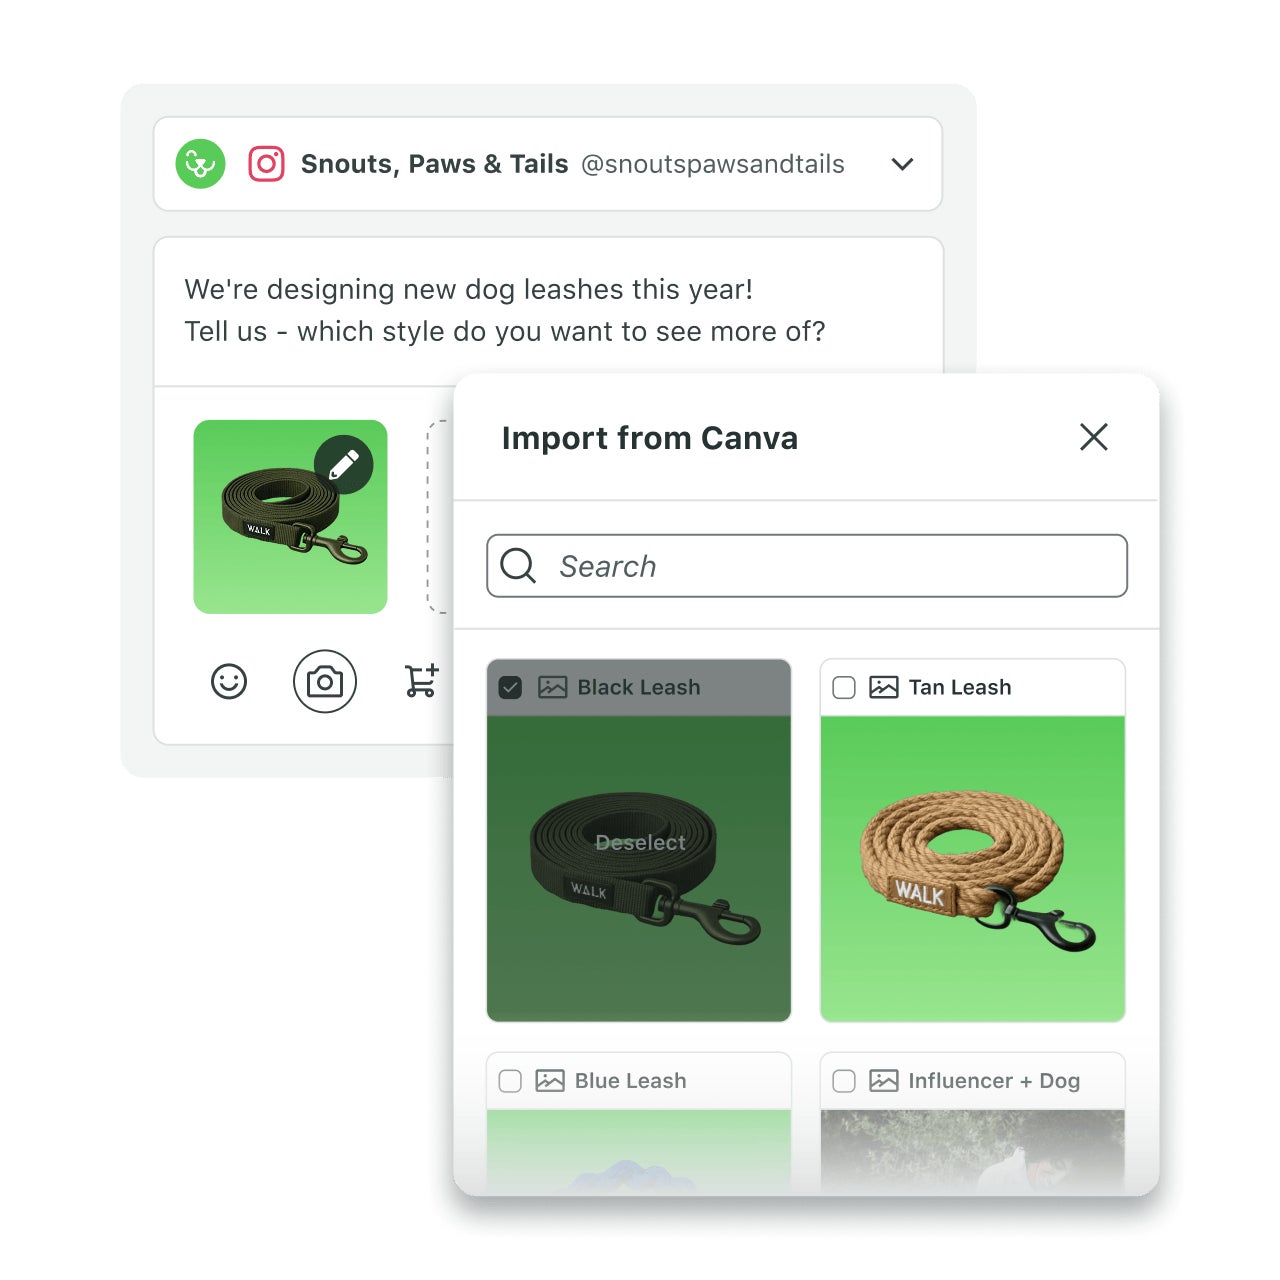
Managing Instagram shouldn't mean juggling five apps
How to post photos and videos on Instagram’s mobile app
Most people post to Instagram directly from their iPhone or Android. The process is simple, but small details like aspect ratio, captions and hashtags make the difference between a post people scroll past and one they engage with.
You can also post on Instagram from a PC or Mac, but the walkthrough below focuses on the steps and advanced settings for posting photos and videos from mobile.
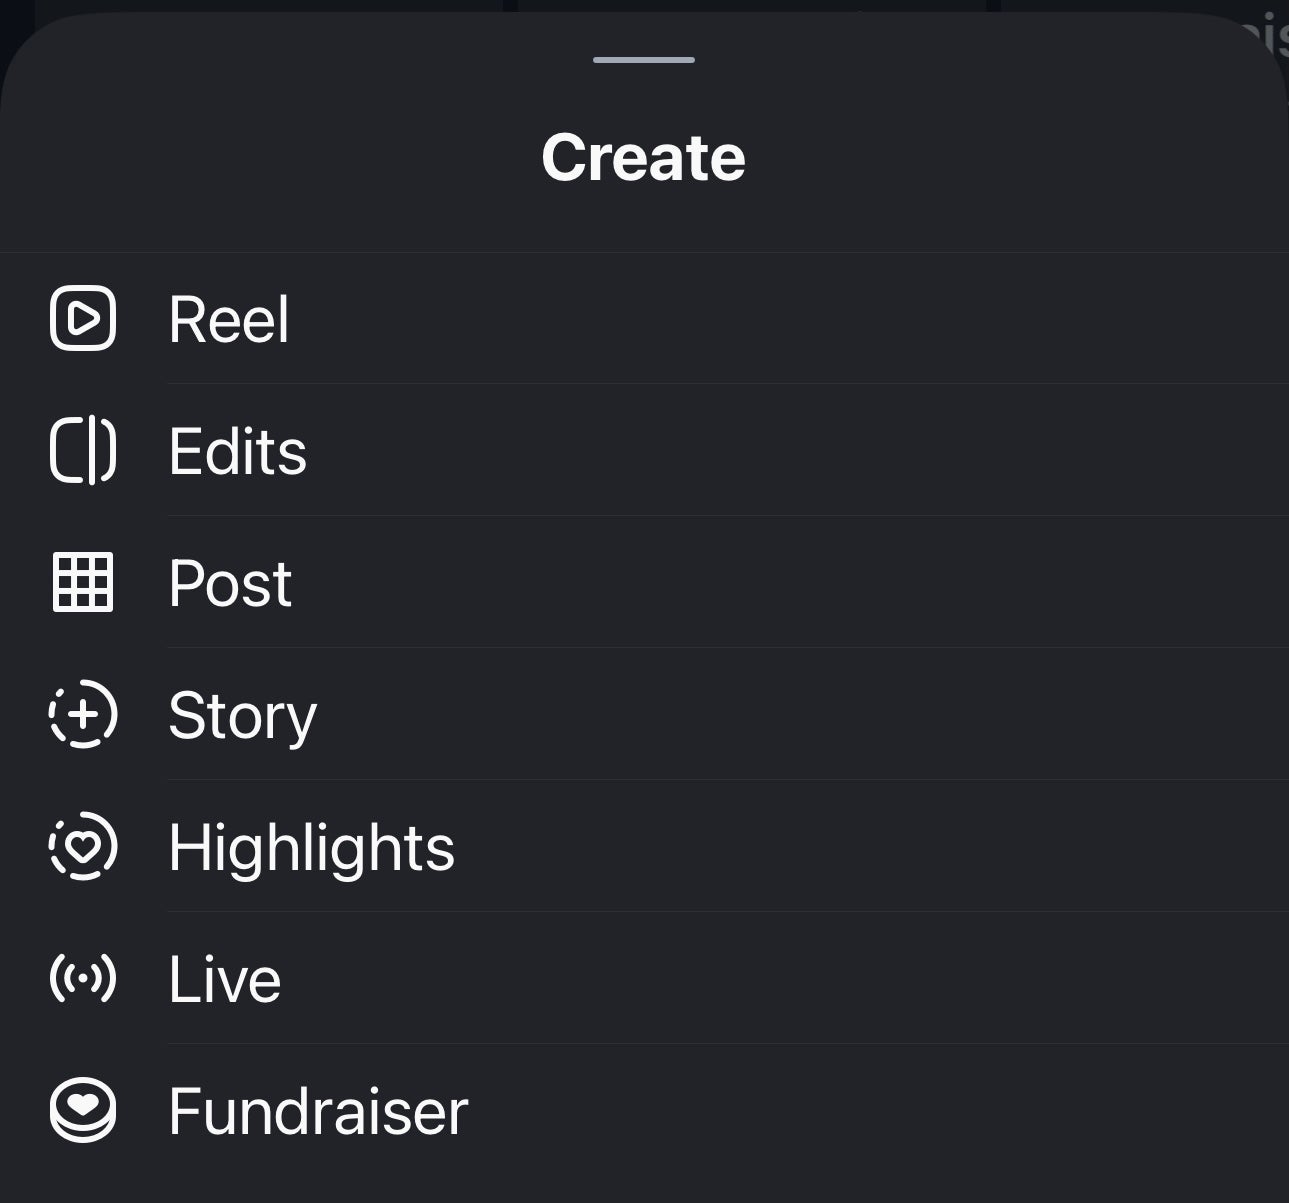
Choose your media type
Open the Instagram app and tap the “+” icon at the top left of the page to add one of the following:
- A single photo: Upload one image to highlight a product or share important information. Single photos are ideal for quick updates and clean visuals.
- A carousel: Share up to 20 images or videos in one post (rolling out; some users may still have a 10-item limit). Carousels work well for tutorials, step-by-step guides and before-and-after reveals. They also tend to drive higher engagement than single-image posts.
- A reel: Use videos to add motion and storytelling to your feed. Short clips match how people watch on mobile, which makes them ideal for product demos, how-tos or customer stories.
Instagram offers clear guidelines for every format. Here are the Instagram file specifications to consider when uploading:
- Photos: JPG/JPEG or PNG files with a minimum width of 1080 px
- Videos: MP4 or MOV files with a minimum width of 1080 px
- Feed post aspect ratios: Between 1.91:1 and 3:4
- Reels: Vertical 9:16 videos are recommended for the best viewing experience
- Reels cover photos: Covers are displayed at different crops across the app, recommended size for cover photos is 420px by 654px (or 1:1.55 ratio)
- Square (1:1) and vertical formats typically perform best in mobile feeds
Preparing posts using Instagram’s recommended specifications can help reduce cropping and formatting issues after upload.
Edit and crop
Once you select your media, the next step is making sure it looks its best in the feed. Instagram’s built-in editor lets you crop images, adjust brightness, sharpen details or trim clips. You can also add music, filters, text and overlays.
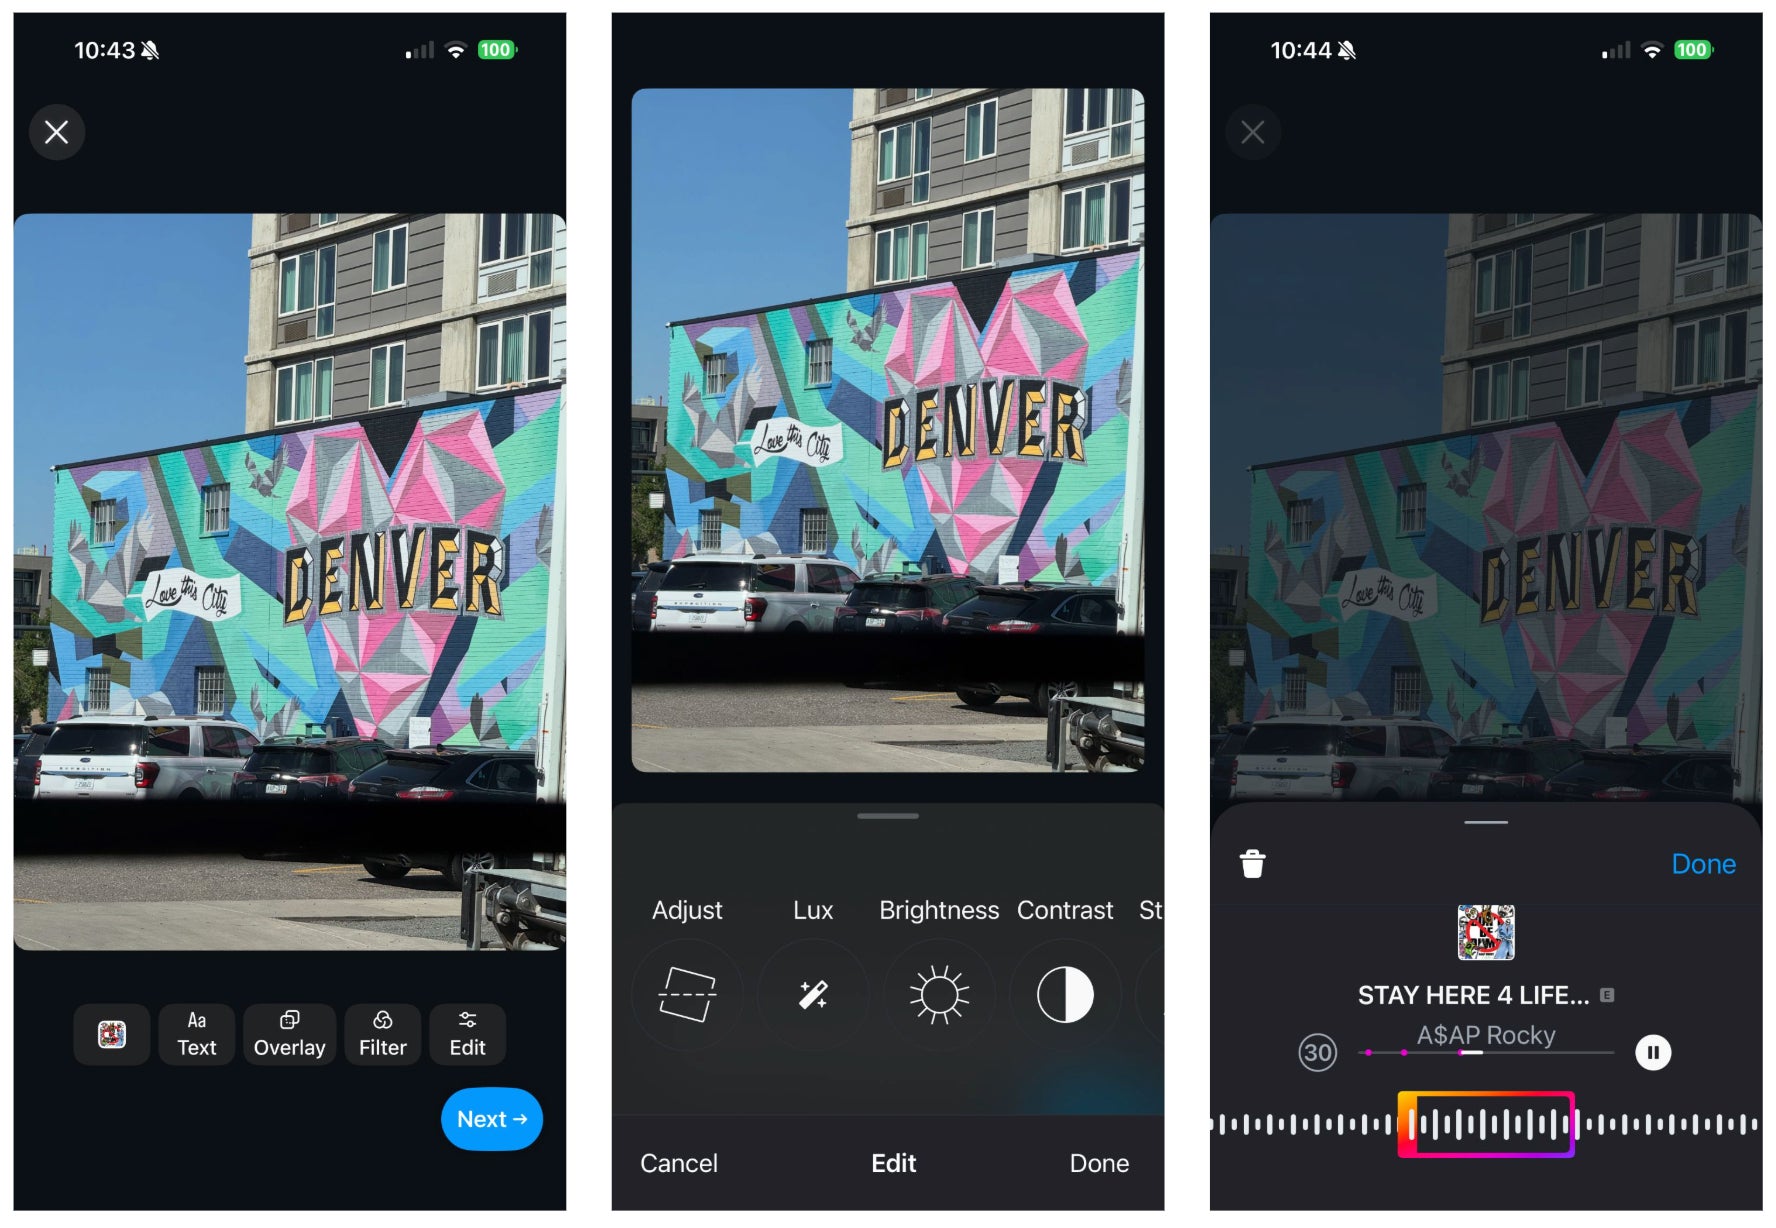
This stage matters because how your content appears in the feed directly affects engagement.
Here are some common aspect ratios:
- Landscape feed posts: 1.91:1
- Square feed posts: 1:1
- Vertical feed posts: 4:5
- Reels: 9:16 recommended vertical format
- Stories: 9:16 vertical format or between 4:5 and 1.91:1
Because vertical images tend to stand out, some brands build their entire aesthetic around them. For example, fashion brand Damson Madder leans on 4:5 across its grid. Consistent vertical framing creates a cohesive look and maximizes visibility in the scroll. Even playful images, like styled socks or outdoor lifestyle shots, feel bold and attention-grabbing because they fill the feed.
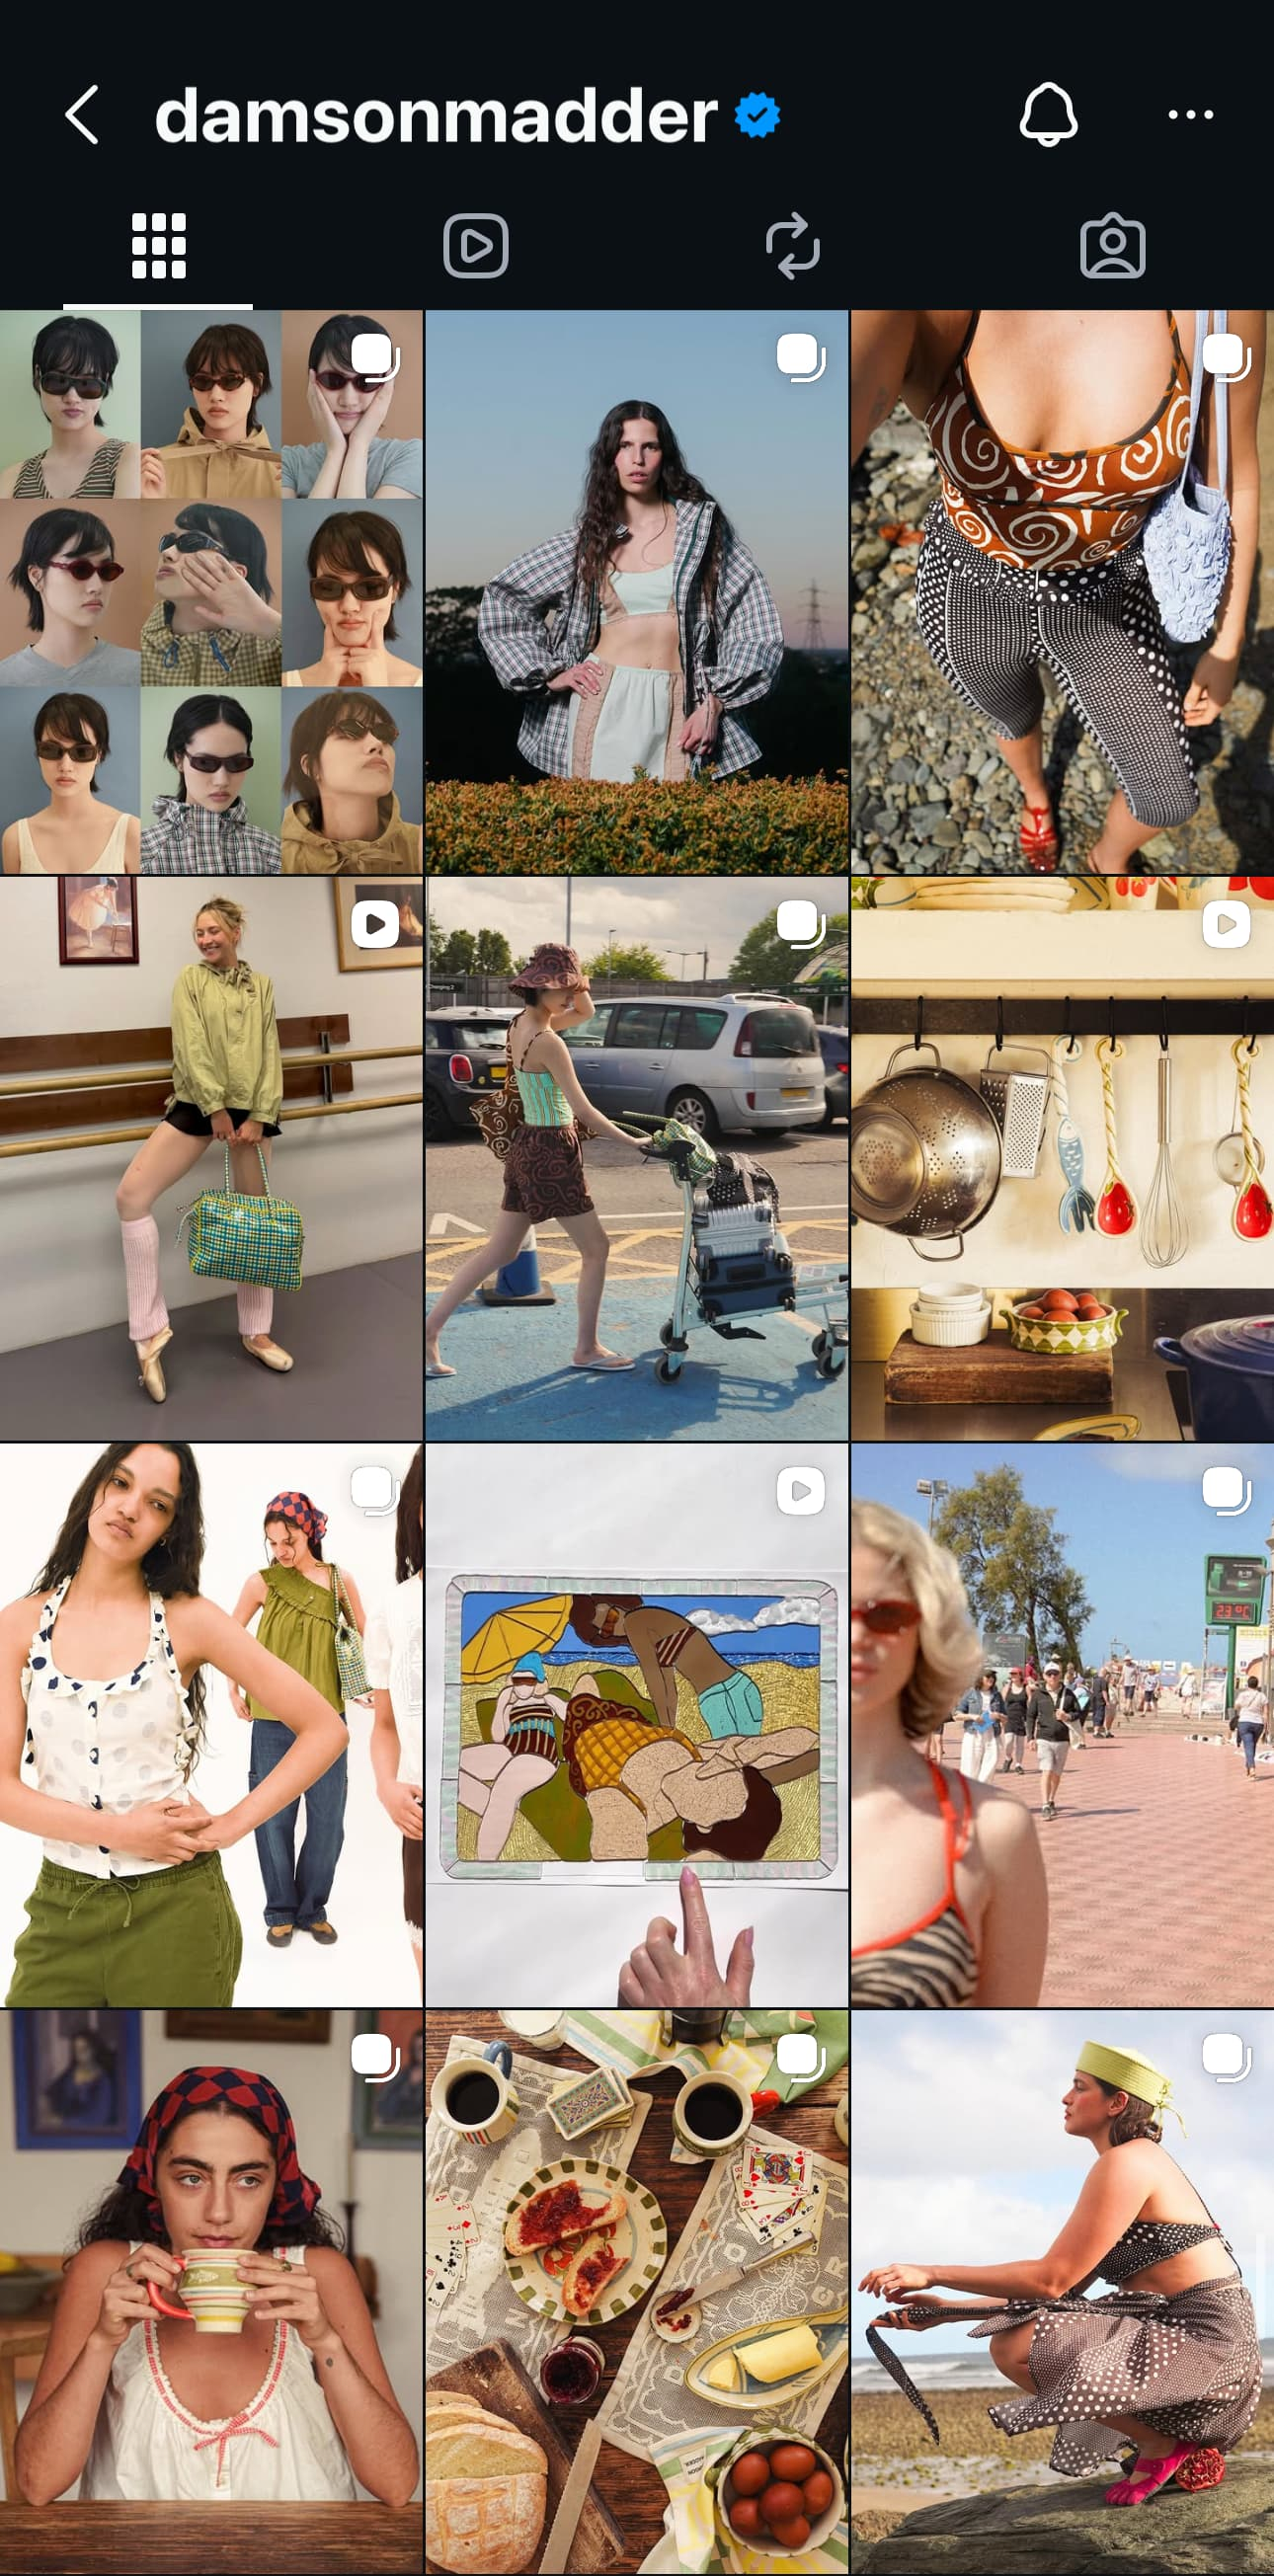
Source: Instagram
But editing isn’t just about filters and crops. It’s also about consistency. Brands with a clear, recognizable visual identity build stronger recall.
For instance, LoveShackFancy’s posts consistently feature soft lighting, pastel tones and airy compositions, creating a vintage-inspired look that feels cohesive across images, carousels and videos.
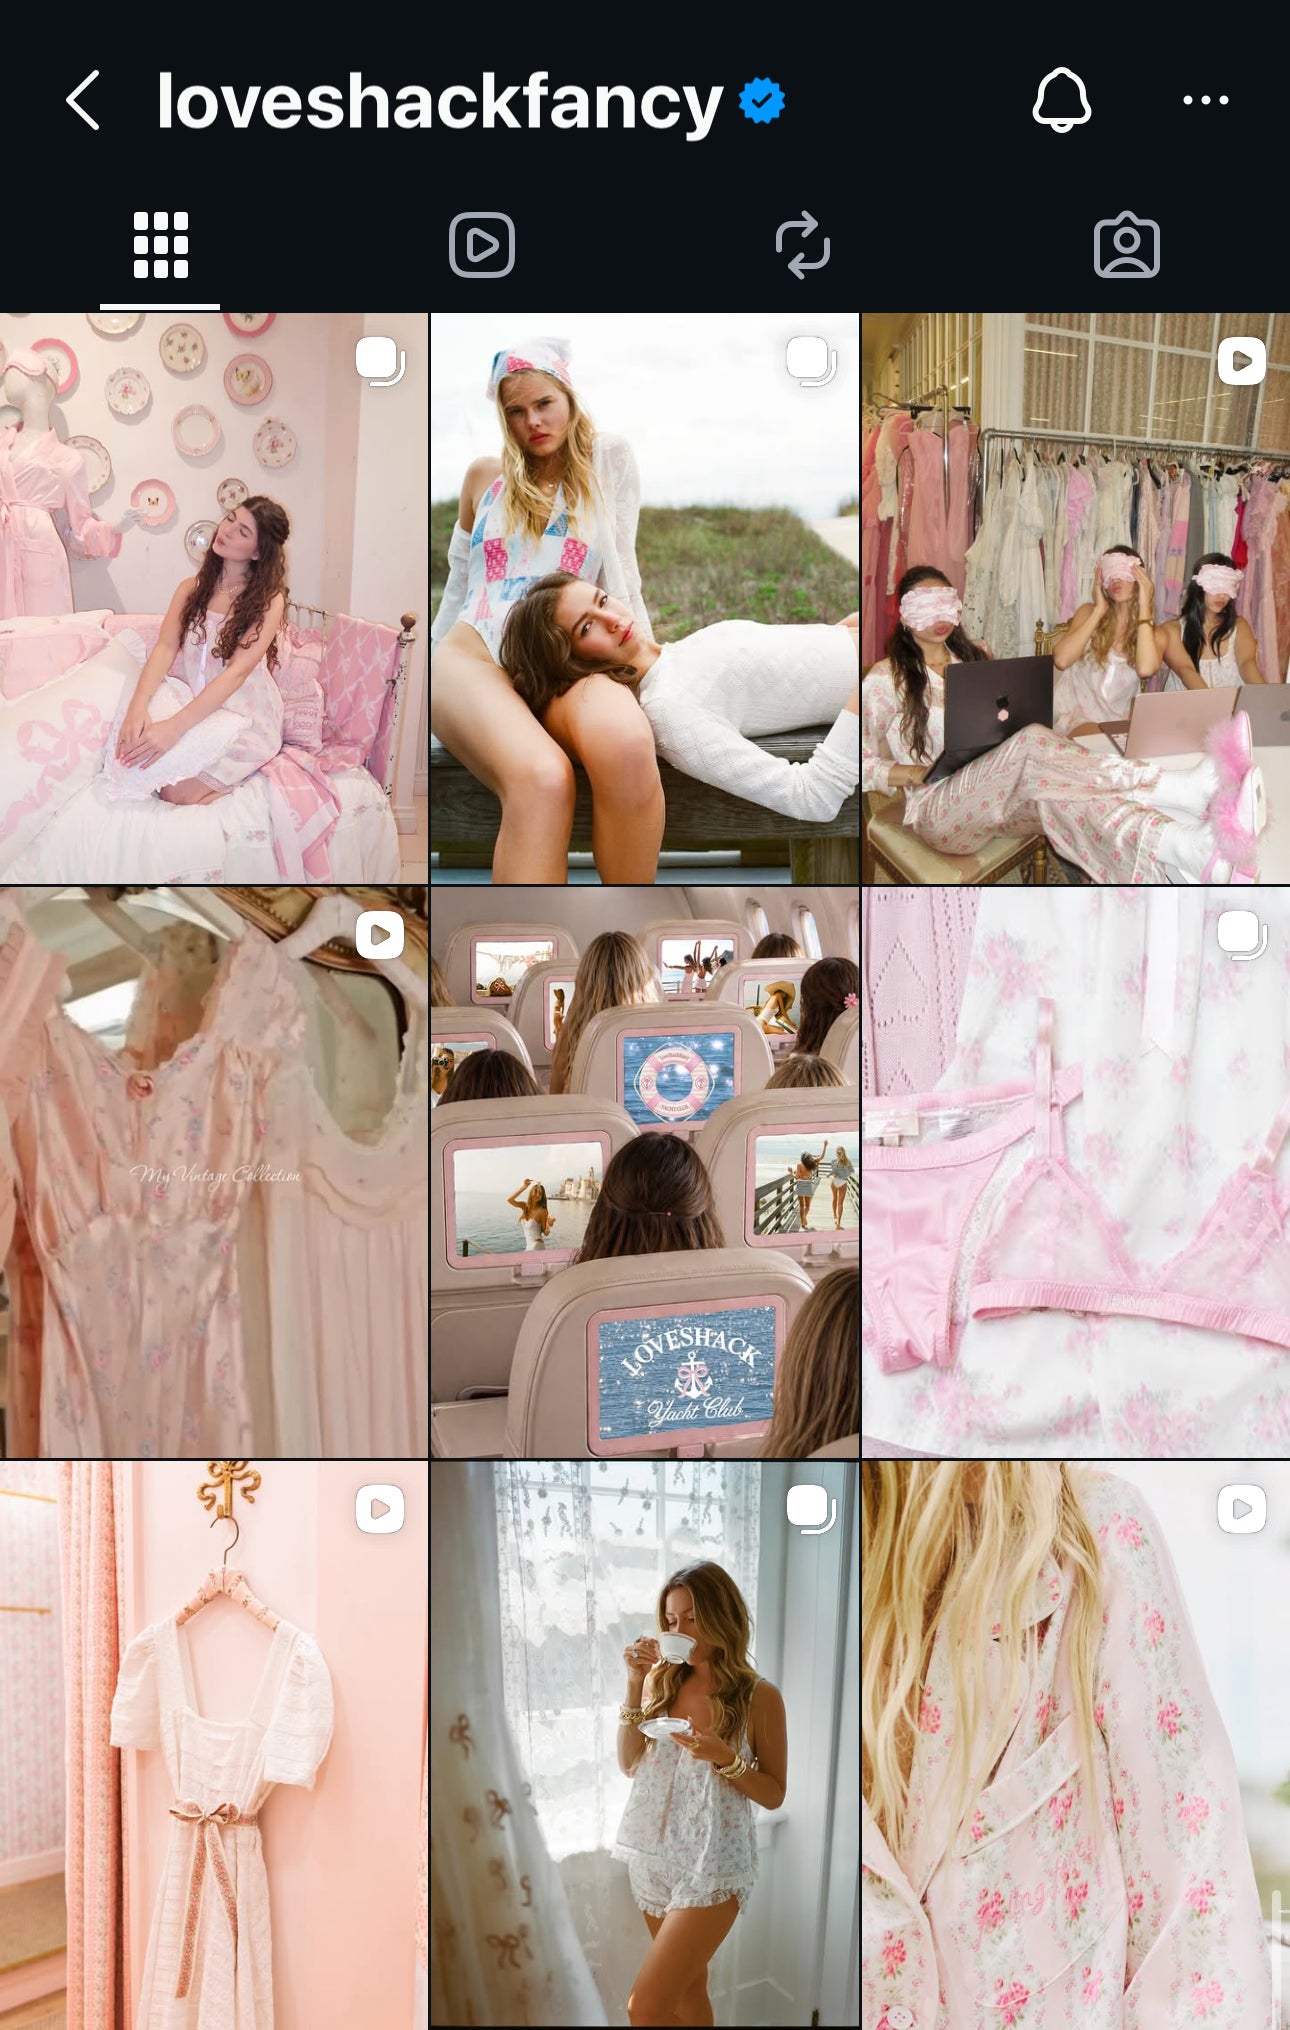
Source: Instagram
The effect is unmistakable: Followers recognize LoveShackFancy posts instantly, even before checking the username. That level of consistency boosts both brand identity and engagement.
However, if you’re managing a social team, maintaining a cohesive look can be complicated. Different people might not crop or filter images the same way and approving edits across channels takes time. A centralized workflow simplifies this process.
Streamline your workflow with Essentials
And publishing is just the start. Essentials also includes Optimal Send Times to automatically post when your audience is most active, SproutLink to turn your Instagram bio into a traffic-driving landing page, and auto-first-comment scheduling to boost reach without cluttering your captions. It’s everything a growing team needs to plan, publish and perform from a single platform.
Ready to simplify your Instagram workflow? Start your free 30-day trial of Sprout Social.
Write captions, hashtags and tags that boost reach
Imagine posting a photo of your new fall collection with the caption, “New arrivals are here.” It gets a few likes, then disappears in the scroll. But if you change it to, “Pumpkin spice isn’t just for lattes. Meet our fall knit, made to keep you cozy all season. Tap the link in bio to shop 🍂” Add Instagram hashtags like #FallStyle and #CozyKnits and you may see your reach extend beyond your followers.
Captions and hashtags can turn a good visual into a post that sparks real engagement. Here’s how to make them work harder:
- Lead with a hook in captions: Instagram allows captions up to 2,054 characters (at time of writing; the limit may vary), but only the first 125 show in the feed before users have to tap “…more.” Since short, direct captions often outperform longer ones, grab attention early by opening with the detail that matters most. Concise, hook-first captions continue to outperform longer blocks of text, especially on carousel posts where users are already interacting with multiple frames.
- Use hashtags strategically: To increase visibility beyond your followers, aim for three to five relevant, popular hashtags for your post. Try mixing broad tags (#FallStyle) with niche or timely ones (#NYCFashionWeek) to balance discovery and relevance. Just don’t forget to refresh your list often so you’re not recycling the same set.
- Tag people, brands and locations: Every tag adds another discovery path. For example, a restaurant that tags its chef and a featured farmer—and takes the time to hit “add location”—increases its chances of showing up in new audiences’ feeds.
Not all hashtags drive the same results. Some are better for boosting impressions, while others fuel more meaningful actions like profile clicks, saves or shares. To see what’s actually working, review your post-level performance data.
Want to see which hashtags are actually driving results? Sprout’s post-level performance reports—available on the Essentials plan—let you track impressions, engagement and profile clicks for every post so you can double down on what’s working.
How to post Stories on Instagram
Stories sit at the top of the app and disappear after 24 hours (unless you add it as a highlight). Compared to feed posts, they appear more casual and are more effective for real-time sharing. These attributes make them a powerful tool for community building.
Smaller accounts in particular see strong results from Stories. Stories remain an effective format for community building because they encourage quick, casual interactions and give brands more opportunities to engage audiences in real time.
Here’s how to post Stories on Instagram:
Select media and design your Story
To create a Story, open Instagram, tap the “+” icon and select “Story” from the bottom of the page. From there, hold the shutter button to record a video or tap it once to take a photo. If you already have content saved, swipe up (or tap the gallery icon in the bottom left) to upload it from your phone’s camera roll.
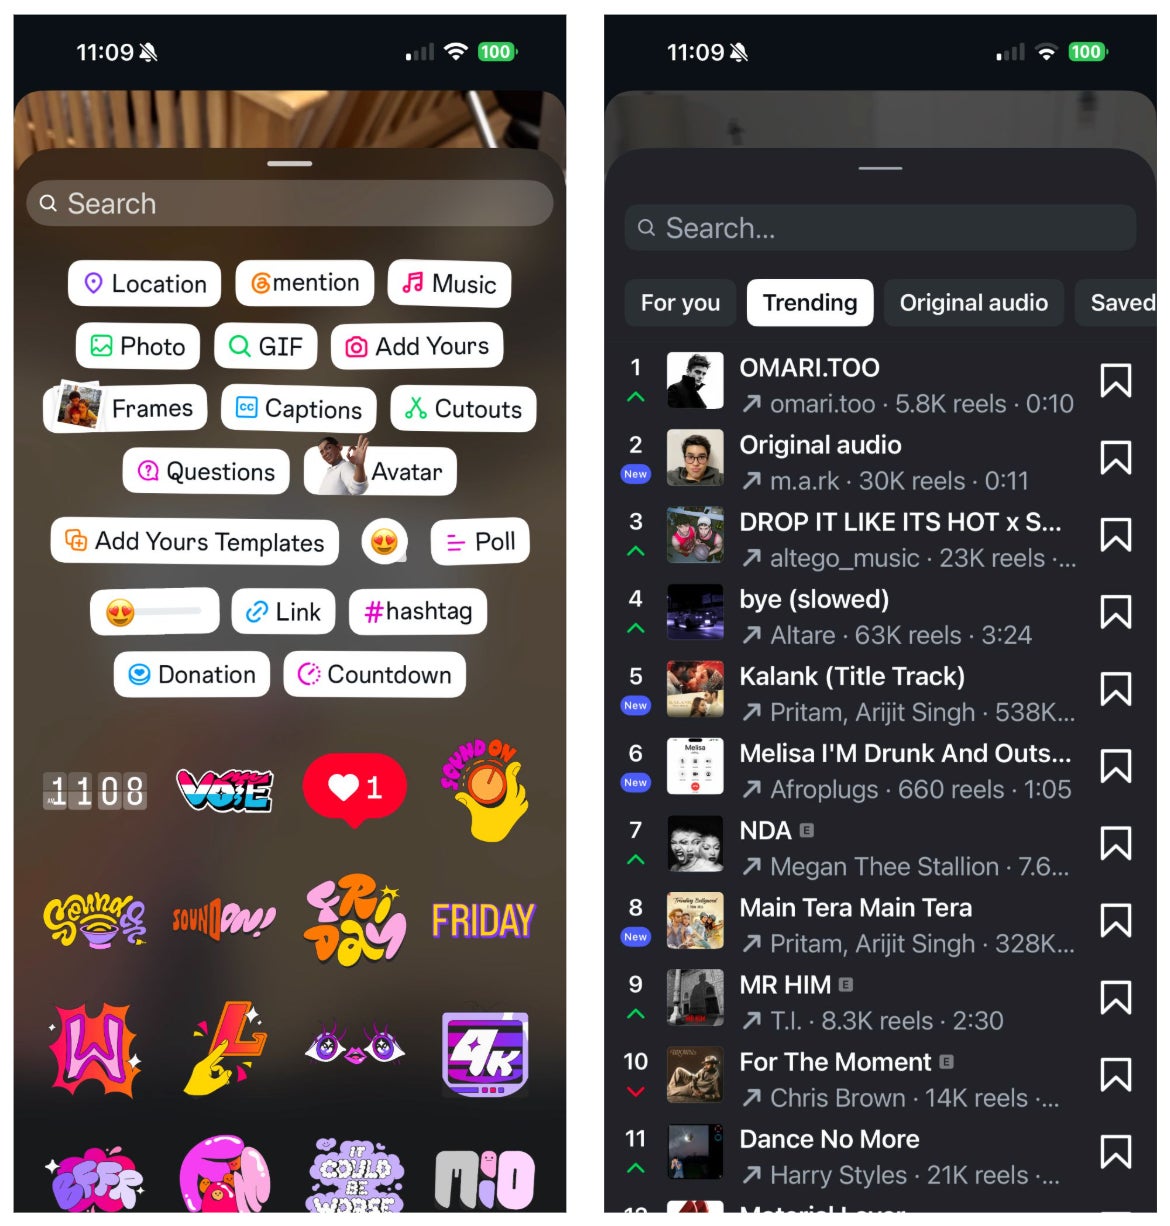
Once you upload your Instagram Story, you’ll get access to the following creative tools to invite participation:
- Polls to gauge audience opinions
- Questions to spark conversation
- GIFs and stickers to add personality
- Music to set the mood
Brands often use these features to turn a passive view into an active interaction.
This simple interaction makes the Story more engaging and gives the brand instant feedback.
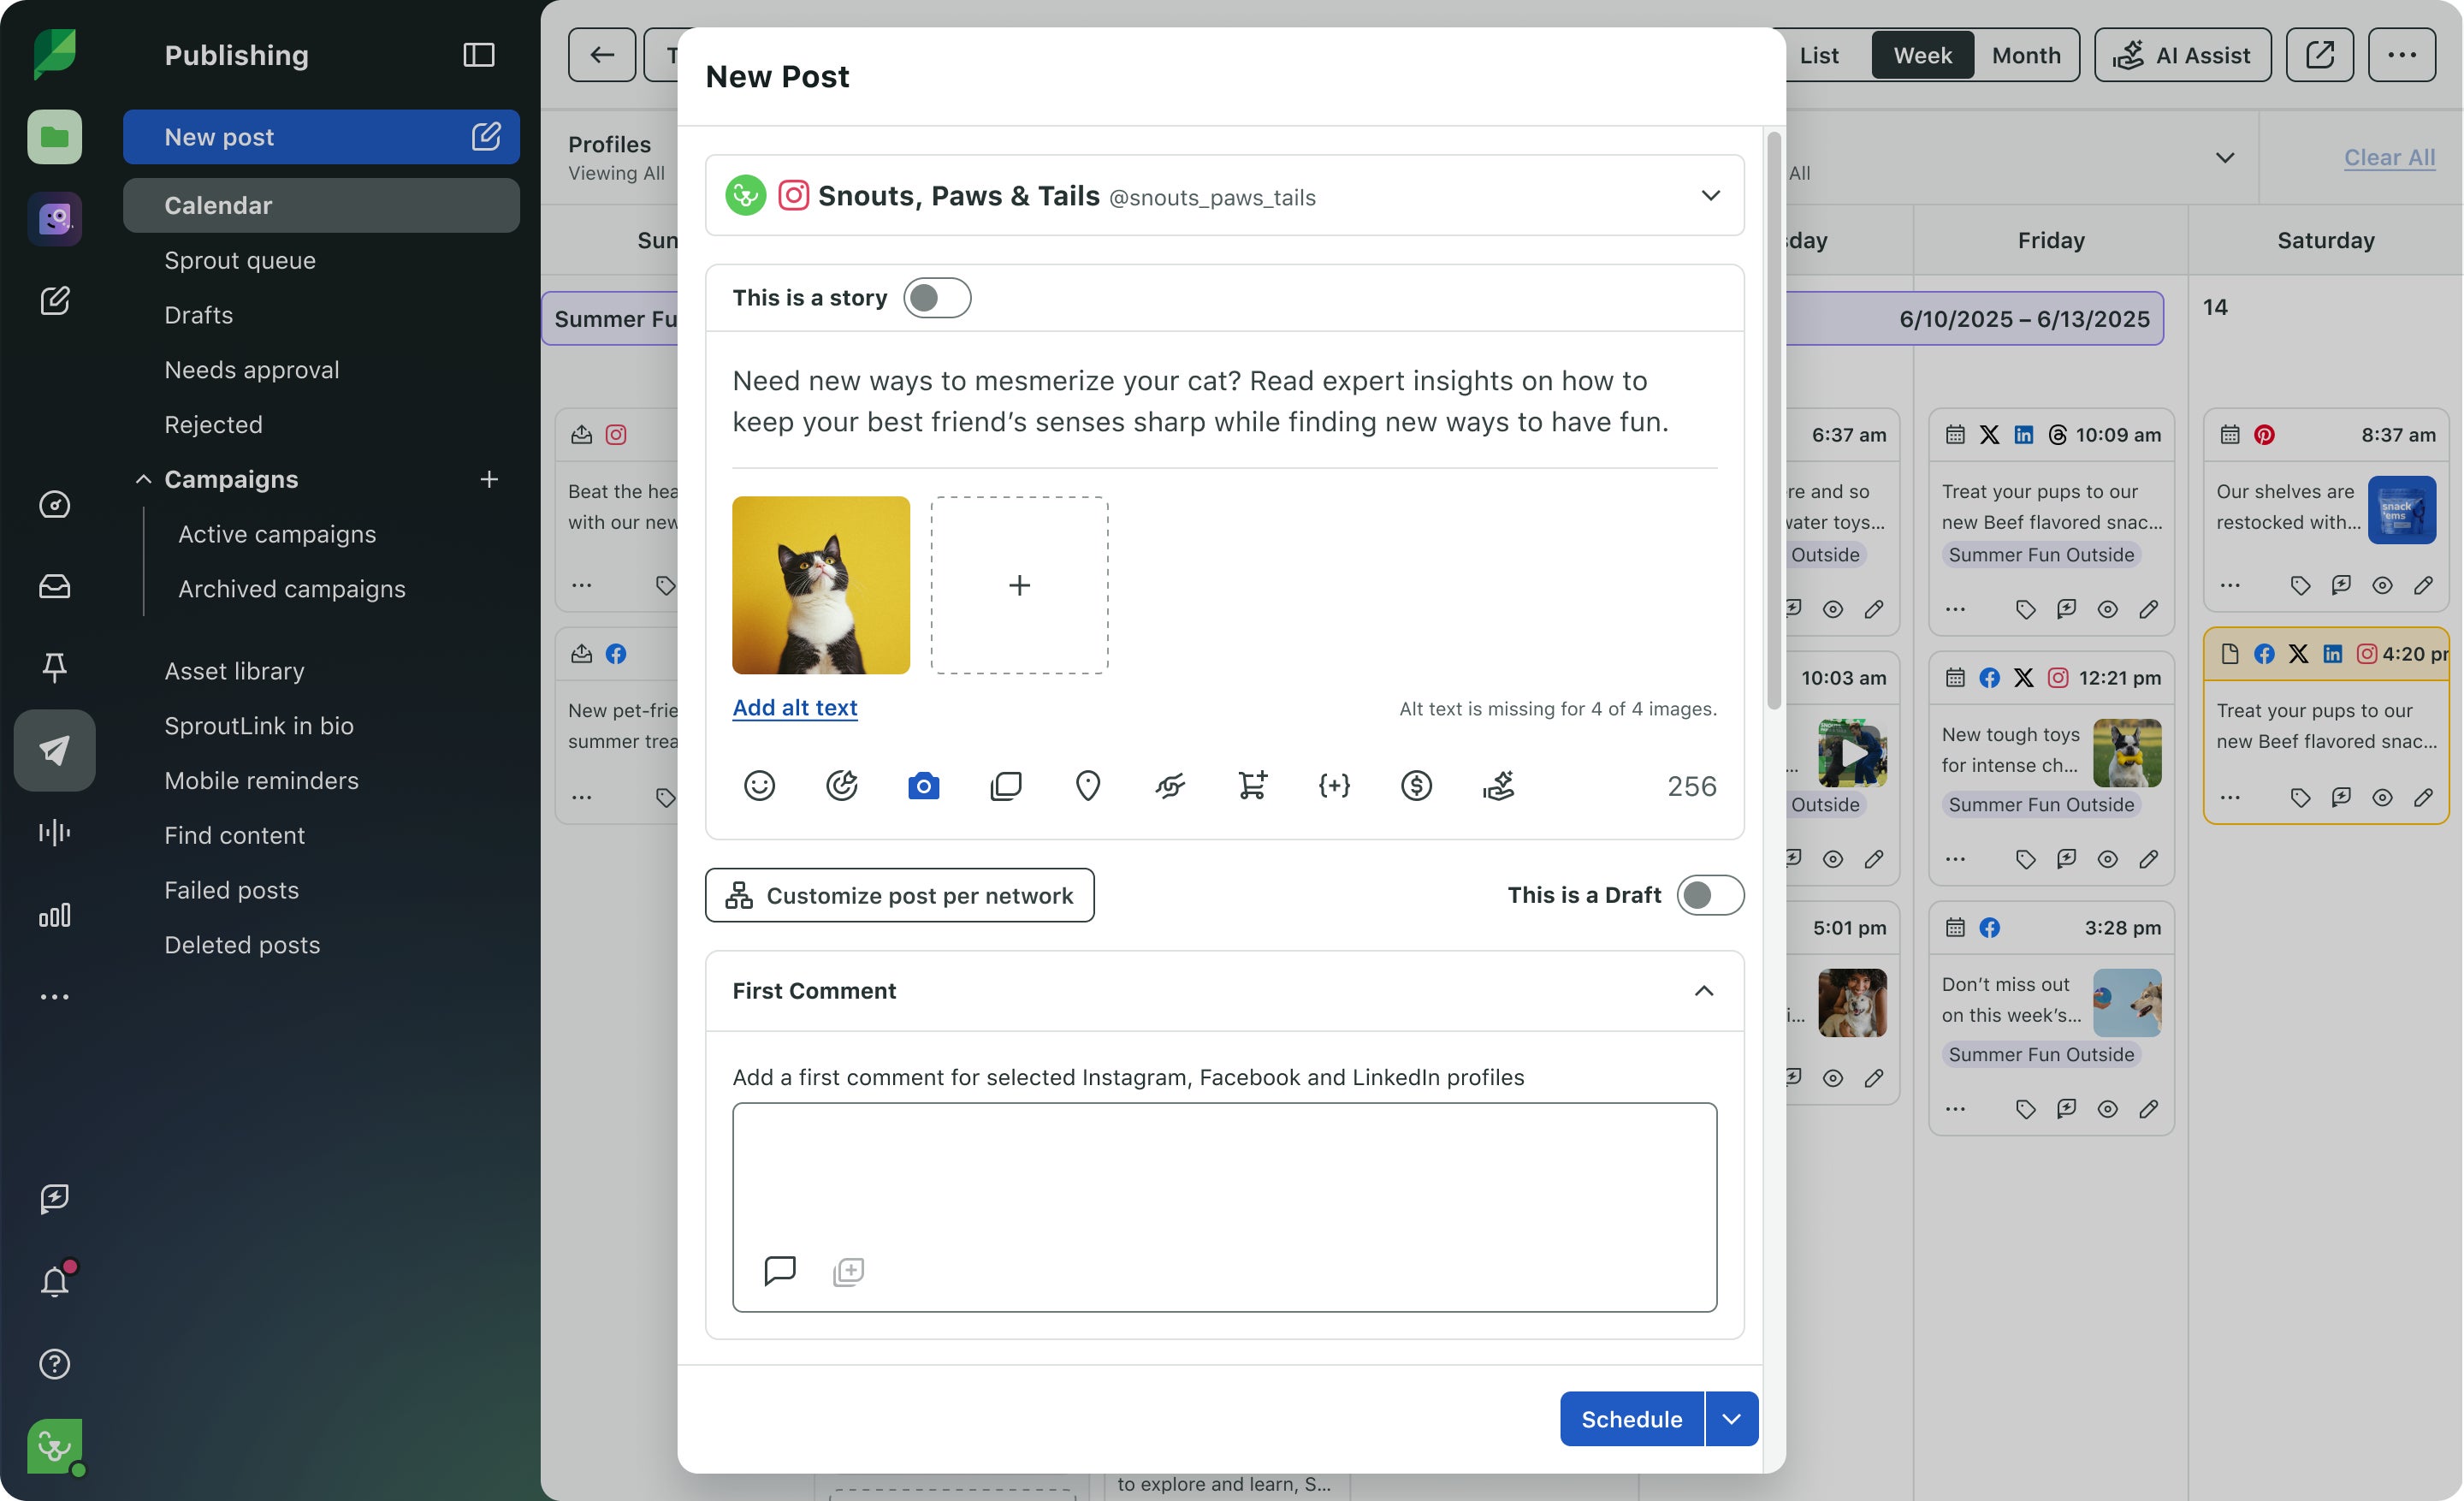
And with Sprout’s Compose editor and content calendar, you can plan and preview Stories before publishing to eliminate last-minute edits and guesswork.
Make your Stories accessible
Stories reach wider audiences when they’re accessible by giving people different ways to engage. For example, many users scroll Stories in public with sound off and others rely on screen readers to interpret visuals.
Here are some tips for making Instagram Stories more accessible:
- Add captions to all videos so the message is clear, even without audio.
- Write alt text for images so screen readers can describe them.
- Stick to the right file specs to avoid awkward cropping or cut-off text. Stories should be vertical, with a 9:16 aspect ratio (1080 by 1920 pixels).
Publish and highlight your Stories
Once your Story is ready, tap the arrow to share it directly.
Stories automatically disappear after 24 hours, but you can save your best ones in highlights (found under your profile bio). Brands often group highlights by themes like “New Arrivals,” “Events” or “FAQs.”
For individual users, posting is simple. But when teams are involved, with different people creating, editing and publishing Stories, the risk of mistakes increases. For solo marketers, Sprout’s Compose editor and content calendar keep your Stories organized and on-brand.
How to post reels on Instagram
Instagram reels can now be up to 20 minutes long and Sensor Tower reported that Reels accounted for 46% of time spent on Instagram in the U.S. in 2025. But they are known for being used as a form of short-form content, designed to grab attention with music, effects and quick edits. For reels 3 minutes or shorter, they also will show up in the Explore and Reels tabs, giving you more ways to reach people who don’t follow you yet. Unlike Stories, reels remain on your profile instead of disappearing after 24 hours.
Here are step-by-step instructions to help you post reels on Instagram:
Choose your clips and design your reel
Open Instagram, tap the “+” icon, then select “Reel.” From here, you can either record video in the app by holding the shutter button or upload existing clips from your phone’s gallery.
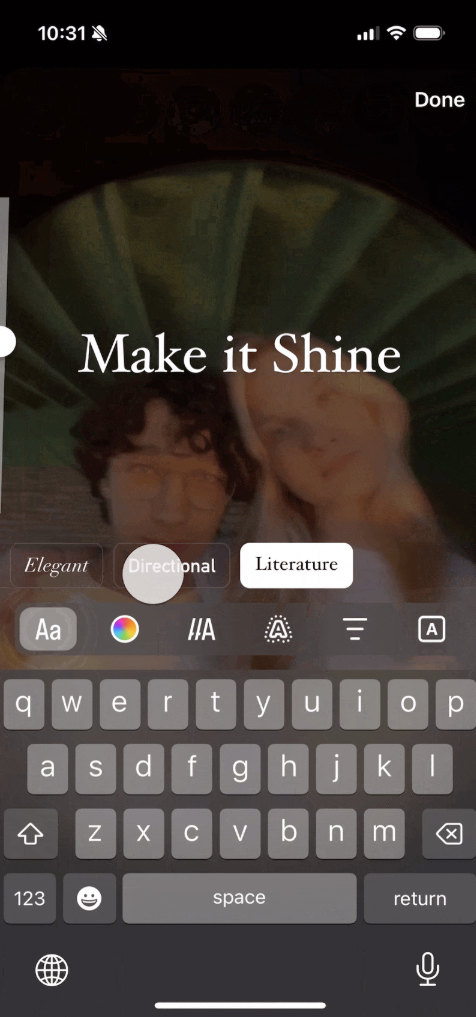
After you choose your footage, Instagram gives you a full set of editing tools to shape the final piece. You can trim and reorder clips to control pacing or merge multiple shots into one seamless video. For audio, you can add trending sounds from Instagram’s library, include your own original audio tracks or create original voiceovers.
Source: Instagram
Once your basic edit is in place, you can layer on effects, stickers or text overlays to emphasize important details or clarify anything that might not be obvious from the visuals alone. When everything’s ready, select a cover image to represent your Reel in your grid. A clear, well-framed cover will make your profile look organized and encourage more people to tap and watch.
Create engaging captions and hashtags
Even the best video needs context. Strong captions help highlight key takeaways and guide viewers toward the next step, whether that’s saving the reel, sharing it or tapping the link in your bio.
Once your caption is set, consider discoverability. As with image posts, hashtags expand your reach beyond followers, so pair broad tags with niche ones that are relevant to your reel’s content. You can only use up to five hashtags on a post, so choose which ones are most strategic to reach your target audience for that piece of content.
For a bit of inspiration, check out the captions your competitors use or try AI writing tools to help draft caption ideas tailored to your tone and audience. If you’re on the Essentials plan, you can still schedule your first comment with a block of hashtags directly from Compose — a simple way to boost discoverability without cluttering your caption.
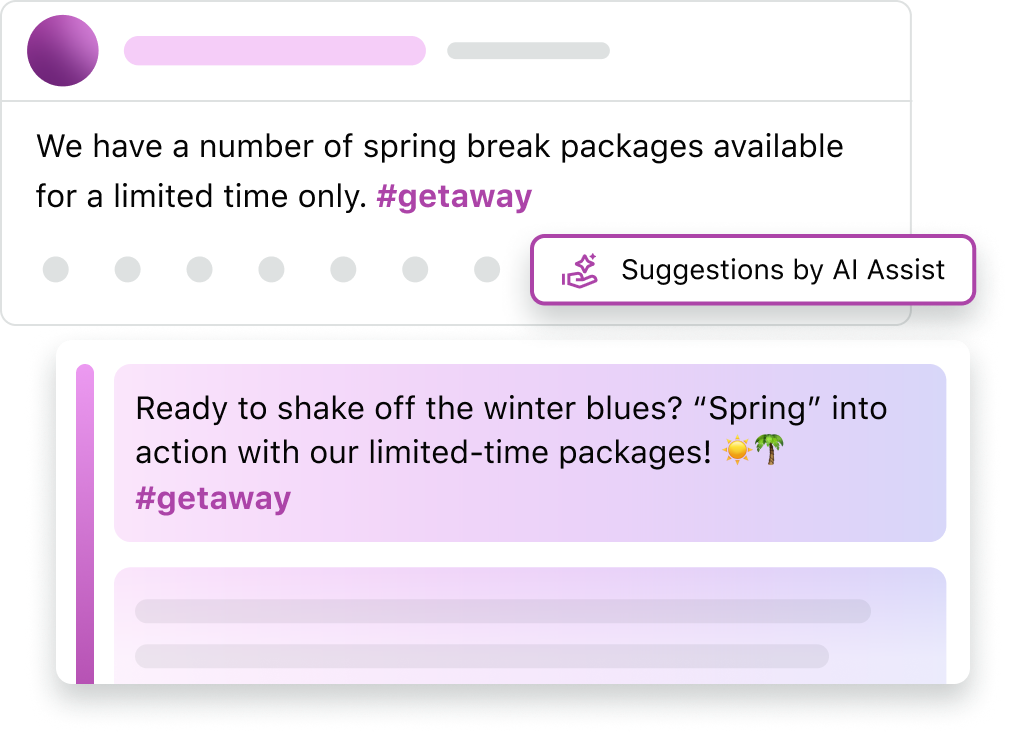
Not to mention, Sprout’s AI Assist, available on Professional plans and above, can generate caption or hashtag options tailored to your tone and brand fit.
Choose the best time to publish
Timing also matters. If you publish when your audience is inactive, the feed can bury your Reel before it has a chance to gain traction. Posting during peak activity windows increases the odds that Instagram’s algorithm will push your video further, giving it more reach in Explore and beyond.
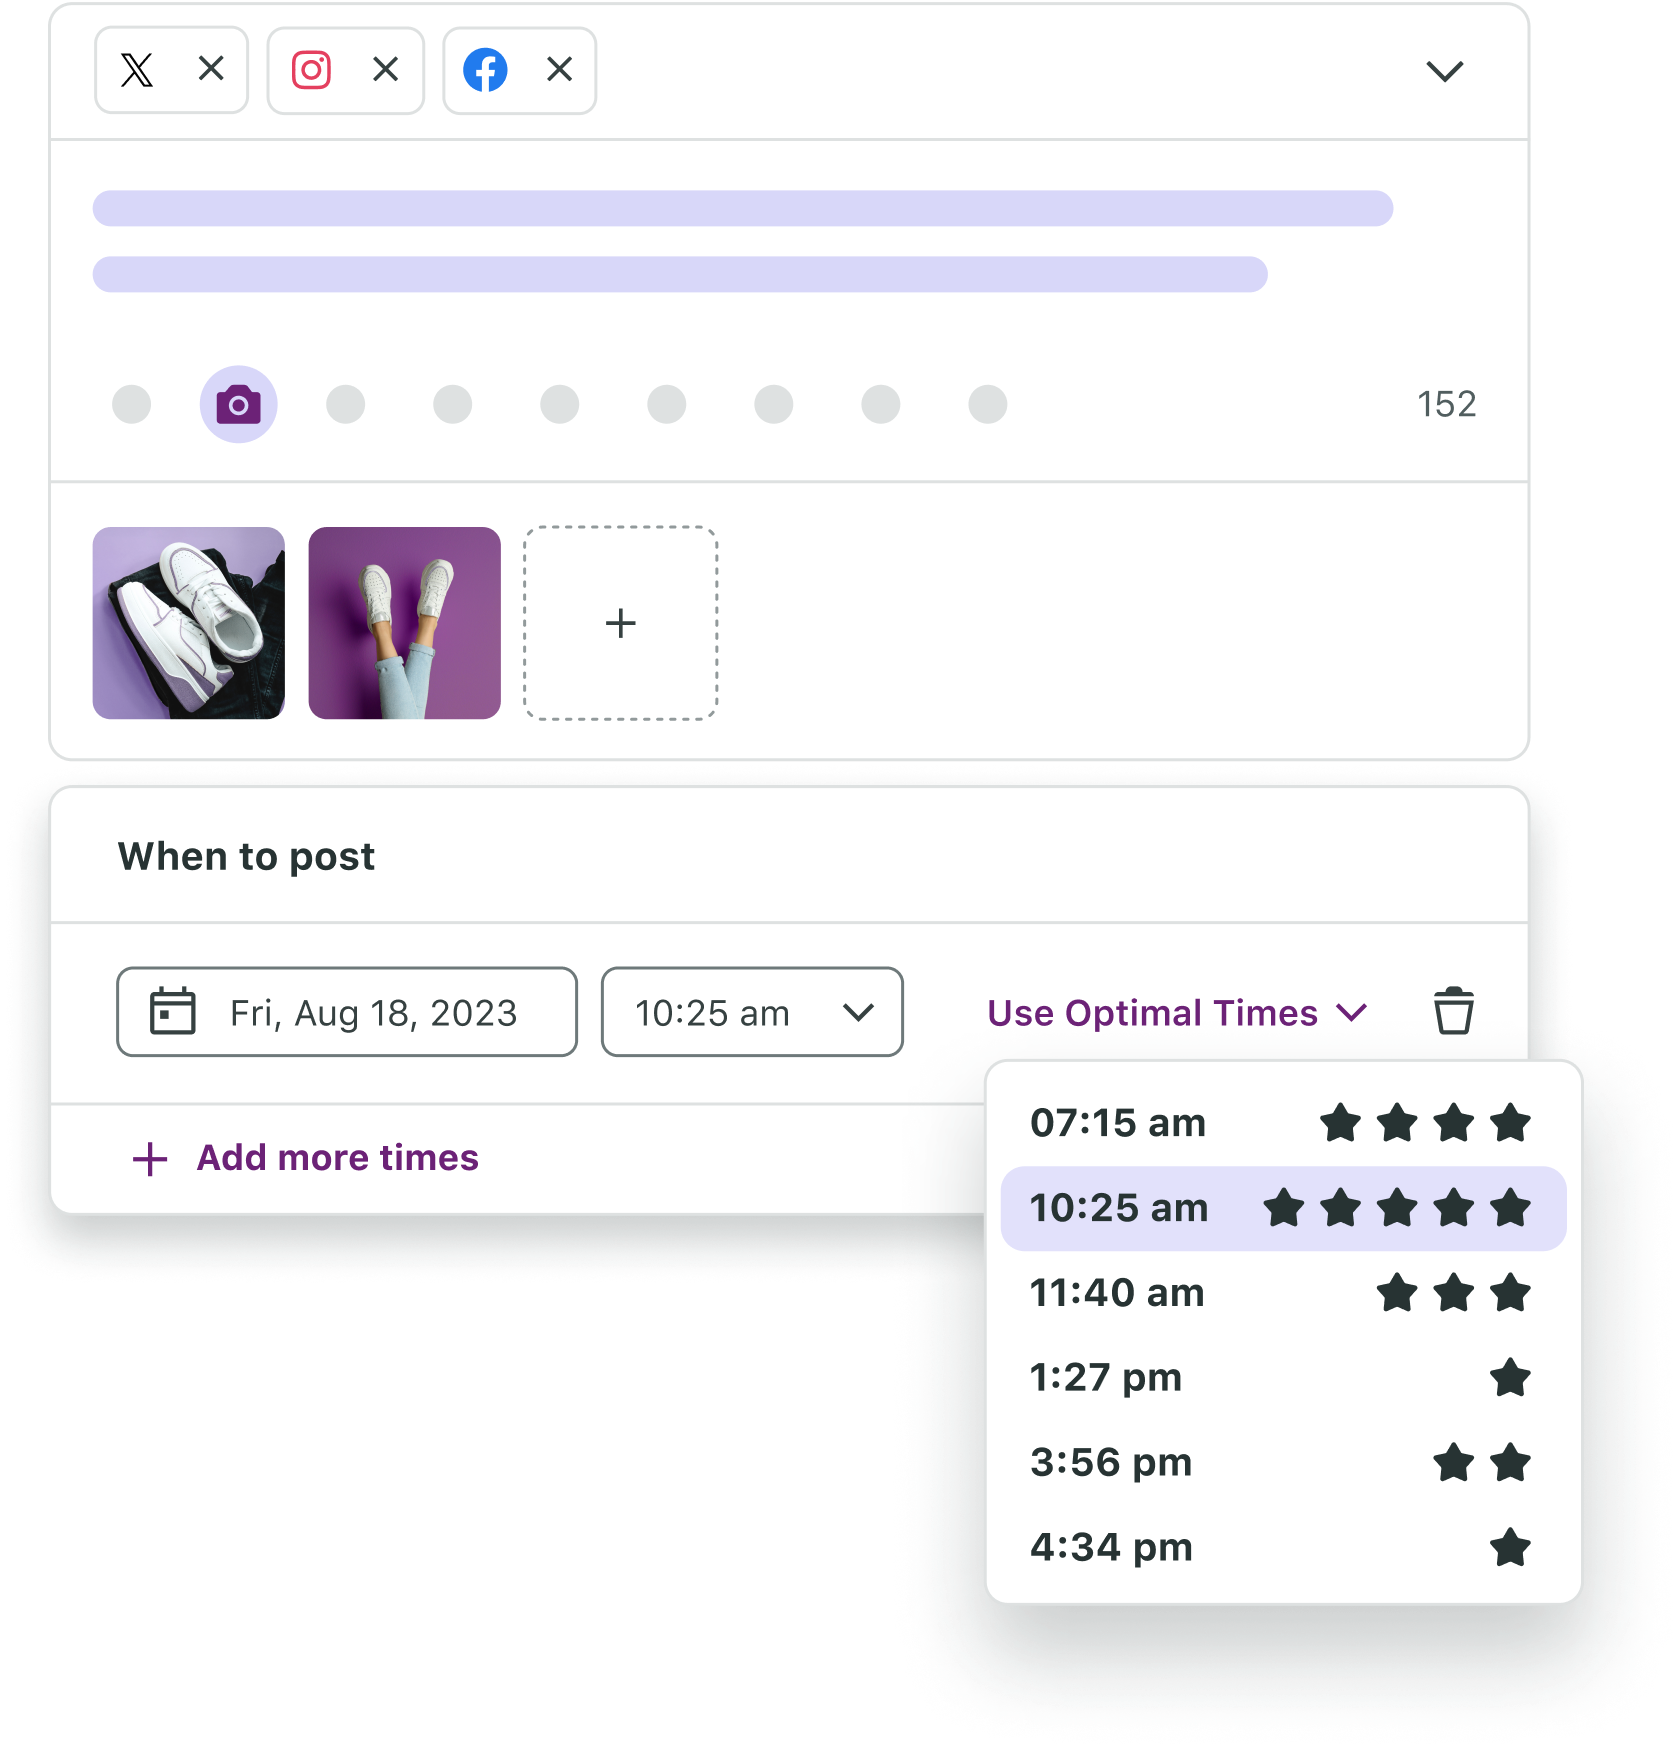
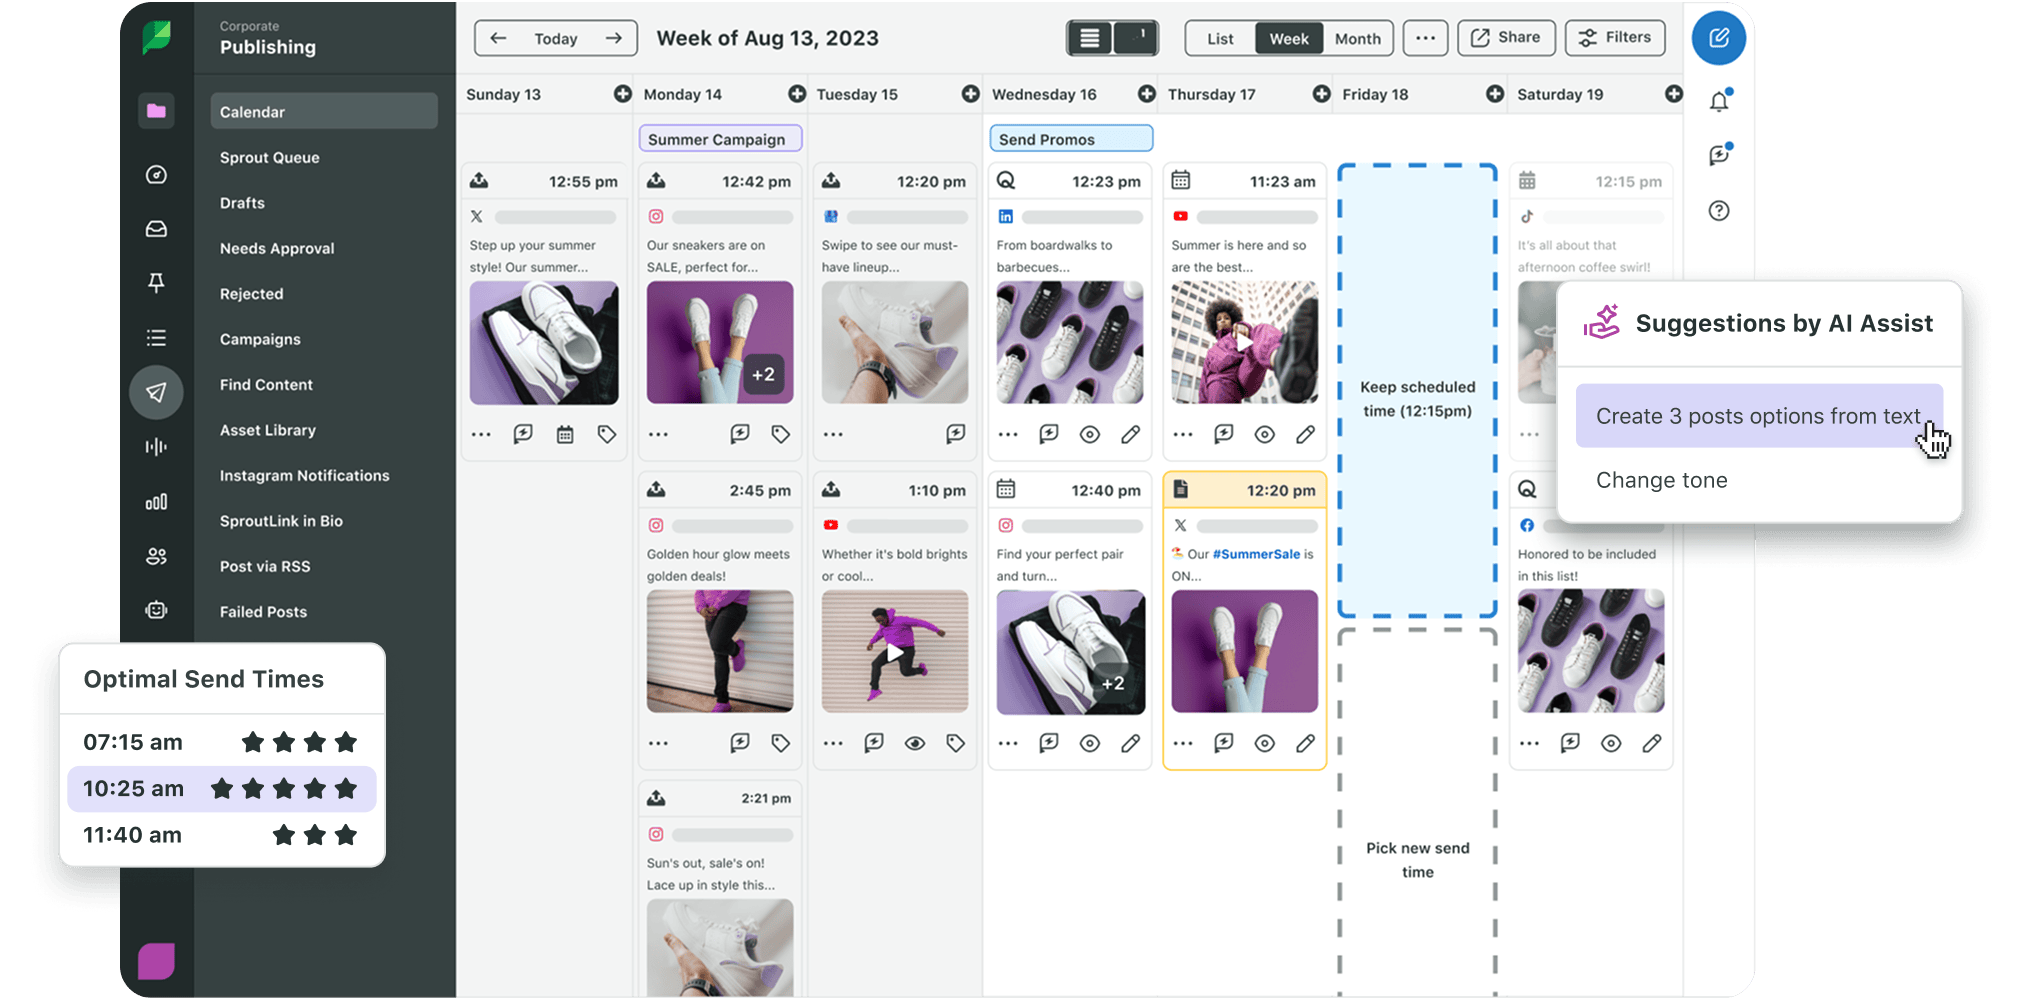
Rather than guessing the best time to post on Instagram, use social media tools with features like “Optimal Send Times” to analyze when your followers are most likely to engage. With Sprout Social, you can drop posts into the Sprout Queue and let the platform auto-publish at optimized times without manually picking timestamps.
Both Optimal Send Times and Sprout Queue are included on Sprout’s Essentials plan, so you don’t need a premium subscription to publish smarter.
How to boost your engagement and reach on Instagram with Sprout Social
If you’re still publishing straight from Instagram or Meta’s native tools, you’re likely leaving reach, consistency and growth on the table.
To centralize publishing, scheduling and reporting into one place, it’s best to leverage an intuitive social media management platform like Sprout Social. With everything in a single workspace, you can post at the right times, maintain a consistent feed and measure what’s working without juggling different apps.
Sprout Essentials
Here are some ways Sprout Social helps you boost your engagement and reach on Instagram:
1. Post when your audience is most likely to engage
Instagram’s algorithm prioritizes recency, so publishing when your audience is online gives you a better chance at surfacing in their feeds.
The challenge is knowing exactly when that window is. Sprout’s Optimal Send Times analyzes up to 16 weeks of your engagement data and recommends time slots when your followers are most active.
2. Publish Instagram-native formats
Instagram rewards brands that lean into its various formats (reels, carousels and Stories) because they keep users engaged.
For brands posting at scale, managing all of these formats can be tricky. Scheduling tools like Sprout make it easier by letting you plan reels (with cover images and captions), carousels (up to 10 images or videos) and standard posts in advance. You can also plan Stories on desktop, then publish via mobile notification at the right moment. This approach streamlines your workflows into one place while respecting Instagram’s API rules.
3. Curate a feed that looks intentional
Your grid isn’t just a collection of posts, it’s your digital storefront. According to the 2025 Sprout Social Index, 65% of consumers say they’re more likely to interact with brands that maintain a strong, consistent presence on social media, highlighting the importance of posting high-quality content regularly.
To maximize the impact of your content, use Sprout’s content calendar to visualize your publishing cadence and ensure your seasonal campaigns don’t clash with evergreen content.
According to Sprout research, 65% of consumers say they’re more likely to interact with brands that maintain a strong, consistent presence on social media.
4. Nail the hashtag and first-comment strategy
Hashtags are still one of the simplest ways to boost discoverability beyond your existing followers. They can help your content surface in searches, show up on explore pages and join trending conversations. But managing hashtags well, including deciding which ones to use and avoiding repetition, can be a challenge.
Scheduling tools simplify this process. In Sprout, for example, you can schedule the first comment, which is especially useful for dropping in a block of hashtags without cluttering your caption. You can also reuse saved snippets directly in Compose, making it easier to apply hashtags systematically instead of recreating them for each post.
5. Prove what’s working and double down
Gut feelings aren’t a strategy, meaning you need data to guide decisions. Recent research backs this up. Rival IQ’s 2025 Benchmark Report show Reels and carousel posts consistently generating some of the strongest engagement rates across industries compared to standard video and static image posts.
To make data-backed decisions to inform your Instagram content strategy with confidence, you need visibility into your own performance. Sprout’s group, profile and post-level reports—included on every plan—let you track what’s driving results.

Turn your Instagram strategy into impact
Posting on your Instagram account is no longer just about getting content out quickly. To grow, you need to combine the following strategies:
- Publish at peak times.
- Keep visuals consistent and accessible.
- Use captions, hashtags and tags to boost discovery.
- Track what’s working and double down on formats driving reach.
Managing all this, especially as a team, can be overwhelming. Sprout Social streamlines the process by centralizing your planning, publishing and reporting in one intuitive workspace. This helps you build efficiency and deliver consistently polished, on-brand content.
Whether you’re a solo marketer looking to centralize your Instagram workflow or a growing team ready to scale, Sprout has a plan designed for you. Try Sprout Social’s free 30-day trial today–no credit card required.
The post How to post on Instagram: A step‑by‑step guide for feed, Stories and reels appeared first on Sprout Social.
from Sprout Social https://ift.tt/ajzQ32K
via IFTTT
No comments:
Post a Comment