Today, brands’ front doors are their social media profiles—and you, the social media managers, are the gatekeepers. That is not an easy job.
Building an impactful, holistic social presence takes time, research, creativity and constant innovation. On top of that, you’re inundated with unexpected crises, emotionally charged consumer messages and constant change in social media trends. And you can’t just sign off or take a social media detox when the work becomes overwhelming. This constant balancing act can lead to social media managers reaching their breaking point.
According to Sprout Social data, 40% of social pros say they experienced burnout recently.
What I am here to tell you is that battling social media burnout does not mean you are incapable of doing your job. It does mean you need to ask for help and learn how to tell your boss you’re overwhelmed. In this article, we’ll explore ways to have effective conversations about burnout with your boss, and we’ll provide specific prompts to help you get started.
How to discuss burnout with your boss: Don’t suffer in silence
Your boss likely has lots of things competing for their attention, so they may not be aware that you’re struggling unless you speak up. And while it may be intimidating to start the conversation, a lot of good can come from leveling with your supervisor and being honest about the challenges you face in your role.
An executive decision was made today. NOPEvember will also include a full social media detox. I have reached full burnout where everything is 2 seconds away from making me either upset, sad, or annoyed. I need a mental reset from everything. #nopevember#noworknovember
If you’re feeling overwhelmed at work, talking to your boss about burnout will help you challenge assumptions about your role and responsibilities and bring any invisible expectations to light.
For instance, are you overscheduling yourself? Why do you feel the need to work to the point of burnout? Does your boss know that you’re working late every night? Do they actually expect you to be able to respond to messages immediately or is that an expectation you put on yourself? Uncover those answers so you can recalibrate if needed.
Most, if not all, managers have been through a period of burnout themselves. In that case, they’ll have empathy for your situation as well as advice to get you back on track.
Only 29% of social media marketers say they are most comfortable talking about burnout with a direct manager.
Having a vulnerable conversation is an opportunity to set new norms with your manager, like being transparent about your state of mind, feeling comfortable expressing blockers or even saying no when you don’t have the bandwidth.
Get the ball rolling
When you address burnout with your manager, you’ll need to get specific and provide context to help them understand what spurred on what you’re feeling. Here are a couple questions that can help you get to the root of the problem:
What are your top priorities right now?
What is holding you back from focusing on big picture projects?
What is the most mentally draining aspect of your job?
What tools or resources do you need to do your job more effectively?
How do existing processes or management styles contribute to burnout?
Is personal stress carrying over to work?
With an understanding of what challenge(s) you’re trying to solve, you can start the conversation with your boss more effectively. And prioritization will help you more easily juggle your tasks in the long run.
When you’re ready to talk, it’s best to do it in person or via video call whenever possible, but getting it on your boss’s radar can start in writing with an email or Slack. Here are a few ways you can kick it off:
I’ve been overwhelmed by the volume of messages I’ve been managing lately. Do you have time to chat about it this week?
A lot of our recent projects have been really urgent. In our next one-on-one meeting, could we talk through top priorities?
I’ve been putting out a lot of fires on social lately and it’s becoming unsustainable. Do you have time this week to chat about how we can get ahead of crises?
How to tell your boss you’re overwhelmed: Propose solutions and demonstrate your value
Approach your conversation with some solutions in mind. Think about what “better” will look like for you. Maybe that’s more time to focus on big picture projects, minimizing working after hours, new resources to manage your workload or more open communication between you and your manager.
You’re not going to fix burnout in a single conversation, so start with a realistic and specific goal for your meeting. It will vary for each individual but here are a few suggestions:
Align on priorities and expectations
Implement a new or different process
Determine where you need more support and identify teammates or external resources, like a temp or contractor
Develop or reorganize timelines
Communicate roadblocks
Remember, the focus of your conversation should be on the impact your burnout has on not only you, but your team and business. You want to have a productive conversation, not a vent session. This is more likely to happen when you can show how burnout directly impacts your productivity, focus at work, the rest of your team and overall marketing goals.
For example, you might say, “I’ve been unable to contribute to the business from a strategy perspective because I’ve been focused on execution and responding to inbound messages. If I had more time to hone in on our social data, I could bring really beneficial insights to the rest of the organization.” Showcasing how much more impact you could have on top line goals will inevitably pique your boss’s interest and make them invested in your recovery from burnout.
While you should have an idea of what might fix the problems at hand, the onus is not solely on you. Your supervisor can and should help solidify the proposed solutions. At the end of your conversation, reiterate your plan of action to your manager and clarify any remaining confusion or concerns.
Follow through and follow up
Once you learn how to discuss burnout with your boss and enact your agreed-upon plan, be patient with yourself. Immediate relief is not guaranteed. When you feel like you’ve had enough time to make an assessment of how things are going, set aside time to reflect. What’s changed since you spoke with your boss? What is working? What is not?
If you’re still struggling after some time has passed and the solutions you came up with aren’t providing relief, don’t get down on yourself, clam up or accept defeat. You’ve already taken that first step—make it a point to follow up with your manager, continue the conversation and build off what was discussed initially. Together, you can decide how to tweak your original plan of action if it hasn’t been effective.
Lastly, follow up even if things are working! Your boss will want to know that you’re feeling more productive, supported and revitalized.
Get the support you deserve
Burnout is very real and pervasive in the social media marketing community. Restoring balance in your work life might feel like a big to-do when you’re burnt out, but you don’t need to go it alone. Communicating your struggles to your boss is brave, bold and the best way to get back on track.
If you’re having these conversations and things aren’t getting better, your boss isn’t as receptive as you’d hoped, you don’t feel psychologically safe at work or you’re in need of more mental health support, here are a few resources that may help:
If managing multiple social media accounts is contributing to your burnout, we think Sprout can help. Sprout can help alleviate some stress by streamlining your processes and improving efficiency so you can empower your social teams.
What does it mean to have exceptional customer service? Automated phone systems? Website chatbots? Help guides? These ease your customer support teams’ workload, but they don’t always cater to the needs of your customers—especially if they have a unique or urgent issue. When this happens, they don’t want to click through a series of irrelevant options or read through useless FAQs.
They want to speak to a human as soon as possible, and guess where they go to achieve this? Social media.
The number of US social media users is expected to surpass 308 million in 2023 (up over 6 million from 2022 projections). So brands—now’s the time to build a social customer care strategy (if you don’t already have one).
Not sure where to start?
In this piece, we’ll discuss leading social media customer service statistics and how to use them to build stronger relationships in 2023.
How do customers use social media for support?
Brands have several options for delivering customer support, but the one that appeals most to consumers is social media. From 2020 to 2021 alone, the volume of consumers who preferred using social messaging for customer service jumped an impressive 110%.
As customers continue to flock to social for their support needs, it will take more effort to maintain speedy social media response times. Be careful—if you fail to offer timely resolutions on social, almost half of consumers may unfollow your brand. Even worse, over a third will talk about the experience with their family and friends.
So how are customers using social channels to receive support from brands?
“About 70% of my customers reached out to me through social media channels, the other 30% by email,” says Zoila Streich, Co-Founder of Independent Fashion Bloggers and former fashion business owner. “Most questions are about product availability and payment methods, but a few are feedback about the products or the buying process.”
You’ll also find customers using it to report service outages:
Good afternoon lethal Energy,
Thank you for contacting Mediacom with your concerns. We're sorry for any interruption of services that your power company caused and we are happy to help where we may. Can you DM us if you are experiencing any other issues currently? ^JJ https://t.co/oiNdqufxNq
Or to point out issues with shipments and deliveries:
@ReserveBar I have a problem with a recent order. I emailed Customer Help and waited, but no response. I then opened a ticket. Still no response. I know the holidays are busy. Still, I would like to have my issue resolved. Can you help?
Thank you for taking time out of your schedule to share your satisfaction and appreciation with us, kindness such as yours really does make a difference to our employees! Kind Regards,
Tammi | Pottery Barn Social Media Team
Make sure to prepare for the ebbs and flows of incoming customer support requests. New product launches or promotions lead to an influx of sales, which means more opportunities for inbound questions, so have your social media presence properly staffed.
“The volume of customers using our social media customer support fluctuates between 40% to 60%, depending on promotions,” says Yuvi Alpert, Founder, Creative Director and CEO of jewelry brand Noémie. “Because we drive people to our social media profiles through other channels, such as our newsletter, many of the questions we receive come through those platforms.”
How important is social media customer service to consumers?
Social media has flipped the balance of power between brands and consumers. Only on social can people compare a brand’s support practices to its competitors in less than a few clicks. If a business providing similar products or services is offering better help, Sprout Social’s Index™ found that 30% of consumers say they’d choose the competitor.
The public nature of social media support has influenced many brands to rethink their roster of standard support channels. More than half say that private/direct messaging plays a role in their customer care strategy.
With social media customer service stats like these, there’s only one thing to do: improve your social media A-game, so you don’t fall into the trenches of negative reviews.
Being consistent with your customer support builds trust and loyalty. Some will even go out of their way to show their praises in public (hello, social proof).
@culvers too many times we hear nothing but negative, but I wanted to give a shout out to the Culver’s in Richland Center. The fries were perfect! Temperature, look everything! And that burger…I’m in heaven! Friendly people made my day! Good job RC Culver’s!
Having stellar customer support is essential to both customers and brands. But manually responding to every message—especially when you have multiple social media accounts and thousands of customers—is not sustainable.
With a tool like Sprout Social, customer care teams can organize and filter incoming messages across platforms, triage responses and view critical customer information all in one place.
Solo Stove chose Sprout after struggling with backlogs of customer DMs and mentions. Using Sprout’s Smart Inbox and Automated Rules, they can quickly see customer support messages based on keywords like “order status” and “shipping.”
This visibility has not only made Solo Stove’s customer care team more efficient, it also correlated with a bump in positive brand sentiment.
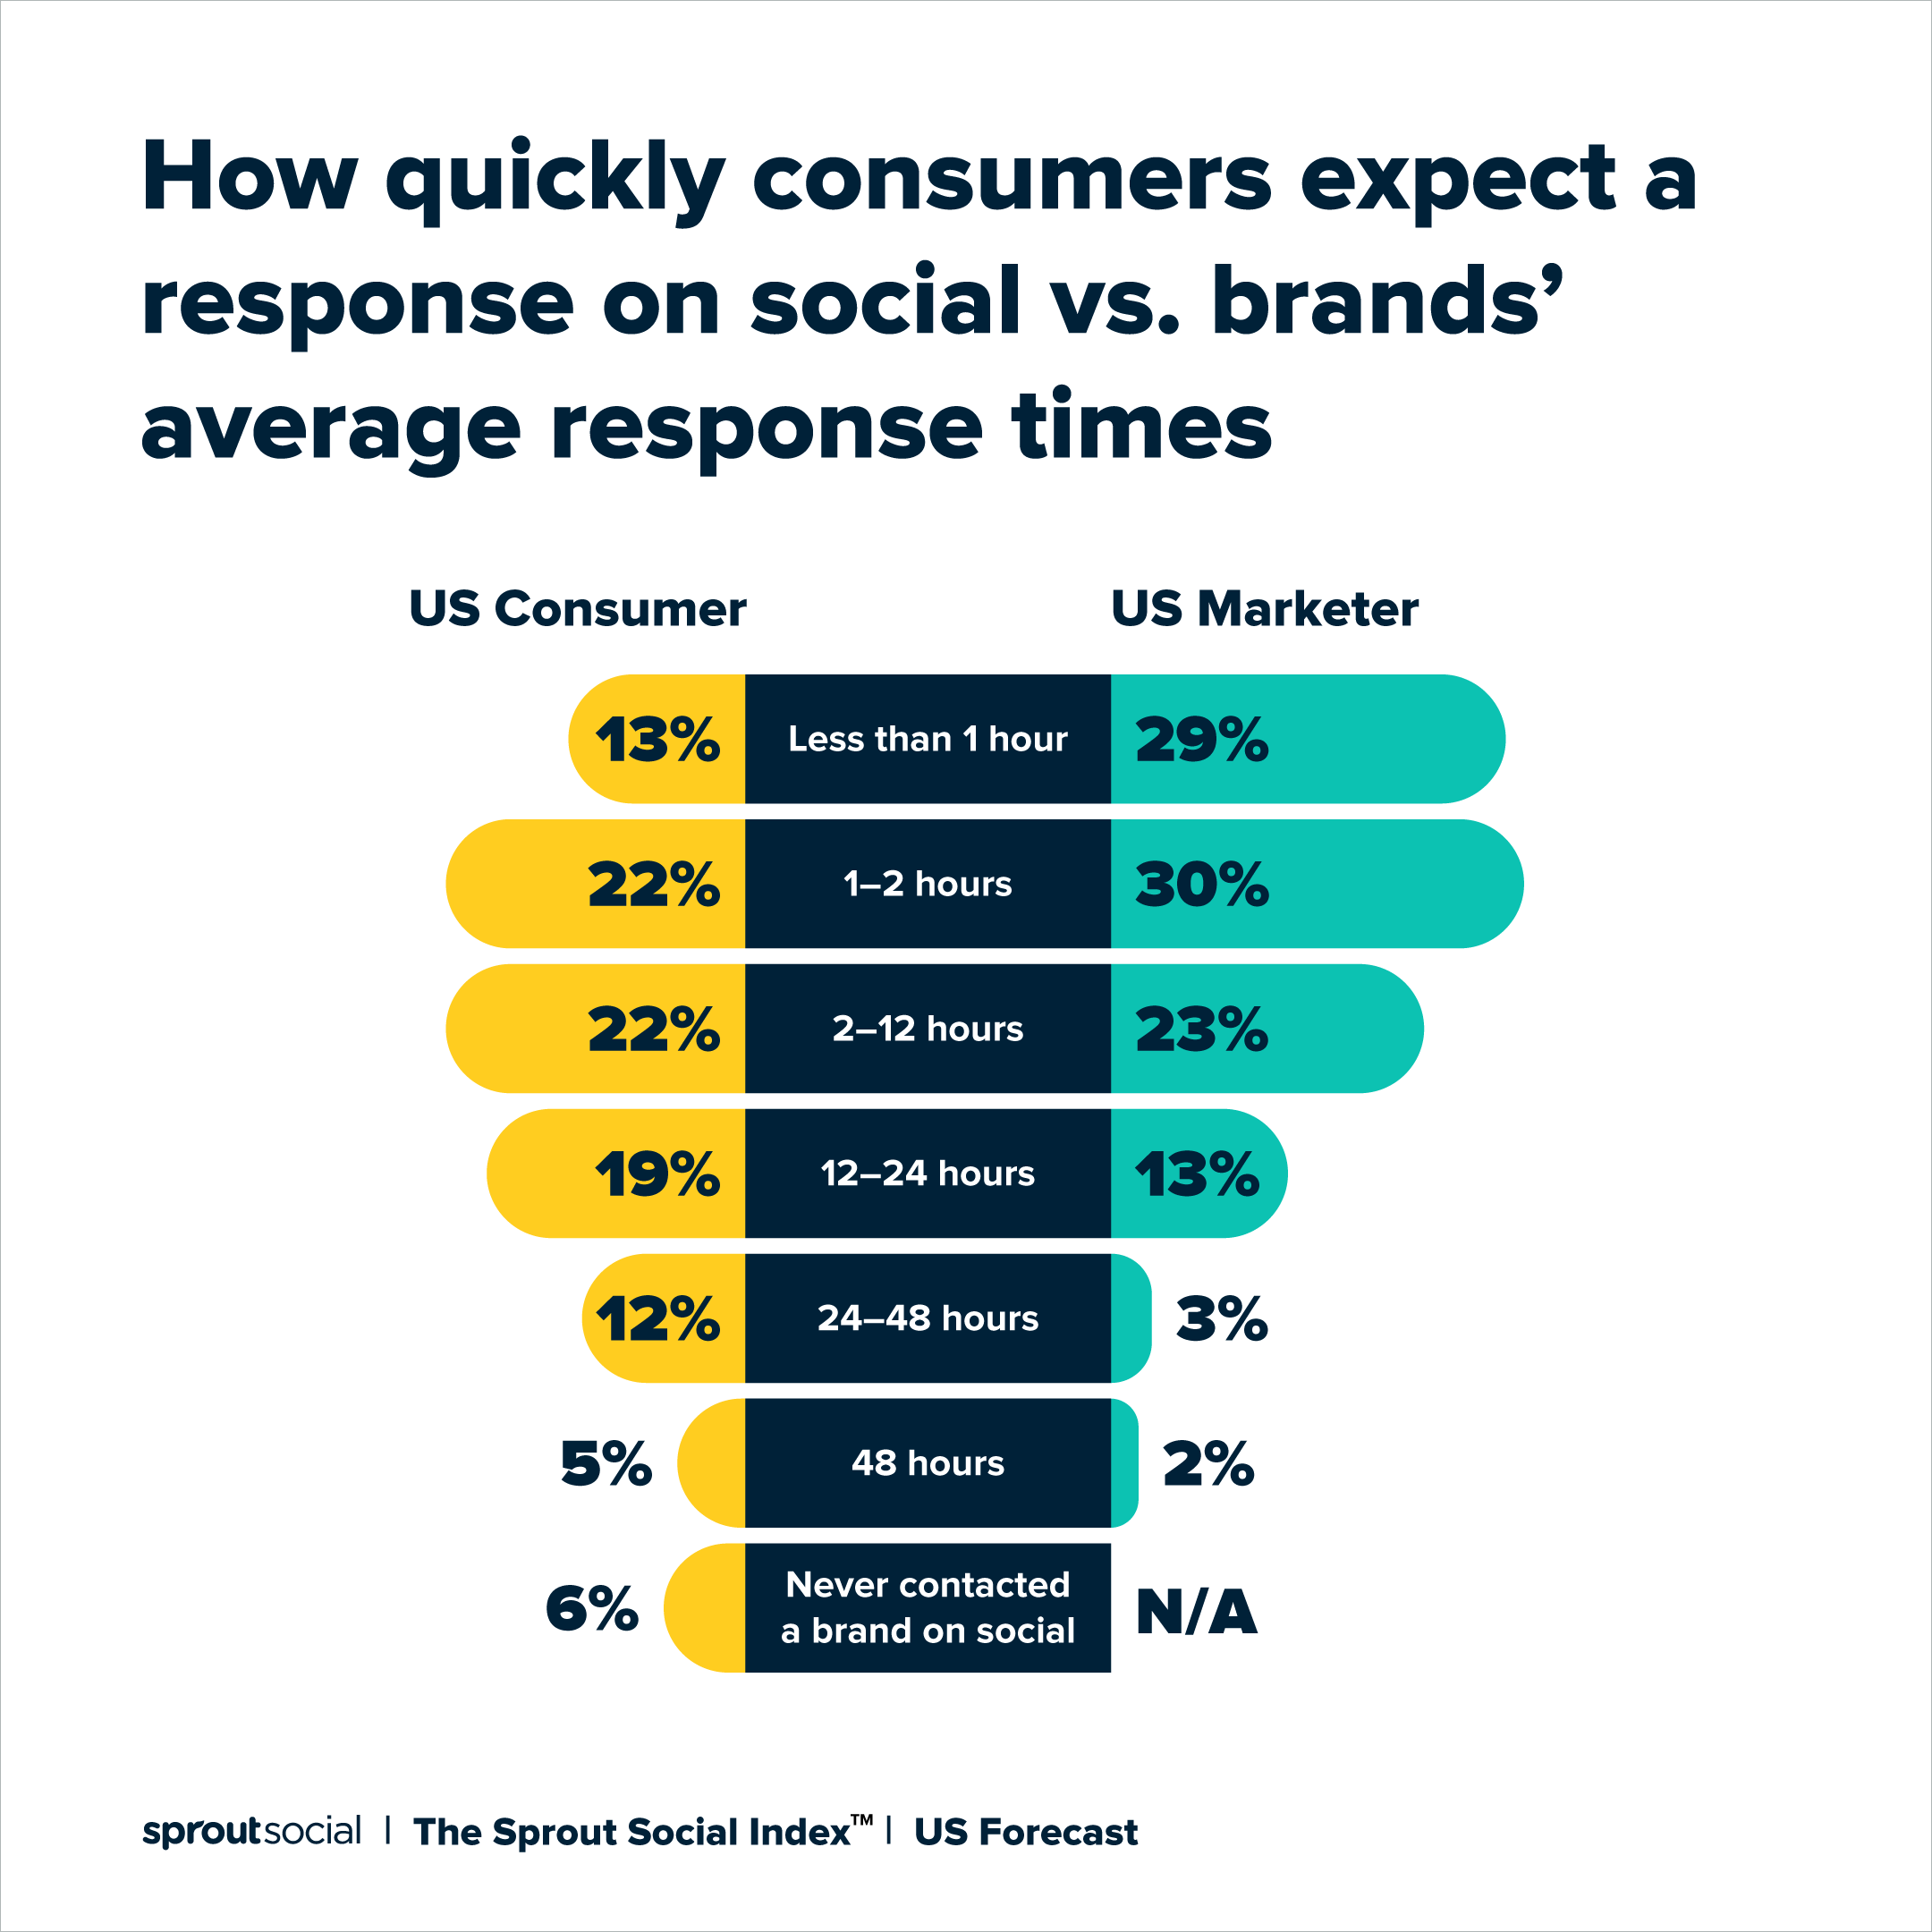
How quickly do brands need to reply to customer service messages on social?
Being present on social media is great. But having a fast response rate sets apart the “best in class” brands from the “I’m unfollowing you because your customer service is horrible” brands.
How fast is fast enough? In many cases, it depends on the industry and the situation.
For instance, Yuvi Alpert finds a day is fast enough during promotions. “It is critical that we answer those questions within 24 hours. We found that allowing more time to elapse lowers customer interest. By offering prompt responses, we see dramatic increases in sales of featured items.”
But what do customers say the proper response time is for social media customer support?
Our latest Sprout Social Index™ data found that 76% of consumers expect a reply within 24 hours on social.
At one time, taking a day or more to respond to a customer was acceptable. But now most demand instant access and gratification. And if you’re considered a high-priced product or service, then you definitely must respond quickly. One report shows customers who pay more for a service expect a higher level of social customer care.
When MeUndies set a goal of replying to all messages within a 60-minute window, they needed an alternative to responding natively through social platforms. They turned to Sprout’s Smart Inbox to get an all-encompassing view of their Instagram direct messages, mentions and comments in one stream.
Now, be mindful that a fast response isn’t the primary goal—it’s to resolve customers’ issues. Unfortunately, some brands are quick to reply but slow to resolve. And when that happens, unhappy customers will let you (and all their followers) know:
Delta is replying, but the issue is lingering too long. Address customer problems fast or risk losing current and potential customers.
Facebook customer service stats
Facebook is the number one platform where consumers follow brands, so it’s easy to reach out whenever needed. Around 69% of Facebook Messenger users say communicating with brands here builds confidence in the company.
If your customers are on Facebook, then you should be too.
OLIPOP, a tonic brand, uses Facebook to offer direct customer support. “I’d estimate at least 50% of our customers will message us questions or comment directly on our posts across Facebook and Instagram,” says Melanie Bedwell, eCommerce Manager for OLIPOP. “Ideally, we try to reply instantly, but if that’s not possible, then at least during the same day.”
Here are examples of their engagement with happy customers:
They also use opportunities to promote their in-store options (and their tool to locate one near you).
Twitter customer service stats
Twitter is where you’ll find most people headed to compliment or complain about a brand. About 64% of Twitter users even say they’d rather Tweet a brand than call them.
53% of Twitter users find it helpful to see how brands answer questions or solve issues publicly.
51% of surveyed Twitter users report their experiences communicating with brands on Twitter makes them feel more favorable toward the brand.
1 in 3 (34%) Twitter users purchased a product or service after a positive customer interaction on Twitter.
Why do people reach out to brands on Twitter? All sorts of reasons, but the most popular reasons to seek out customer service on the network are product defectiveness (37%), order issues (29%) and bad in-person experiences (29%).
While it’s great to have this two-way communication with customers, a customer service-filled feed can distract from other campaigns and promotions your brand is trying to highlight. This is why some brands stand up separate Twitter accounts dedicated to customer care.
“Businesses use social media for a variety of purposes, including marketing, engaging with customers, interacting with influencers and more,” says Keenan Beavis, founder of Longhouse Media. “That’s why having a distinct social media account dedicated to customer support inquiries is so important. You don’t want your advertising, likes and shares to bury client demands and questions. ”
We see companies like Belkin using this approach. The consumer electronics brand notifies users to ask questions using its dedicated Twitter customer service channel.
If you visit Belkin on Twitter, you’ll see they go over and beyond for their customers. They even offer multi-lingual support.
Hola.
Sentimos mucho escuchar de su experiencia y quisiéramos conocer más detalles. Favor síganos aqui en Twitter y envíenos más detalles en un mensaje privado para poder atender su caso adecuadamente. Con todo gusto le atenderemos. https://t.co/h2jYyfYdnu
Improve customer experiences with social media customer service
You created your business profiles on the social channels your customers frequent. But don’t just use them to promote your products and services. It’s a channel where today’s consumers expect customer support.
Be ready to engage with both customers and prospects by creating separate handles and using Sprout’s social customer service tools to manage it all in one place. Timely alerts + quick responses = happy customers. It’s a win-win for everyone.
Ready to build relationships with your customers? Sign up for Sprout’s free trial to get started.
The podcasting market is currently booming: it is estimated that 177 million people in the US have listened to podcasts as of 2022.
As the popularity of podcasts continues to grow, it’s becoming an avenue for brands and content creators to cement themselves as experts in their niches while reaching their customer base.
The good news? Whether for the sake of marketing or simply as a side-project, podcasting has a lower barrier to entry as compared to other channels.
In this guide, we’ll explain how to start a podcast from scratch, tips for promoting a new podcast and how to monetize it.
What is a podcast?
A podcast is a form of audio content that features one or more speakers talking about a particular topic. There are thousands of podcast shows across different topics. You can find one about anything you can think of: from movie talks to gardening to marketing—like our Social Creatures Podcast where we chat with some of the most inspiring and unique businesses on social media.
Why you should start a podcast
Edison Research recently found that the widespread popularity of podcasts has consistently grown over the past few years with the percentage of people familiar with podcasts in the US estimated to reach 79% in 2022. Your audience is likely listening and that’s an opportunity you can’t afford to miss.
Most content creators want to reach a wider audience and establish themselves as experts. Starting a podcast can bring you these advantages and much more.
A podcast is a more intimate form of content than other mediums. It allows hosts, especially brands and marketers, to deliver effective brand storytelling. By showcasing voices and real people, podcasts can create a personal experience and humanize the brand. This fosters deeper feelings of engagement and loyalty among listeners as compared to other content formats, which appear mass-produced.
When done right, podcasting can also maintain an edge over the competition by staying relevant to your consumers or audience. Constantly producing content around current trends in your niche and interviewing experts, helps your brand gets established as a thought leader.
Starting a podcast can also bring you another stream of income and build your network as a creator or brand. Here’s everything a beginner needs to know to start a podcast.
How to start a podcast in 6 steps
1. Research a podcasting topic or niche
Firstly, you’ll need to define a target audience and research competitors in your niche.
Who is your podcast for? Having a clear idea of your ideal listener will help you create relevant and valuable content. Identify basic information about your target audience like demographics, age, occupation, interests, hobbies and pain points.
Here are some additional statistics from Edison Research to give you an idea of who listens to podcasts in general:
47% of monthly US podcast listeners are aged between 12-34
A majority of podcast listeners are active on Facebook.
Use this information about your target audience to create a strategy from content to promotion.
Once you have your topic and niche in mind, do some research on other similar podcasts. By understanding your competitors, you can figure out how you can position your podcast in a way that sets you apart.
With so much competition, it’s almost impossible for generic podcast concepts to gain traction. Ideally, your podcast topic should be specific enough to draw in a certain type of person but broad enough that you can create multiple episodes around it.
For example, what sounds more compelling: a horror movie podcast or a podcast that explores the cheesiest B-movie monsters of the 1980s and 90s?
Go beyond business, politics or film. Get specific. Do your research on what’s missing in the market. Then make a note of what you’re interested in talking about, what aligns with your brand and the skills and expertise you have to offer. Connect all these and you’ll discover your niche.
2. Plan your podcast details and posting frequency
Before we get into the nitty-gritty of how to podcast, here are a few things you’ll need to plan.
Name your podcast and add episode titles
If you’re working as part of an established brand, you have the benefit of name recognition when it comes to your podcast.
And if you don’t, you’ll need to come up with something that is memorable and distinct from other pods in your niche. You can come up with a descriptive name and use keywords your target audience is searching for around the topic. For example, if a content creator names their show ‘The Content Creator Podcast,’ it’s very clear who that podcast is for and what it’s about. If you want to be more memorable, you can come up with a witty or catchy name.
Here are some examples of non-marketing podcasts with unique names that pique the interest of potential listeners:
“Invisibilia”
“Brown Riot”
“What It Means”
“Hidden Brain”
Just like choosing a podcast name, choosing episode titles is also important. It should be descriptive enough for people to know what to expect and give them a reason to click. The theme of your podcast and the specific subject of the episode are good sources of inspiration.
Also, remember when I mentioned including keywords? It’s important to keep relevant keywords in mind. Search rankings on podcast directories are based on podcast name, provider name and episode titles. So use the keywords relevant to your topic and that your audience is likely to search for.
Decide on your episode length
There is no such thing as an ‘ideal length’ when it comes to podcast episodes. Episode lengths vary from show to show. The half-hour mark seems to be a happy medium for most pods, although some run slightly shorter (and some significantly longer). However, in a survey, 32% said they “feel put off by longer episodes of an hour or more.” So, it’s better to start with episodes that err on the shorter side and build from there.
Another good rule of thumb is to tailor your episode length according to publishing frequency. If you publish daily, keep it short. If it’s a weekly podcast, stay within the 50-minute mark. If you publish less frequently, an hour per episode won’t seem too long to your audience.
Note that your audience probably listens to a ton of other podcasts (Edison Research found that US podcast listeners listen to an average of five shows a week). Having a shorter show means they can easily squeeze you into their schedules.
Format your episodes: script or not?
Most podcasts are not scripted. Only some highly produced shows are scripted word-by-word. Besides, scripting takes a lot of time and the conversational nature of the podcast might get lost.
However, a little bit of organization goes a long way to keep you from straying too far off-topic. You can have bullet points and specific scripts written out for more formal points, such as introductions and pre-recorded segments.
Sharing basic notes and having an outline of segments is way better than going into a show totally cold.
Create episode descriptions, notes and transcripts
Presentation is a huge part of podcasting.
Putting together episode descriptions can help your potential listener know if a show is relevant to them or not. Similarly, having notes and timestamps is useful for those who want to skim your episode and don’t have time to listen to the whole broadcast.
Episode descriptions also play a role in making your podcast discoverable in search. This is important because 73% of podcast listeners discover new shows by searching the internet. Include the right keywords in your podcast and episode descriptions (but avoid keyword stuffing). Here’s a great example from The Branding Lab by Yvonne Ivanescu:
Bullet points, timestamps and transcripts can be particularly helpful for first-time listeners. Make use of podcasting software that has transcription features to easily capture every word.
Define your podcast aesthetic
So much of figuring out how to start a podcast boils down to your branding strategy. And having cover art and other creatives that carry the essence of your podcast is a part of this. It should visually describe your brand while capturing your audience’s interests. For example, the podcast cover art examples below use color and graphics to convey their brand identity with the theme of their podcast.
You can create cover art yourself using a tool like Canva. Or work with a professional designer who can help you encapsulate your brand into the right logo.
Ideally, your podcast cover art should be 1400 x 1400 pixels, in JPEG format and under 700 kb in size. Opting for larger formats can cause issues down the line.
3. Build your podcast presence
To build your podcast presence, the first step is to publish your pod through a hosting platform. Then, build your social presence on the right channels to reach your audience.
Select a podcasting platform and create an RSS feed
You’ll need a podcast hosting platform to store audio files online for distribution. You’ll then use this hosting site to deliver content to a podcast directory like Spotify, where your audience will be able to find your podcast.
When selecting a podcast-specific hosting site, consider factors like storage and bandwidth limits, analytics reporting and ease of use. Some options include:
After selecting a podcast hosting platform, you’ll need to create an RSS feed to publish your podcast.
An RSS feed is a medium to carry your audio files as podcasts and make it publicly available on the internet. It contains all your podcast info and the URL can be used to distribute it on channels like Spotify and Apple. Here’s what a typical RSS feed looks like:
To create an RSS feed, add your podcast audio files to the dashboard of the hosting platform along with a description. You will then get access to the RSS feed URL. You can continue to add new podcast content when they’re ready. Some platforms may have slightly different steps, but this is what you’ll need to do in general.
Another way to make your podcast accessible is by creating a website. Website building platforms like Squarespace and WordPress have tools or plugins to create an RSS feed.
You can then submit your RSS feed URL to distributors to reach more listeners. More on this in the next section.
4. Choose the right podcasting equipment and software
Purchase podcasting equipment
Despite popular belief, starting a podcast doesn’t have to be a huge money-sink in terms of gear.
In theory, you could put together a quality show with little more than a smartphone. The bare minimum gear needed for a professionally recorded podcast is a microphone and a headset. Use a professional-level microphone right from the beginning to ensure consistent tone and volume.
Microphones: Buy a USB mic like the AKG Lyra or an XLR microphone like the Shure SM series. You can get a good microphone in the price range of $70 to $200.
USB audio interface: This is a device that converts your analog audio signals (i.e. your voice) into a digital signal for your computer. The Focusrite Scarlett or Zoom LiveTrak are good options. A USB audio interface costs anywhere between $100 to $200.
Headphones: Quality, comfortable headsets are a must-have for all podcasters. The Sennheiser PC 7 or the Logitech H390 USB Headset are good options. You can get a USB headset for under $70.
Some additional podcasting equipment to consider:
Microphone stand
Sound-proofing materials
Pop filter
Cables
This was our podcast setup 3 years ago for the Apple event vs the setup from this year! pic.twitter.com/tSWeepJrGF
This gear is a cost-effective starting point for a small podcasting team. Avoiding complicated equipment in the beginning will let you focus on the most important part of podcasting: creation. Remember, as you grow, you can always invest in more equipment and upgrade.
Get podcast recording and production software
We recommend using audio recording software to record a podcast. There are lots of free and paid options available in the market. Some recording solutions include:
Skype and Zoom are the best options if you are recording from multiple sources.
Apart from this, you’ll also need at least one software to edit episodes during the production stage. Here are three of the top editing software to consider:
Alitu: This is a web application that automates audio cleanup and adds music or other effects.
Riverside: A beginner-friendly, easy-to-use software that comes with advanced editing tools.
Logic Pro X: An advanced editing software that enables total control over audio quality, music production and other sound effects.
Additionally, there are platforms like Anchor which allow you to record and edit your episodes directly from a smartphone.
5. Recording a podcast episode
Start with an outline for the episode
Creating an outline will help you map out what you’re going to say. You don’t have to go so far as to create a script. Here’s a sample outline you can use:
Episode intro: 30 to 60 seconds
Map out topics you will cover: about 4 minutes each
Add talking points for each topic
Closing remarks: 2 minutes
Closing music: 30 seconds
When you start recording, you might make a mistake: an interruption in the background or you mispronounce a word. Whatever the case, it’s best to record the whole episode without stopping. You can make edits later.
If you do interviews or have co-hosts, it’s best to record everyone on an individual track. You can go about this by using Skype or Zoom to record the podcast. Another option is to use a double-ender call recording tool, which enables you to create studio-quality recordings with multiple hosts remotely, independent of internet quality. This feature is available on some podcasting software like Riverside.
Edit your podcast to fit the outline you had in mind
After successfully recording your podcast, you’re now in the production stage. This is where you edit out mistakes, stitch together audio clips and add in music.
If you’re a beginner in podcasting, you might be wondering how much editing you should be doing. We suggest going for minimal edits to keep your process simple and sustainable. Here’s the Minimum Effective Podcast Editing Approach (MEE) introduced by the Podcast Host:
Step 1: Record everything without stopping
Step 2: Topping and Tailing: Cut out segments of audio at the very beginning and very end of the recording
Step 3: Amplify audio to -2 dB peak amplitude. This step can be automated if you use certain editing software like Alitu
Step 4: Export and publish
If you want to take editing one step further, here are a few processes you can follow:
Removing periods of dead air
Canceling out background noise
Adding in sound effects and background music
Reducing echo or mic bleed
Remember to strike a balance between respecting the listener’s time and the outline you had in mind when it comes to editing.
6. Promote your podcast
Let’s say you put a new episode online. Now what?
For starters, make sure that your audience knows about it. The concept here is simple: integrate your podcast with the rest of your content strategy by promoting it consistently.
If you have a dedicated email list, start there. Have an active blog? Repurpose episodes into blog posts and embed the episode within them. Here’s an example from the Shopify blog, which makes the episode easily accessible to site visitors and drives traffic to their podcast.
Social media is the perfect place to give listeners a taste of what your latest episode is about. One way is to announce new episodes by sharing snippets of your favorite moments:
https://ift.tt/0pHPeYJ
Additionally, find communities on social media where your podcast niche is hyper-relevant and talk about your podcast.
Another way to get more listeners is to reach out to introduce your show to influencers or prominent people in your niche, who would benefit from listening to your show. If they like your podcast, they might suggest it to their audience.
Here are some more ideas to promote your podcast on social media:
Announce new episodes with an original meme
Share teasers of your upcoming episodes
Run Facebook ads on your podcast website
Wondering which social media platforms will work best for podcasts? Here’s what a survey report by Edison Research says about social platform popularity among podcast listeners: a majority of listeners use Facebook (68%) and Instagram (64%), while 45% of listeners use TikTok.
How to set up a podcast
Once you finish recording your podcast and create an RSS feed, it’s time to publish them on distributing platforms. Here’s how you can get your podcast episodes on Spotify and Apple podcasts.
How to start a podcast on Spotify
Spotify has an easy setup process for podcasts. Here’s what you need to do:
<style=”font-weight: 400;”>Paste in your podcast’s RSS feed URL.
You’ll receive a verification email from Spotify. Enter the 8-digit code from that email in the form.
Fill in additional details such as category, language and countrynclud
Review the info and click Submit
After successfully submitting, you’ll receive the Spotify URL for the podcast. It may take a few hours for it to show in the app.
You may need to follow some additional steps to authorize Spotify as an additional distribution platform. Check out the list of their aggregator partners here.
How to start a podcast on Apple
Setting up your podcast on Apple is a more manual process as compared to Spotify. You’ll need an active Apple ID. If you don’t have an existing one, create a new Apple ID. Make sure it’s fully activated and is enabled for two-factor authentication. Then, here are the steps you can follow to upload your podcasts:
Sign up for an Apple Podcast Connect Account and name your account. You can use an individual name or the company name.
Click the Add (+) button.
Choose Add a show with an RSS feed.
Enter the RSS feed URL.
Choose permissions. You have the option to restrict user access. This means only users you choose will see the podcast.
Under availability and rights, choose availability and set content rights.
Set show release date. You can choose to release it immediately or set a custom date and time.
Add your contact information.
Click Save.
Click Submit for Review.
It can take Apple 5-8 days to manually review your submission. When it’s ready, you’ll get the Apple URL to your podcast.
A few days after approval, people can begin searching and finding your podcast in the Apple Podcasts app.
How to make money with a podcast
Podcast platforms do not directly pay creators like YouTube or TikTok. If you are looking to generate income from your podcast content, it’ll need to come from either your audience (direct monetization) or third-party companies who pay you to promote their brands.
Let’s take a look at these monetization models in detail:
Sponsorships
According to a report, 60% of podcast listeners searched for a product after hearing about it in a podcast. Many brands understand this scope of podcasts and partner with podcasts for sponsorship ads.
Typically, a sponsorship ad is added at the beginning of the show (“pre-roll” ad) or at the very end (“post-roll” ad).
You can do a paid partnership with a company and promote their product or service on one of your podcast episodes. Podcasters take 15-60 seconds out of their script to market the brand. It’s best to approach brands that are in the same niche as your podcast or are relevant to your audience, rather than going for a random sponsor.
Find podcast sponsors by joining a podcast network like Midroll or pitch directly to brands.
Affiliate sponsorships
By being an affiliate, you earn a percentage of each sale made by one of your listeners as a result of your podcast. Usually, sponsors will give you a promo code or a special URL to track purchasers from your show.
The affiliate model is best for podcasts that have an engaged audience or one who will consider your purchasing advice.
Memberships
You can directly monetize your podcast by asking your listeners to pay you. With a membership model, ask your audience for donations to keep the content coming, or to subscribe to get access to premium content.
Adding a Stripe donation form on your site or creating a paid membership tier using Patreon or Buy Me a Coffee are ways you can ask for donations.
Podcasts with a good base of listeners and significant engagement can also sell branded merchandise. The Brain Candy Podcast does an amazing job of offering cute stickers and other merch that their listeners love.
🚨New Merch Alert!🚨 Have you seen the latest designs in our Candy Store yet?! First of all, we’ve got our Classic BCP…
A podcast advertising network acts essentially as an agent for your podcast. Advertising networks have connections with brands and can help you land opportunities you may not have otherwise come across on your own. Some networks let you reach out to advertisers directly once you’ve joined, while other premium networks can pitch to advertisers on your behalf.
Some examples of podcast advertising networks include AdvertiseCast, PodcastOne and Megaphone. Keep in mind that you may need to fulfill certain requirements to join an advertising network, such as a minimum subscriber count.
Amplify your brand’s voice
There’s obviously a lot that goes into getting your podcast off the ground, but it can be fun and rewarding.
The success of your podcast will depend on your content and how you promote it. Make sure that social media is the cornerstone of your promotional strategy. Speaking of which, check out our best times to post on social media to ensure that your latest content gets the reach it deserves.
How to start a podcast: frequently asked questions
Is it free to start a podcast?
Yes, it is possible to start a podcast for free. You can get your podcast started with zero costs if you have a smartphone and computer. Also make use of free podcasting software.
How does a beginner start a podcast?
First, decide on the topic of your podcast. What can you speak about with authenticity? Is there a niche you’re passionate about and can provide fresh perspectives on? Identifying all these can set you on the right path to starting a podcast as a beginner.
How much does it cost to start a podcast?
Depending on the software and equipment you use, you can start a podcast for under $200.
There is no hard and fast rule for podcast length. Anywhere between 10 to 30 minutes is a good choice for new podcasts. New listeners are more likely to try out your podcast if it has short episodes.
What equipment do I need for a podcast?
A computer, microphone, a pair of headphones and podcast editing software are some must-have equipment for podcasters.
If there’s one thing we know for sure about social media, it’s that you can always expect to see new features, content types and ways to engage your audience. And one of the latest features from YouTube is YouTube Shorts.
Haven’t heard of it? No worries, you’re not behind the curve. In fact, you’ve probably already been creating this type of short-form video content on other platforms.
And if you’re not, you should be. Customers consider short-form video content to be 2.5x more engaging than long-form video content. Plus, two-thirds of customers also agree that short-form video content is the most engaging type of content, over images, live videos, GIFs, memes and more.
YouTube has been one of the most popular (if not the most popular) video-sharing platforms since its inception nearly two decades ago in 2005. It’s been known for its longer-form, horizontal video content where creators upload funny, educational and promotional content—over 500 hours of it per day.
YouTube Shorts are a new video type where users can shoot, share and view vertical short-form video content (i.e., videos that are 60 seconds or less). Because these mobile-friendly, vertical micro-videos have proven to be so popular, a number of platforms are trying to get a piece of the pie (we’ve got our eyes on you too, Instagram Reels).
And while many brands are repurposing content and sharing them across platforms, this provides yet another way for brands and businesses to engage their YouTube subscribers.
And if you’re new to micro-video content in general, here’s a great example of a YouTube Short (click the picture to view):
How to make YouTube Shorts
There are two options when making YouTube Shorts: create your video from scratch within the app or upload an existing or edited video. The latter tactic is ideal if you’re repurposing your TikTok videos, Instagram Reels or longer YouTube videos onto your channel.
How to make a Short on mobile
To create new Shorts natively in YouTube, you’ll need to use the mobile app.
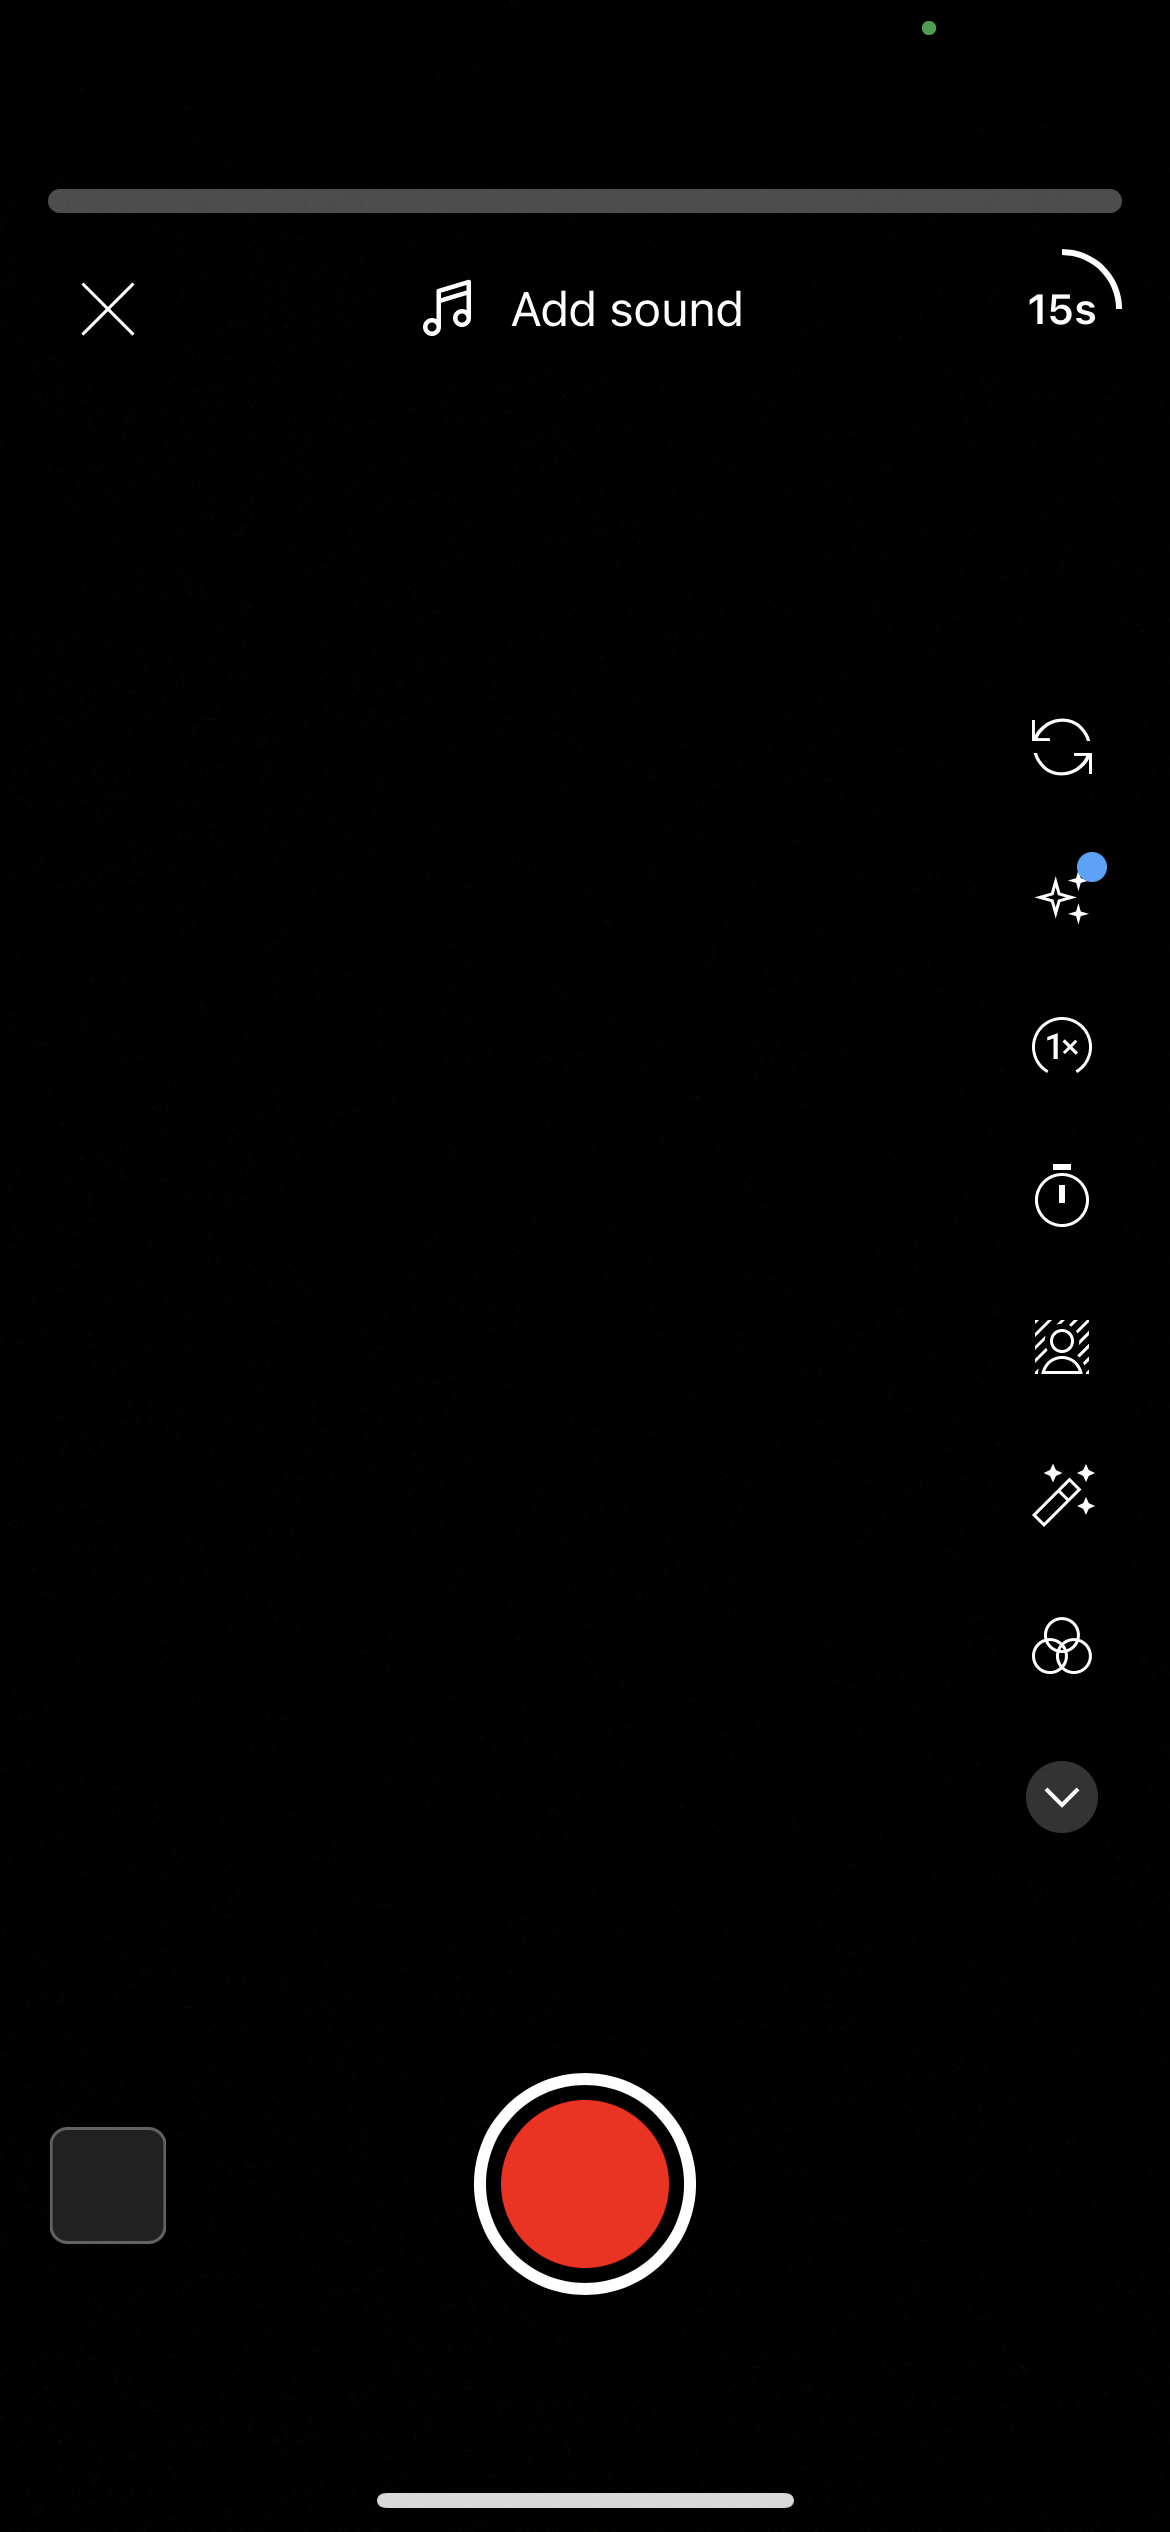
Step 1: Open the YouTube app on your mobile device and tap the plus sign + at the bottom of the screen.
Step 2: Tap Create a Short. If this is your first time creating a Short, you’ll need to Allow Access to your camera.
Step 3: Start recording your video by tapping (not holding) the red record button. By default, Shorts are set to record for up to 15 seconds. But if you tap the 15 in the top right corner, you can change that to 60 seconds.
To record multiple segments, tap the record button to pause recording, then tap it again to resume recording for your next segment.
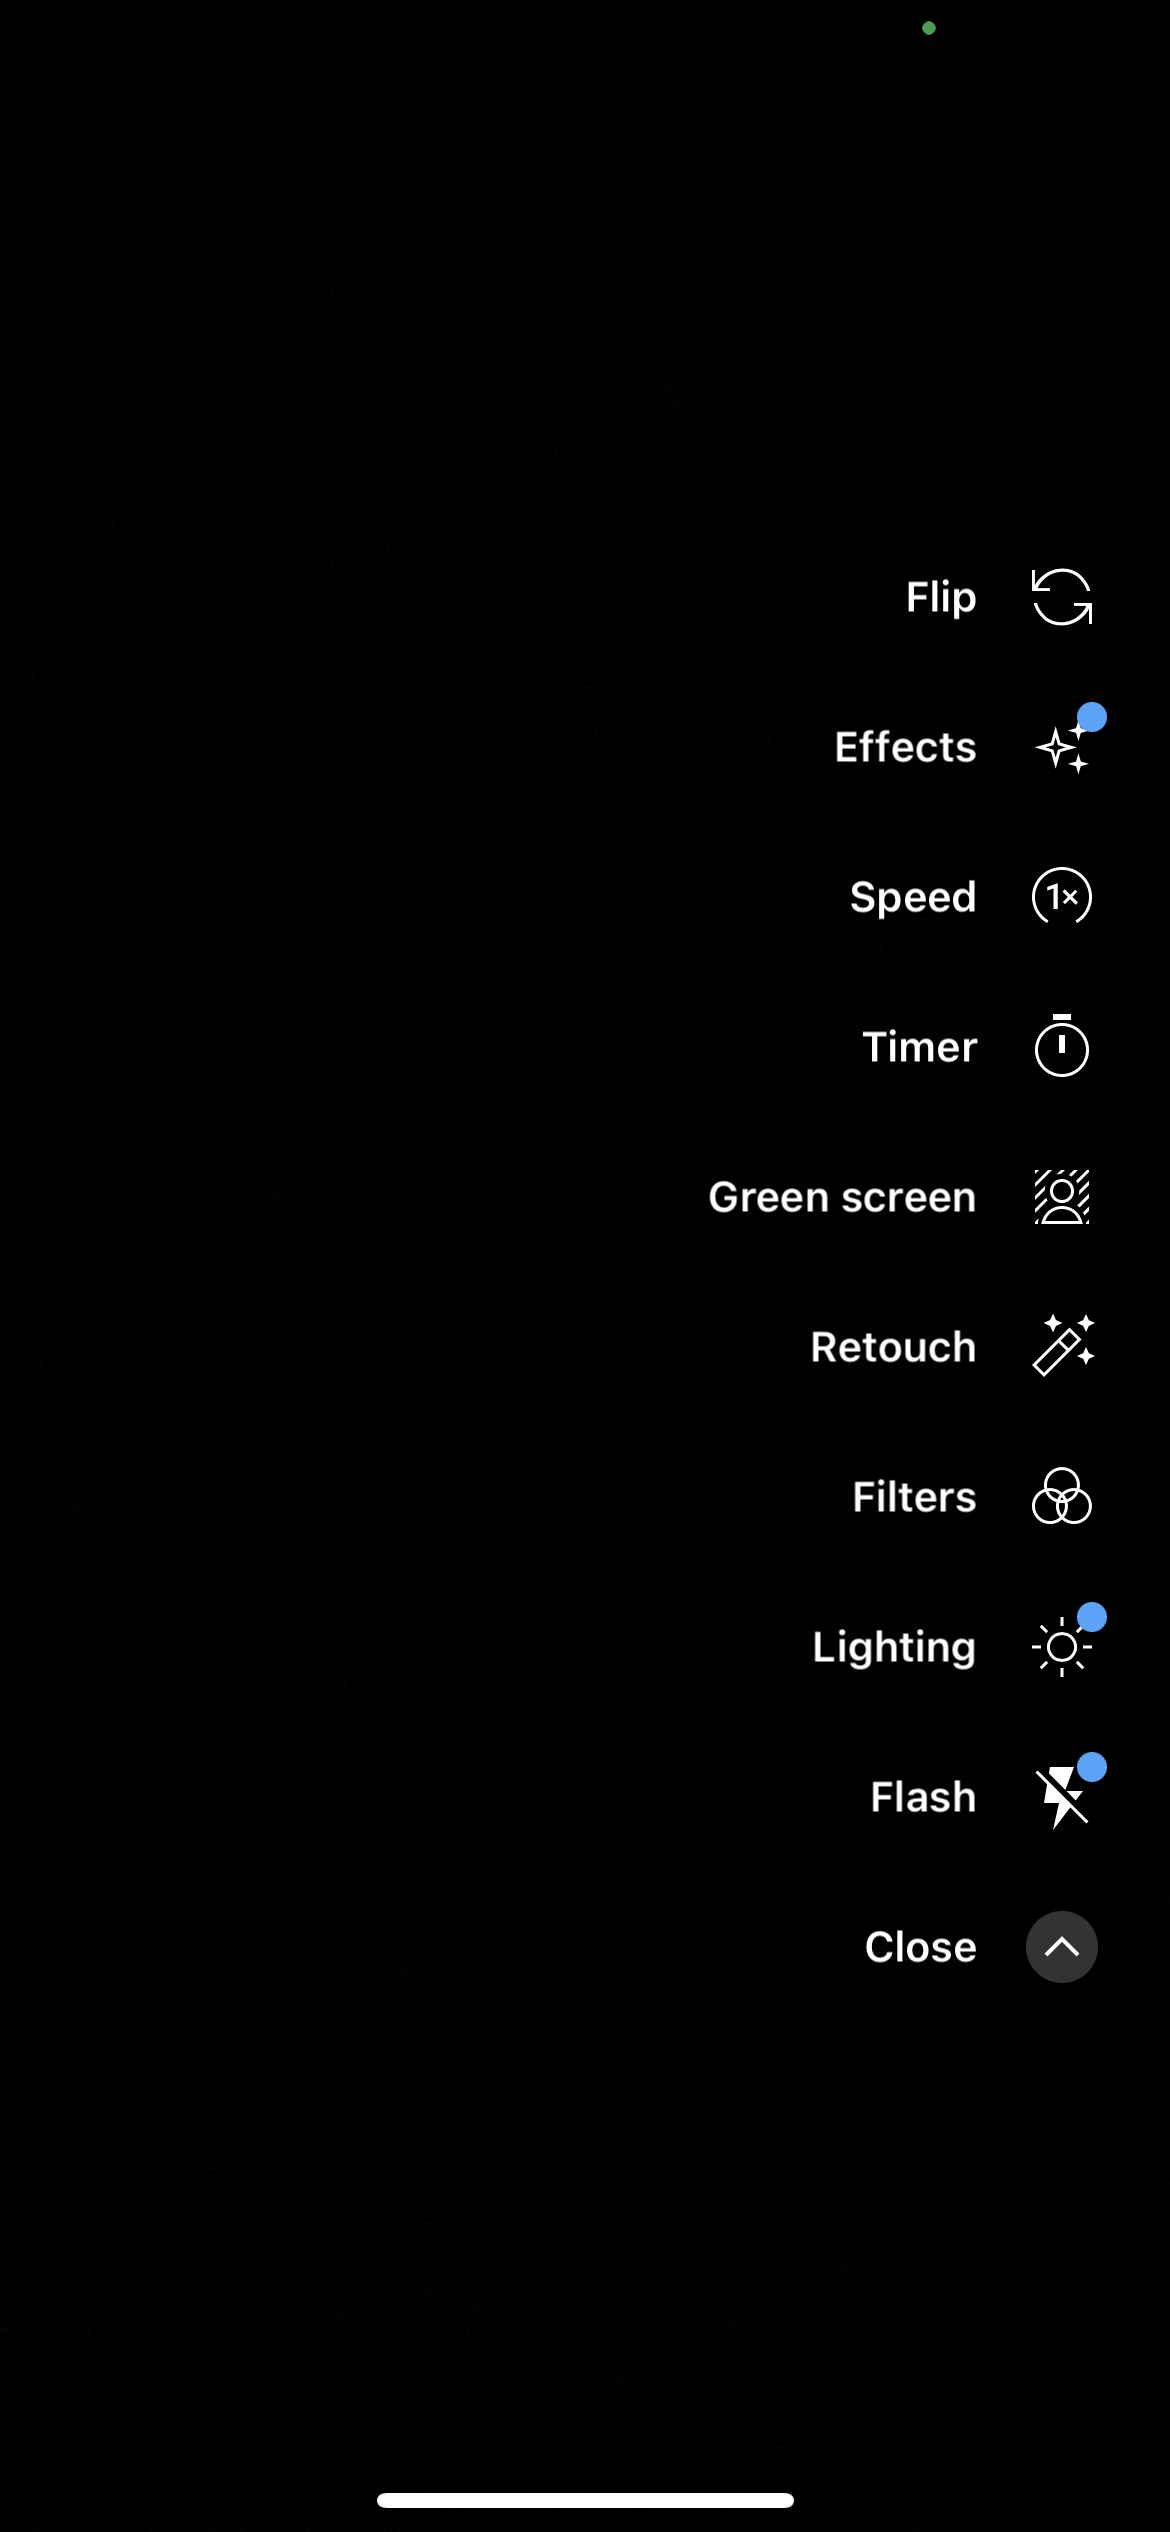
There are a number of recording and editing tools in the right sidebar to help you get even more creative with your video:
Flip: Flip the camera to use the front or back camera while recording
Effects: Choose different effects that change up your recording, like mirror images, motion trails, fisheye lens and more
Speed: Increase or decrease the speed of your recording—options are 0.3x, 0.5x, 1x, 2x and 3x
Timer: Set a timer when using a tripod or other form of self-recording so you can get into position
Green screen: Place a photo behind you while recording instead of your actual background
Retouch: Automatically touch up your video
Filters: Change the coloring of your video by adding a filter overtop your recording
Lighting: Adjust the lighting of your video to make it brighter or darker depending on the mood
Flash: Turn the flash on or off while recording
Step 4. Once you’re happy with your video, tap the white check in the bottom right corner of the screen. Here, you can preview your video and add music, voiceover, text overlays and more. Then tap Next in the top right corner of your screen.
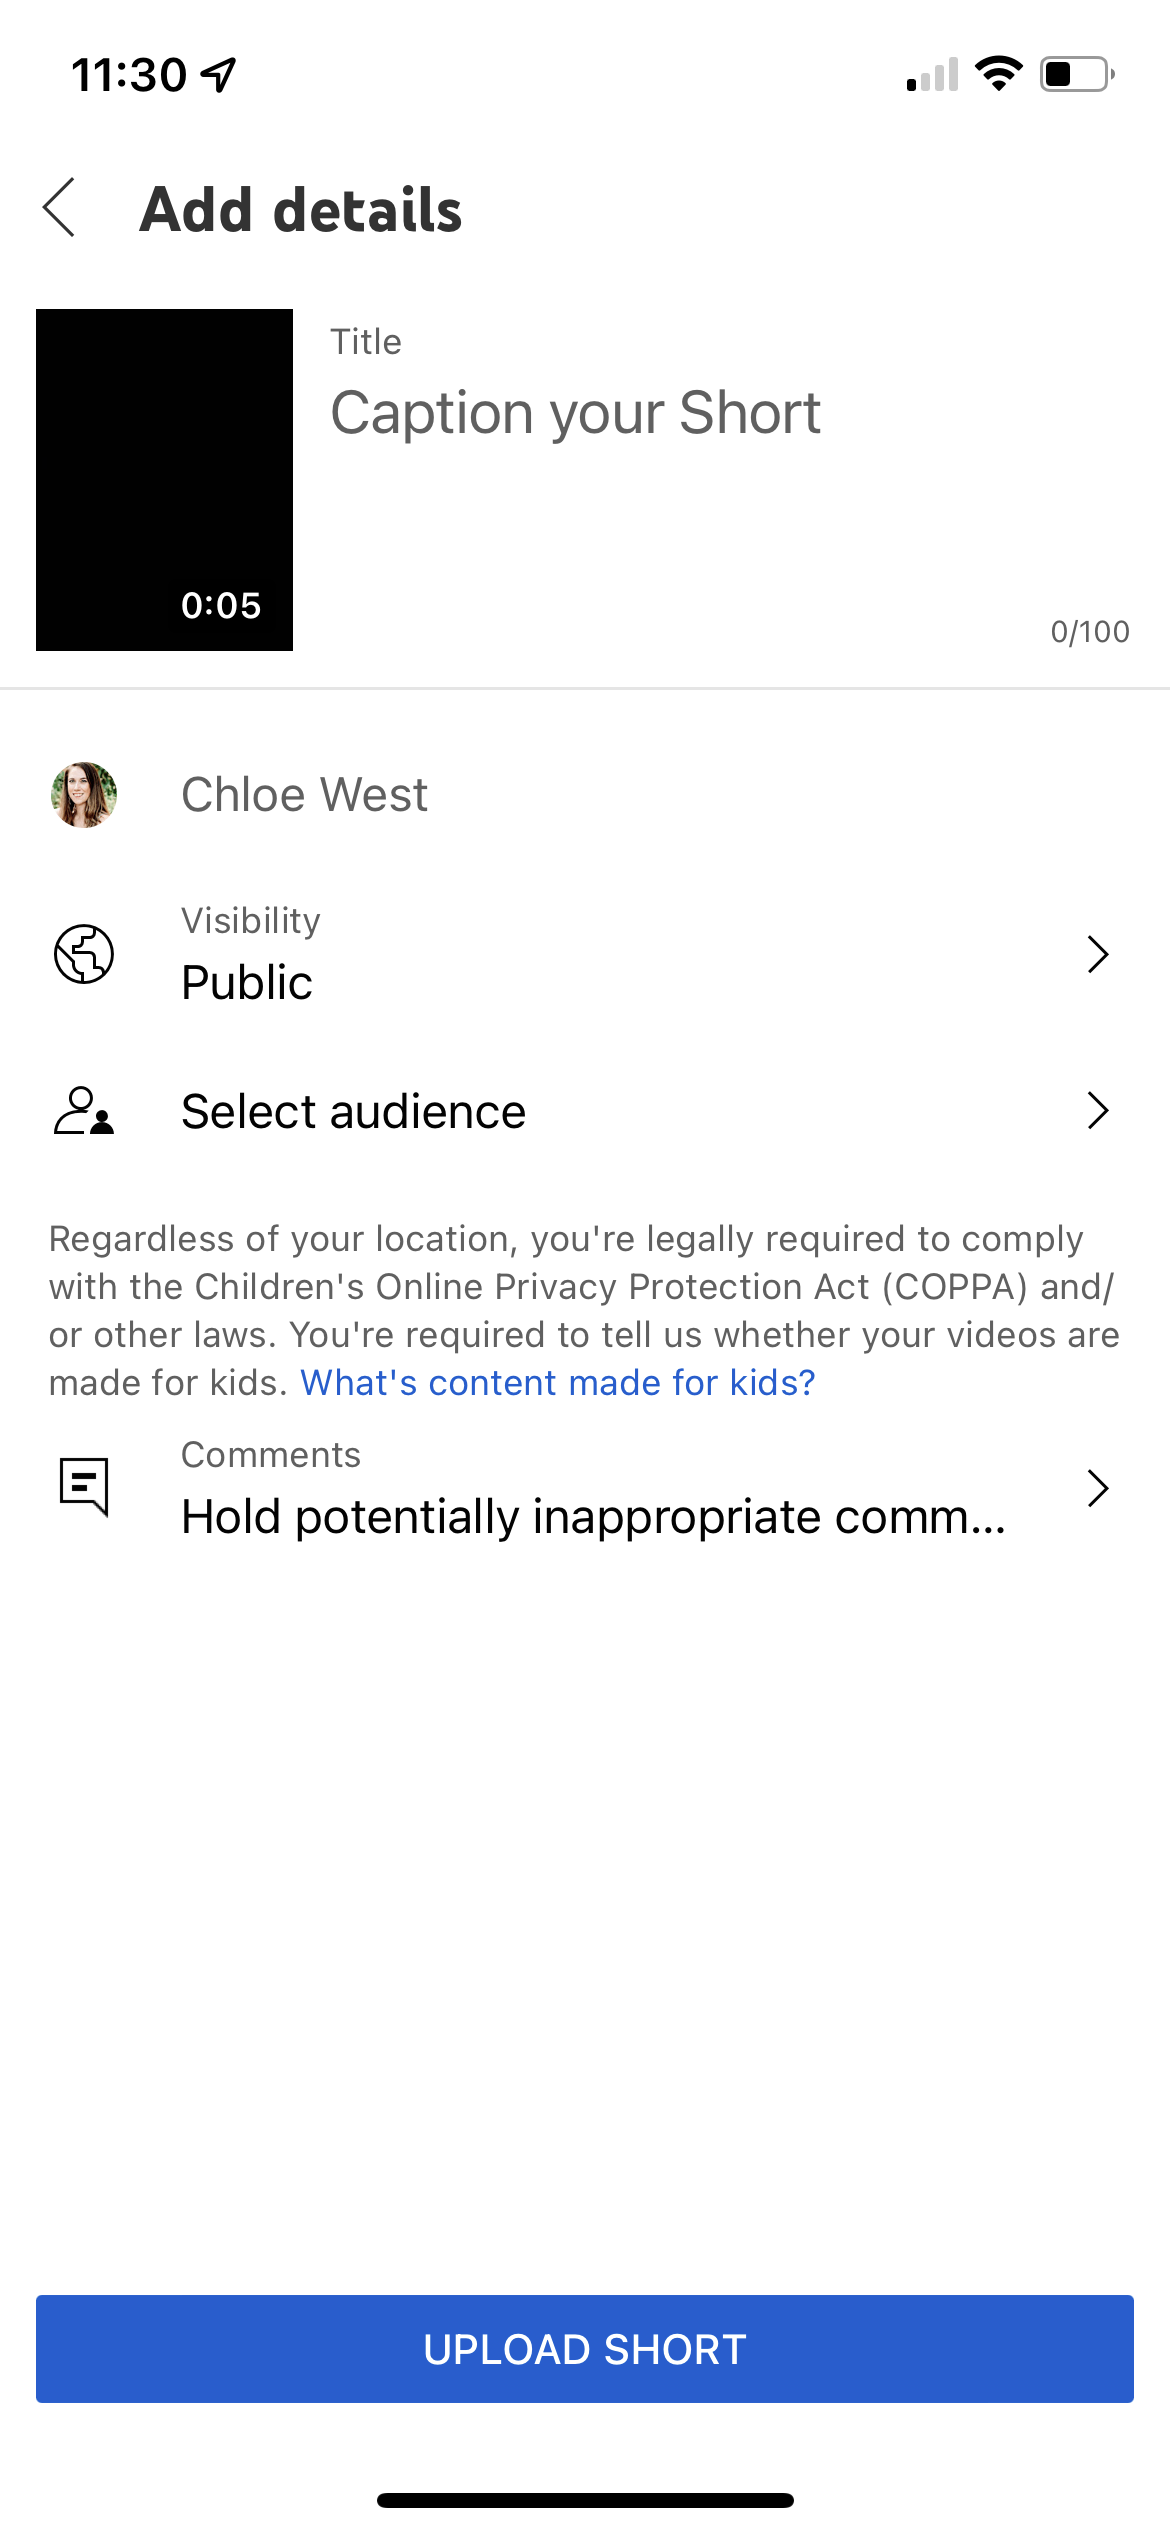
Step 5. Create a caption for your video, set visibility, select an audience (i.e., dictate if the video was made for kids or not) then tap Upload Short.
How to upload a Short on mobile
Instead of recording a new video natively, you can upload a Short directly from mobile.
Step 1: Open the YouTube app and click the plus sign + at the bottom of the screen.
Step 2: Select Upload a video.
Step 3: Select any video under 60 seconds from your camera roll. Any video under 60 seconds will automatically be considered a Short.
Step 4: Fill in all of the relevant details (caption, visibility and audience) and publish.
How to upload a Short on desktop
If you want to upload a Short from your desktop, the process is the exact same as uploading long-form videos—YouTube distinguishes which type of video it is by both length and orientation. If you’re uploading a square or vertical video, the network knows it’s a Short. Same goes for if the video is less than 60 seconds.
Step 2: Click the Create icon in the top right corner of the page.
Step 3: Upload your YouTube Short.
Step 4: Fill in all of the relevant details (caption, visibility and audience) and publish.
What are the benefits of YouTube Shorts?
YouTube Shorts can be a great way for brands to further engage and increase brand awareness with their customers. It’s time to switch things up.
Additionally, half of all YouTube watch time comes from mobile devices, compared to just 14% on desktop computers. And since YouTube Shorts is a mobile-first feature, you may reach that expanded viewership with more than traditional horizontal, long-form video content.
Since YouTube Shorts was released in July 2021, this feature has reached 30 billion daily average views. People are watching—and loving—YouTube Shorts. So if your brand already has a presence on YouTube, consider adding some micro-vertical video content into your YouTube marketing strategy.
And of course, if a new potential customer finds your brand via Shorts and subscribes, they’re automatically subscribed to your long-form content as well. So this gives you an entirely new outlet to increase your channel subscriptions. Win-win, right?
YouTube Shorts best practices to consider
Let’s cover a few best practices first to help you get the most out of this new marketing avenue.
Post consistently
Just as most platforms do with new features, it’s safe to assume that YouTube is prioritizing Shorts for performance and views. One creator’s analysis looks to verify that after seeing a “massive jump in views in the last month since uploading a Short every day”.
Creating YouTube Shorts consistently will help you boost your brand reach to a wider audience. If you’re struggling with staying organized, making a content calendar that will help you plan out ideas and stay on schedule.
Make content relevant to your audience
What is your audience going to enjoy most? If you’re not sure what to create, spend a while exploring the platform to see what other businesses are putting out there. A few ideas include:
How-to videos
Quick reviews
A relevant story
Industry tips
Fun facts
An experiment
Use a trending sound byte
If your short-form video content is relevant, engaging, educational and valuable to your target audience, then you’re on the right track.
Here’s a great example from online course platform Teachable, talking about burnout that creators often feel:
Focus on making the first few seconds captivating
If those first few seconds don’t immediately hook your viewer, they’re going to keep scrolling. Those first few seconds of your video are the most important part. Find a way to capture your viewers’ attention immediately so that they stay for the rest of the clip.
Get creative with your captions
Your caption can be up to 100 characters, so make it count. Tease the content, use a funny line, summarize what viewers can expect to see and the like.
While your video is the most important part, captions are still shown when Shorts pop up on the YouTube home feed, so having a compelling caption can be what makes someone decide to watch your video or keep scrolling.
Record in vertical format
No one wants to turn their phones as they watch YouTube Shorts, so make sure you’re always shooting in vertical format to make your videos easy to consume. Videos shot in horizontal format appear with blank space above and below the video to pad the vertical space, and it doesn’t create an ideal viewing experience. So just keep it easy and stick to vertical.
You can repurpose a horizontal video as a vertical Short, like Visme did with its educational content, by cropping the video to focus on the most important part:
Use trending songs, hashtags and events
One great way to increase views and get people interested in your content is using trending songs, events, audio clips, hashtags and challenges. Because of the viral nature of the content, you can boost visibility and reach new audiences. Just make sure that it’s still relevant to your business and makes sense for your brand.
Use your authentic voice
Don’t forget your brand voice when creating YouTube Shorts. You still want to follow your guidelines to ensure your video content still makes sense for your brand and aligns with your messaging and mission. If your content seems out of place for your brand, it can hurt your image and reputation.
Here’s an example from Starbucks showcasing a barista injecting a bit of personality into her drink tutorial:
Show behind-the-scenes moments
Consumers love a good behind-the-scenes moment. Use your Shorts videos to showcase product creation, product packaging, office tours, behind-the-scenes from filming, bloopers and other fun video clips. Giving your audience a glimpse behind the logo can help to humanize your brand and make your viewers more interested in what you have to share.
Remember that Shorts loop
YouTube Shorts (and all other micro-videos) loop back to the beginning once the video clip ends. Use this to your advantage by tying the beginning and end of your video together, creating a seamless loop that will keep viewers entertained and interested in watching more of your videos.
This is really useful in recipe videos, as we see from this example by Tasty:
Monetize your YouTube Shorts
You can monetize your YouTube Shorts using the YouTube Shorts Fund. This is a $100 million fund dedicated to creators who are publishing YouTube Shorts specifically as a way to incentivize creators and businesses to use this new feature. If you’ve monetized your YouTube channel, creating Shorts is yet another way to increase the revenue you’re generating.
YouTube Shorts monetization options
Speaking of monetizing, let’s dig a little deeper into this. Because brands of course want to increase revenue through social selling, but why not increase revenue just because of the content you’re publishing on social media?
YouTube created the Shorts Fund in August 2021, which is a $100 million fund dedicated to paying out creators that generate large audiences for their Shorts. To qualify, YouTubers must fit the following criteria:
They’ve uploaded an eligible Short within the last 180 days
They follow YouTube’s community guidelines
They create completely original content
They’re 13 or old (and creators between the ages of 13-18 have parental consent)
There’s no application process for the YouTube Shorts Fund; instead, YouTube notifies qualified creators during the first week of each month via email and notification inside their YouTube account that they will be receiving a bonus from the Fund.
To increase your chances of qualifying, create consistently high-quality and original content to share as a YouTube Short. However, there are other ways of monetizing your YouTube account as well if those are more appealing to you and your team.
Start creating your own YouTube Shorts
YouTube Shorts are a great way to improve the performance of your YouTube channel overall. Don’t forget to check out our guide to find more ways to increase your video views. Then start creating, publishing and promoting your YouTube video content.
Let’s get right to the point. Increasing traffic to your blog is challenging. Writing an amazing blog is only half the battle. In order for readers to find your content, you need to cut through the online clutter.
To stand out you need to do more than just write an amazing piece of content (although that’s a great start). There is strategy behind getting more traffic for your blog. I compiled the top 11 strategies for you. Some of these strategies you may have heard before, but they are very important tips.
I included some powerful, lesser known strategies. These could be game changers, helping people who have already covered the basics to increase blog traffic quickly.
Stop letting your best work go to waste. Use these tips to maximize each piece of content you write and get more traffic to your blog.
Find keywords that are easier to rank
Don’t skip keyword research. This is an important step in making sure your content can be found organically. To perform keyword research you can use tools such as SEMrush or Ahrefs.
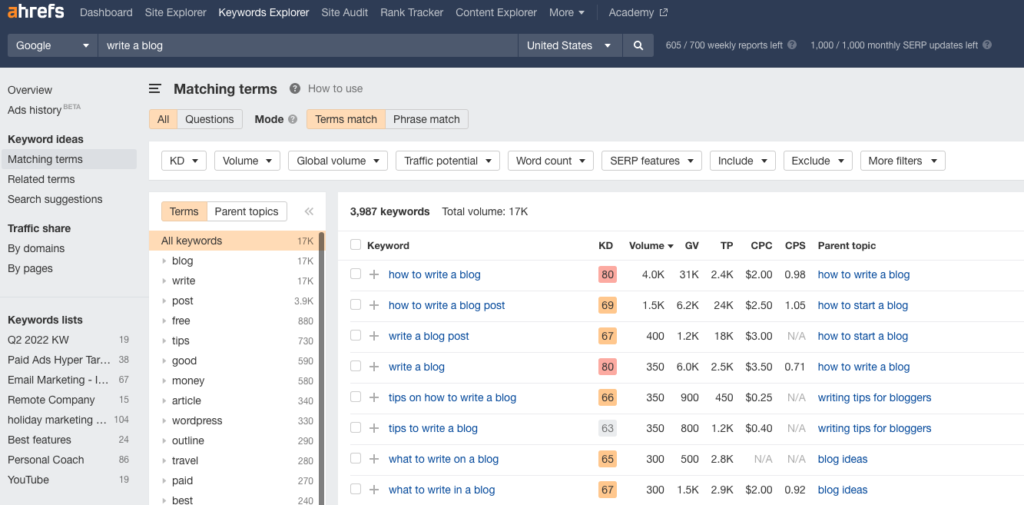
My recommendation would be to start with a broad topic you want to write about. For example “write a blog”.
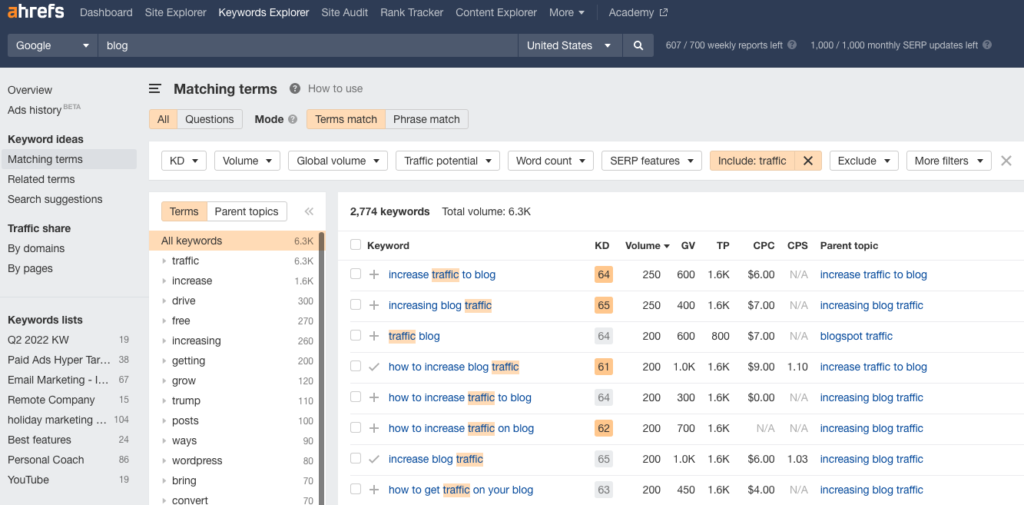
Here are the results of my initial research in ahrefs.
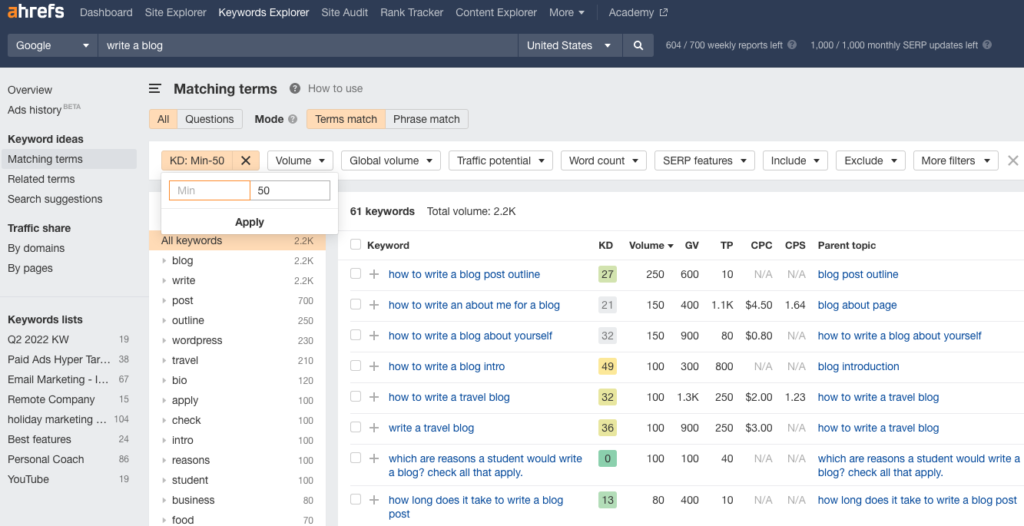
Next, condense your search by finding keywords that are easier to rank for. In this example I changed keyword difficulty to anything below 50. Here are the results:
Once you’ve got your keywords, use them in your blog where it makes sense. Add them to your blog post title, subhead, throughout your post, and in image alt text. Make sure your title and subheads are relevant to your content, and that your keywords fit naturally into the body of your post.
Whatever you do, don’t jam keywords into blog posts just for the heck of it. That’s called keyword stuffing and it can get your blog banned from Google searches.
Write your blog based on search intent
To write based on search intent you need to understand why readers are making that search and what they want to learn.
But you’re not a mind-reader, so how can you know exactly why someone made a search query?
The good news is you don’t have to — search engines already figured that out for you. Search engines such as Google use their algorithms to rank posts based on which content best answers a reader's intent. All you have to do is search your main keyword in Google and see how it ranks the top 10 blog posts. Then write your post based on the same intent.
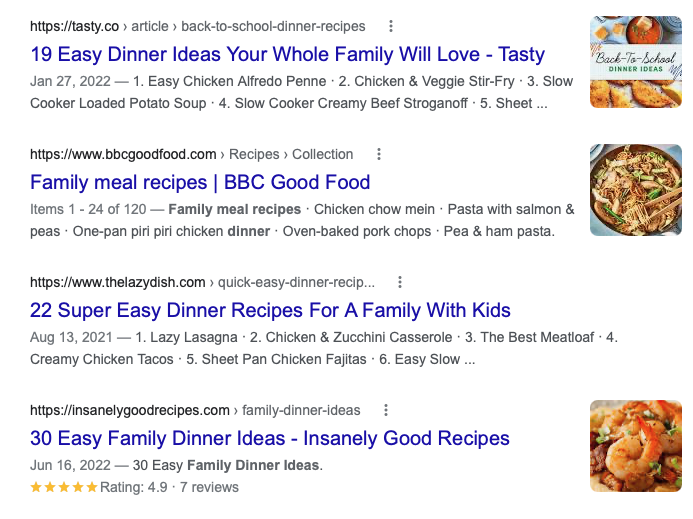
Here’s a great example: If I want to write a blog post on “dinner ideas for families”, what type of recipes should be included? The answer — recipes that are “quick and easy.” Eight of the top 10 posts for this search are dinner options that are quick and easy to make.
Optimize existing blog posts
Just because a blog post is published doesn’t mean your work is done. Existing blog posts are “low-hanging fruit” opportunities for improvement.
There are several ways to optimize a blog post. Here are just a few tips:
Make sure your main keyword is in the title
The blog post should answer the readers search intent
Use other keywords you want to rank for naturally within the blog
Place keywords in the alt text of your images, if it makes sense
Add something new that adds value to the reader. This could be a video, picture, or additional content.
You’re reading a blog post that was optimized
Full disclosure, this blog you’re reading — I optimized it. Here why and what I did to update it; maybe it will help you.
First, I performed keyword research in Ahrefs to make sure I was targeting the right keywords. I discovered I wasn’t. The previous version of this blog post targeted keywords like “drive traffic to your blog”. Check out my previous headline:
That’s not what people were searching for. They’re typing “increase traffic to blog” into Google.
So I updated my headline and revised some of the copy to reflect how people search.
I also evaluated the top blog posts for “increase traffic to blog” and found those other post’s content provided more value to a reader than mine.
Always remember when writing a blog, content is king. With so many blogs being published, you have to make sure your content provides more value to the reader than the other posts or you won’t be shown to searchers.
So what added value am I providing in this post? Proven tips from my own experience that you won’t find anywhere else. So keep on reading!
Post a video of your content on social media
Posting a link to your blog on your social media channels is pretty obvious. But you can take it a step further by producing a short video highlighting the main benefits of your post.
Check out what AWeber’s Pam Neely did with her blog post — Email Writing Hacks: 6 Writing Tips for Any Kind of Email. She created a short educational video highlighting the main benefits of her blog post which she shared on our social media channels.
Creating the video is quick and easy with a tool like Lumen5.
Make it easy for people to share your blog
Include social sharing links on all of your blog posts so readers can easily share your content on social media. Consider including Click to Tweet links in your posts, too. These help people share the best nuggets of your expertise from your blog posts on Twitter.
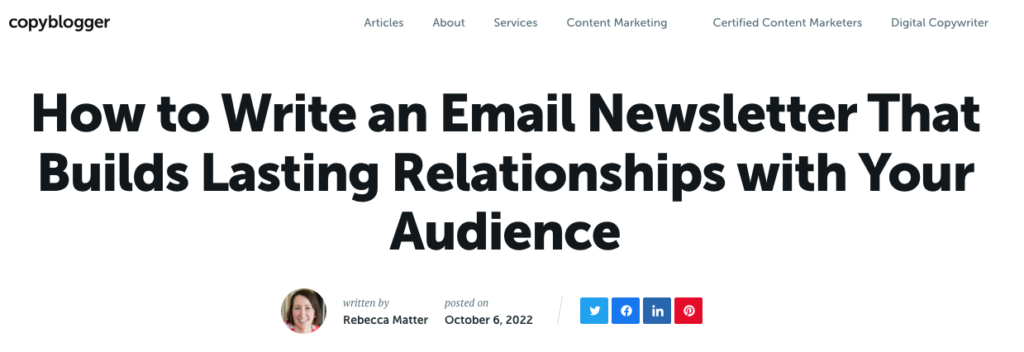
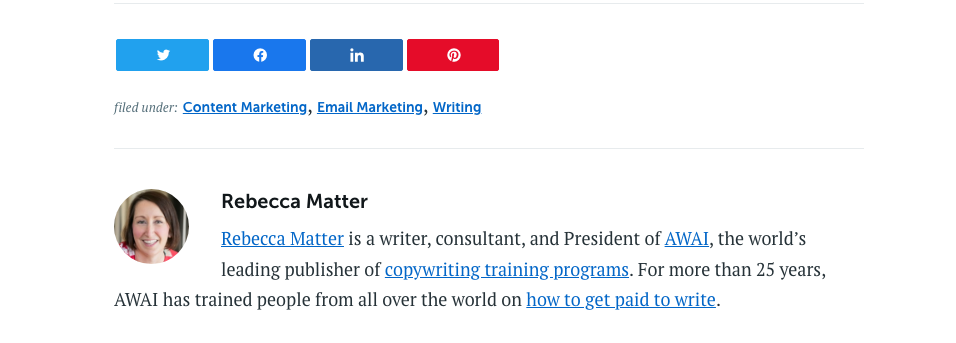
Here’s an example from copyblogger where they include social sharing buttons at the top and bottom of their posts.
Recommend other blog posts
Keep your readers on your site by recommending more valuable content at the bottom of each blog post.
There’s software or plugins that you can use which will either randomly show posts, blogs related to the current post, or it can show the most recent content.
Here’s an example you’ll find at the bottom of our blogs.
We’re using Related Posts by AddThis to have our most recent blog posts appear at the bottom of our Wordpress blog.
Become a guest blogger
Guest blogging gets your content in front of newer, bigger audiences and positions you as a thought leader. It’s one of the most effective ways you can drive traffic to your blog.
Henneke Duistermaat gained about 300 subscribers from guest blogging alone. By leveraging that following, she now has 24K+ email subscribers and 10-12K monthly visitors to her blog.
To get started, make a list of blogs similar to yours, that you read regularly, or written by influencers in your space. Then reach out to offer them a post that they don’t already have. Bonus points for writing a niche post offering content that you’re specifically qualified to talk about.
Another way to find guest post opportunities is by commenting on industry blogs and offering your expertise to other commenters. The comments section can be a surprisingly great way to network.
Run Facebook ads
I’ve got a secret. You can’t increase your blog traffic with a Facebook post. Here’s why: Facebook limits your followers from seeing most of your posts so they can make money. And they don’t show any of your posts to non-followers.
To increase traffic on your blog post using Facebook, you need to run a paid advertising campaign.
But don’t worry, you won’t have to spend a lot to get more eyes on your content. You can run a Facebook traffic campaign for just a few dollars a day.
And now for those less obvious, yet super powerful ways to increase traffic.
Automatic blog emails
If someone took that time to sign up for your email list, then most likely they love your content. So don’t keep them waiting, share your latest blog post with them immediately.
If you’re writing content fairly frequently, you may not want to set up an email every time you publish a new blog post. Luckily, most email service providers (ESP) are able to use your blog’s RSS feed to send your latest blog posts in an automated email. You can set these emails to go out on a daily, weekly, or monthly cadence.
But that method doesn’t get your blog in front of your audience, the minute you publish it.
There is a way you can trigger an email to be sent the minute you publish your blog, with no additional work needed by you. As far as I know the only ESP that has an automated blog triggered email is AWeber.
Here’s how to set it up:
Collect email addresses with a sign-up form on your blog
It’s never too late to start capturing your reader’s email addresses. That’s why adding a sign up form to your blog is one of the most important things you can do to turn one-time website visitors into returning (and loyal!) subscribers.
Here’s an example from Ramit Sethi. He promotes his best content in his sign up form to keep new site visitors coming back. Here’s how he does it.
Reference companies and people in your post — then reach out to them
This is a little trick of the trade. Share examples, or data, or samples from other people or companies in your blog post. Then reach out to them and tag them in your social post highlighting that example. Don’t ask them directly to share your post; by highlighting them in your post they may want to share it with their audience.
But be reasonable with who you’re mentioning. Referencing the New York Times and expecting them to share your post is not realistic.
Just above I referenced Ramit Sethi’s amazing sign up form. I think I’ll reach out to him once this post is published.
Answer questions on Quora
Once your blog is published, perform a search on Quora related to the topic. Provide an answer to the question and link to your blog for more details.
A search for “increase blog traffic” shows several potential questions where I can help the person asking the question and anyone else who is seeking the same answer.
Go forth and drive traffic to your blog
Blogging is hard work. It requires time, dedication, and if you’re like me, an obscene amount of coffee. You owe it to yourself to do everything you can to promote your blog and get your content in front of the right audience.
Ready to use email marketing to drive more traffic to your blog? Sign up for AWeber to get started today.