
“Start a newsletter!” It’s an age-old recommendation. One that’s made its home at the bottom of your to-do list.
Why? Because no matter how many times you hear how useful newsletters are, writing one never sounds easy.
Plus, under constant pressure of more urgent priorities, writing a regular email to customers is almost certain to take a back seat.
The fact is, a newsletter will help your business grow. It’s why those good-intentioned friends keep telling you to start one.
But don’t worry! Starting one is a lot easier and quicker than you think. And once you’ve got it started, then you can worry about making sure it’s the best one out there. In fact, I’ve got the essentials down — and you can use them to start your newsletter in an hour or less.
In this post, I’ll go over how to get your newsletter up and running without spending more time and energy than you need to.
But first, what’s the benefit of a newsletter?
Truly, the question here is — why is it worth my limited time to create an email month-after-month or quarter-after-quarter?
One of the easiest ways to make revenue is through your existing customers. Your current customers are 4X more likely to buy from you than new customers.
Each time you send a newsletter, everyone who receives it will think, “Oh yeah, Jerry’s Business.” It’s a reminder. And the more recently someone has thought about you, the more likely they are to buy something or recommend you to a friend.
Newsletters can also include important updates, help promote new products or services and show off some of your personality. All these help to build loyal customers — the best kind!
Since a newsletter isn’t salesy in nature, people read them — pretty regularly if you give them interesting and relevant emails to read. It’s a long game, but it works.
Why can’t I use social media?
Social media can be an effective way to find new customers and engage with people who regularly use it. But even if all of your customers were on Facebook and Instagram (they’re not) they wouldn’t all see your messages.
90% of people prefer to get updates via newsletter rather than social media. Why’s that? Probably because algorithms are in charge of social visibility — and they filter posts heavily.
When you send an email, it goes to everyone on your list, every time. To avoid missing out on even one person getting your message, send a newsletter and use social media as a backup plan.
What should I send in my newsletter?
Alright, you’re convinced. It’s time to get started. But what should I actually write, you think?
Your customers are real people. They’re also working, parenting, eating, and doing a million other things in their day. What’s going to be worth your audience’s time?
For example, if you’re a fitness coach, you may want to send 5-minute stretches you can do throughout the day.
Or, if you sell art online, you could send a photo showing how someone could decorate their living room.
Do you offer a coaching course? Give away a small piece of advice for free every month.
Whether or not you realize it, you are an expert in your field and you therefore have tons of small pieces of advice.
If you’re still feeling stuck on content, start here:
- Expert insider tips
- Business updates and promotions
- Local news
- Relevant blog posts
- Upcoming events you’ll be at
Don’t overthink this part. It’s better to get started with a few ideas, watch the stats and then make adjustments over time.
Okay, now that you have some ideas brewing, it’s time to get up and running with your first newsletter. You can have your first email sent (or scheduled) in an hour.
Seriously, can I start a newsletter in the next hour?
Yes! Just keep it simple.
There’s tons of advice out there about how to make the best newsletter (we have several articles ourselves).
But if you start simple, you can start in the next hour — no matter your experience. It’s more important to get going soon than to make it the best newsletter ever written. That can come later.
There are only three steps to getting your first newsletter out:
- Create a list of customers and leads (subscribers) to send the newsletter to.
- Design your newsletter using ready-to-go templates and tools.
- Write and send (or schedule) your very first newsletter.
Let’s dive into each of these further.
Step 1: Create your list of customers and leads
Whether you already have a list of thousands of customers or are starting today, you can quickly put together a list. Then, get people to sign up and add them all to your email tool.
How to start a newsletter list
Raise your hand if you’re starting from scratch. Not having a subscriber list is common — even if your business is well-established.
Sales platforms like Etsy and Amazon don’t permit collecting purchaser emails. And if you sell in person, your POS may not collect and keep email addresses. Either way, that’s okay. Let’s just get started now!
To start a list from scratch:
- Create a basic spreadsheet (you can do this in Google Sheets for free).
- Add at least two columns: email and full name. (You can also add columns for phone number, location, interests, etc. But don’t feel like you need to add anything other than names and emails for now.)
- Add the email addresses from buyers or advocates who you communicate with regularly. Your top fans will definitely want your newsletter.
Note: To avoid spam filters, everyone you add to your list must have specifically opted into receiving communication from you. For more information, see this article. - Add any other customers or contacts you've communicated with and who agree to hear regularly from you.
That’s it — you now have a list! If your list feels too small, it's not. Sending a newsletter to even a few engaged customers is still worth it. I'll explain how to grow your list, too.
Now it’s time to upload it (I told you this wouldn’t take long).
How to upload your subscribers into AWeber
Note: If you skipped the last step, make sure your existing list is in a spreadsheet. We’ll go over uploading your list to AWeber here, but regardless of your email marketing tool, you’ll need to start with a spreadsheet with names and email addresses of those who have opted-in to receive your emails.
Download your spreadsheet as a .xls, .xlsx, .tsv, .csv, or .txt file (I prefer .csv for ease-of-use).
To upload subscribers into AWeber:
- Sign into your account (or create a free account if you don’t already have one).
- Click “Subscribers” then “Add Subscribers” and you’ll be brought to this screen:
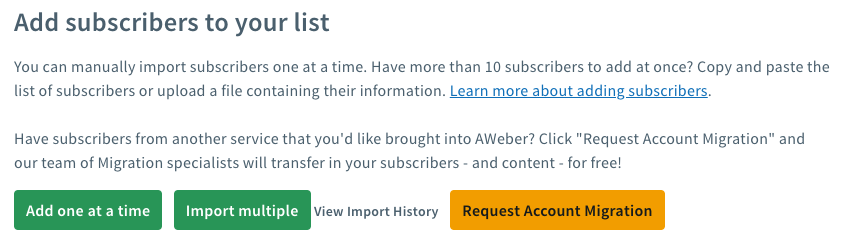
- Click “Import multiple” and then drag-and-drop or browse for your spreadsheet.
- On the next screen choose “Only add new” or “Add new and update existing” subscribers. You can associate any additional data with custom fields.
- Choose whether or not you would like to send a confirmation message to your import list. If you choose “yes,” everyone on your list will receive a confirmation email and will likely be more engaged if they opt in.
- You can add tags to this list, but don’t worry about adding to follow-up lists or Applying list automations for your newsletter.
- Finally, specify how the subscribers signed up to your list. Then, submit your import.
Need more details? Try this related article: How do I import a list of subscribers?
How to grow your list
We all love graphs that go up, right? The dream is an email list that gets bigger by the day and results in more engagement and profit than you ever imagined.
First of all, keep in mind that more subscribers doesn’t always mean more sales. It’s important to include only people who are truly interested in what your business offers. Part of this comes down to content — which I’ll cover later — but a large part is the way you ask people to join your list.
5 tips to easily start growing your list the right way:
- Set up an integration with your sales platform. Whether it’s Etsy, WordPress, Shopify, WooCommerce, or another Ecommerce platform, make sure everyone making a purchase is added to your list.
- Add a form to your website. Let everyone who’s on your site sign up for your awesome newsletter. Bonus tip: offer an incentive — like 10% off your next order — to sign up.
- Create a simple landing page that makes sign ups incredibly simple.
- Share your landing page on any regularly used social media platform: Facebook, Instagram, Pinterest, YouTube, TikTok, LinkedIn, Twitter — all of them. Pin your sign up link to the top of your feed to keep it top of mind.
- Ask people to sign up in real life (or on the phone). Your customers will be most engaged if they remember you’re a real person creating the email they’ll get.
There are no tricks here. Building a newsletter list means building relationships: It takes time, effort and patience.
Want more tips on growing your list? Read this related article: How to Grow Your Email List.
Step 2: Design your newsletter
Okay, we’ve got our list uploaded and it’s time to get started designing and writing your newsletter.
After all that list work, you probably want to jump in and write an email. And I wholeheartedly think you should. But while you do, create a process so that newsletter #2 only requires new information, not new design work.
The easier you can make this process, the more likely you’ll keep up with it.
Choose or create a design template
It’s so easy to make your newsletter beautiful — and a good looking email is going to have better results.
Choose a design that will give your particular audience what they want to see. Keep in mind, a lack of design (aka plain text emails) is still a design choice.
Here are a few extremely simple suggestions to start:
In seconds, get a design that looks just like your website
The Smart Designer takes any page on your site and creates a bunch of templates with it. For example, here are three out of seven templates created instantly when I plugged in https://apple.com:
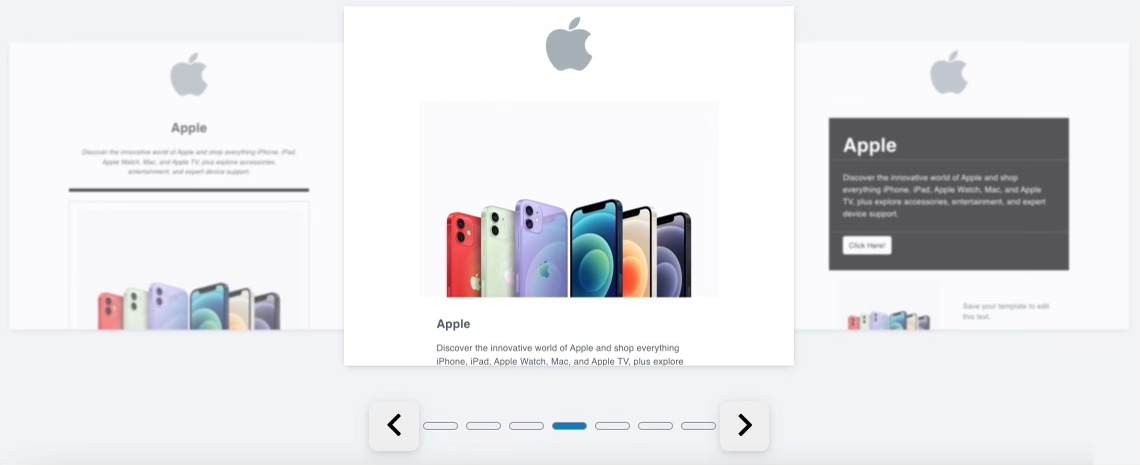
Before doing anything else, plug your website or Facebook page into Smart Designer. Who knows — you might get the perfect newsletter template in seconds.
Choose a pre-made template
Get started creating your email design with our drag-and-drop templates. Take the framework and add your custom logo, image, color, and content.
Here’s our “announcement” layout, which you can customize for your company and easily get going in minutes.
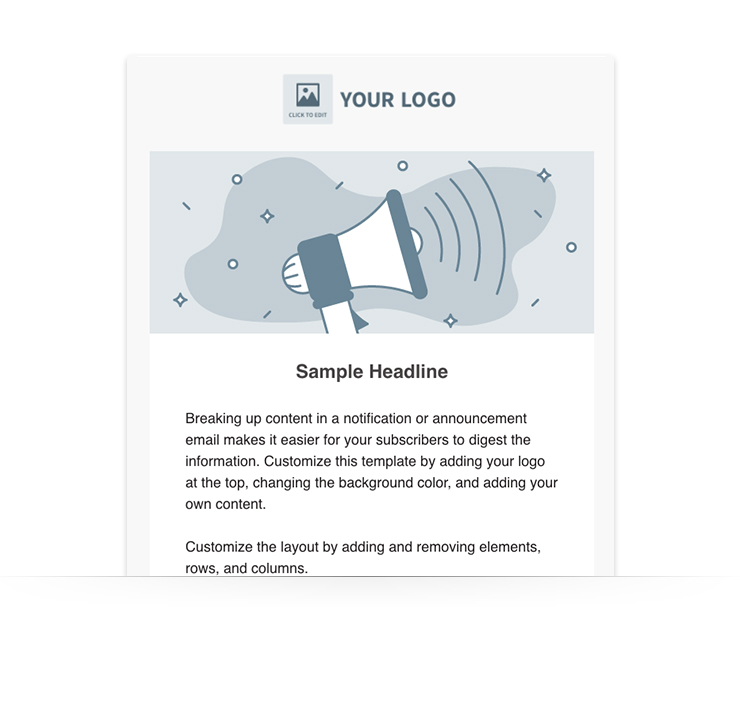
Need to create a logo on the fly? Use our Canva integration to quickly put one together for free.
Create a plain text email to start
Choose our plain text option if you want to start writing, but you’re not ready with your logo, an image, colors, or design choices.
Although most audiences are more likely to respond to a well-designed email, we’re trying to get started today. Give your audience something to read now, and think about more design choices once sending your newsletter becomes second nature.
Related: Want to explore more options for your newsletter design? Make a Lasting First Impression with AWeber’s Newsletter Templates and Email Builders.
Make a few content sections
Think about the last late night show you watched — they have regular sections. A timely standup bit, a skit, an interview, etc.
Sections will work well in your newsletter too — they help your readers know what to expect.
Depending on your personality, these can vary greatly. But here’s a good framework to get you started:
[[Header: The main highlight of your email]]
[[Tip or promo of the day: Your most exciting topic]]
[[Recent content: Blog posts or videos for your audiences]]
[[News: Events, updates, or local news]]
That’s it! Plug in these topics as paragraphs with headers, or swap them out for your own. This doesn’t need to be War and Peace — a few topics are all your audience wants to see anyway.
Step 3: Write and send your first newsletter
Congrats! You have your design and list hammered out. Now it’s time to start on your inaugural email newsletter.
Start a new broadcast in AWeber using the template you’ve decided on. Fill out your sections using recent information. Have fun introducing your newsletter in the header and let your new subscribers know what to expect in the future.
Every month (or week or quarter) when you write your newsletter, keep these tips in mind:
- Only write 2-3 sentences per paragraph — maximum. Your audience doesn’t want to read a lot.
- Add links back to your website. Give your subscribers the chance to make a purchase when they’re ready.
- Edit your writing. Typos and spelling mistakes aren’t easily forgiven by readers.
- Include your personality. Your customers will really appreciate the you in your newsletter. Let your true self shine.
Is it even possible that “Create your first newsletter” is the easiest part? It is, because you’re keeping it simple.
Make sure you set a subject line and a message preheader, then send yourself and one other person a test. Check for typos and make sure all the links work. Then you can go ahead and send it (or schedule it)!
Need more help on writing your first newsletter? Check out this article: How to write a newsletter: 5 characteristics of addictive newsletters.
Ready to start your newsletter? Sign up for AWeber today
Need the perfect easy-to-use tool that’s made to get you started quickly? Sign up for a free AWeber account today.
You can do everything mentioned in this blog post with a free plan. So why wait, get started now!
The post How to Start a Newsletter in Under an Hour appeared first on AWeber.
from AWeber https://ift.tt/3jf0Mt7
via IFTTT
No comments:
Post a Comment